
How to make pantry glass private
November 01, 2010
Share this
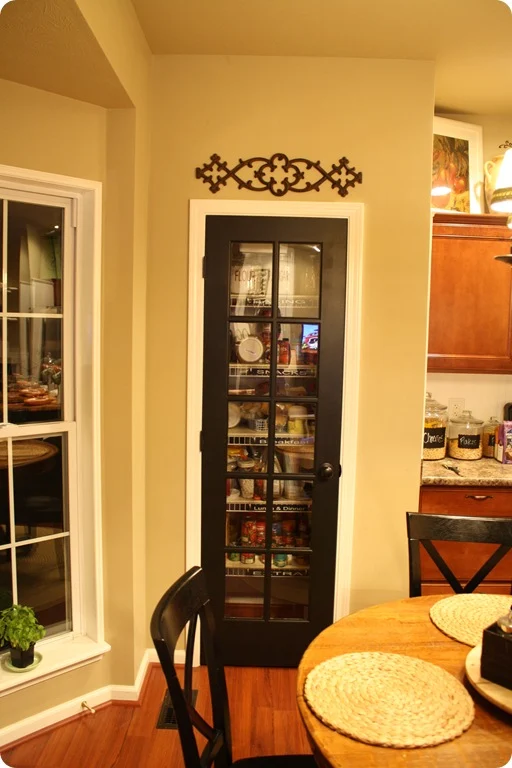
Remember the
pantry door transformation
I showed you?:
This post may contain affiliate links for your convenience.
See my policies and disclosure page for more information.
Dad and I installed it and it wasn’t the easiest project ever. Actually, it was really quite annoying. And the part I finished up this weekend didn’t help it’s cause. Sheesh!
I mentioned I wanted to cover the windows on the door with something – I originally bought window film -- but it wasn’t the texture I was looking for. (I ended up using it for the ghost in our foyer!)
So when I posted this project, a few of you mentioned you had used plain old contact paper to get the look I was going for. Bahhhrilliant!
I admit I was a little teeny tiny bit doubtful – I picked up some clear contact paper at Target, and when I got home I tore it open, I was expecting it to be perfectly clear.
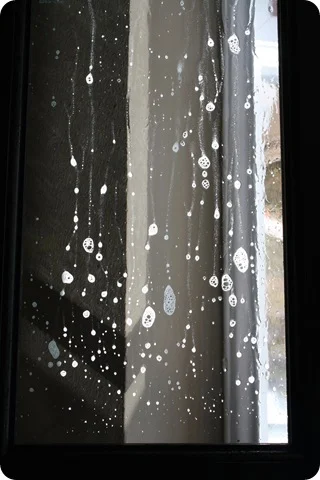
Well…you were right (I know, I should just believe) – it was exactly what I wanted! A very soft, hazy look – just enough to let light in, but block the view to the canned goods. :)
What I didn't realize was it was a TOTAL AND COMPLETE pain in the booty to install. Gah. OK, maybe you did. I may have blocked it out.
I started with my supplies – not much needed:
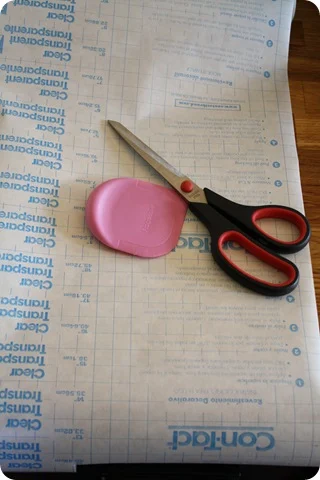
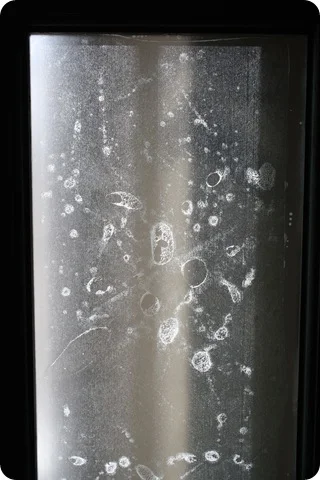
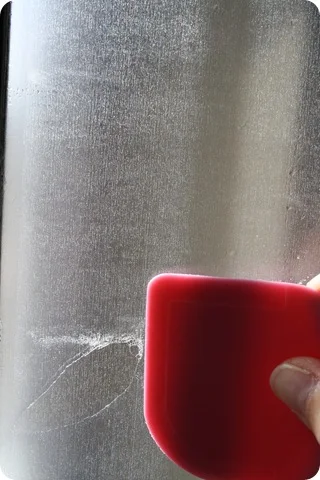
I tried a few things, and the pan scraper worked best for this project by far! I cut out a piece of contact paper, slightly larger than the window pane. When I installed it, I used a razor to trim the contact paper so it would fit perfectly in the pane.
The problem was…1.) the contact paper is supersonic and I tried four razors and not one would cut it easily 2.) when I would push hard to get through the “paper,” the knife would grab at the painted trim around the panel and little itty bitty flecks of black paint were coming off and getting stuck under the plastic:
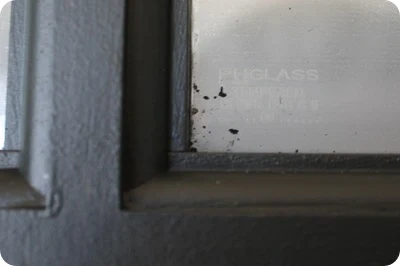
It was driving me batty. I tried everything possible, and finally gave up. I decided to just cut a piece that was the exact size of each window pane, so I wouldn’t have to do anymore cutting with the contact paper on the window.
It was a lot of trial and error. Lots of cutting, holding it up, cutting, holding it up, cutting, realizing I had cut it too small, starting over. :)
When I would finally get the right size, I’d make sure it was perfect one more time:
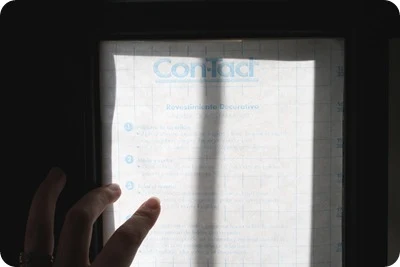
Then I soaked the window with window cleaner:
You can try to do this without soaking the window but you will realize quickly it’s next to impossible. :)
When it’s wet, you can move it around and make it fit just so:
Then use your scraper (or any flat surface) to push out the bubbles:
You’ll want a paper towel handy to soak up the cleaner as you go. Lots of pushing, wiping, pushing, wiping.
It took FOREVER. Mostly because I would cut it the wrong size, or scratch it when peeling it off the backing. I lost my mind a little more with each window pane. :) I think it took four days of me tackling it whenever I had a few minutes. FUN stuff.
Did I mention I couldn’t use the same size cut out of the contact paper for every window pane? You’d think they were all the same size, but amazingly – NO. Most were just a tad different. How is that possible? Because it’s a Sarah project, that’s why. :)
BUT. Dare I say it…SO worth it!!
It helps just a tad that I decluttered and moved some items around in the pantry:
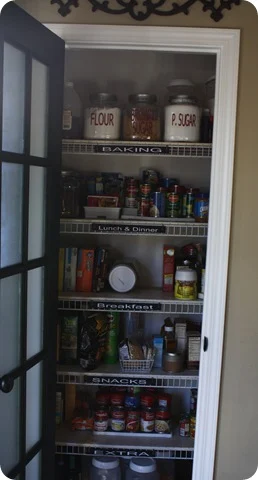
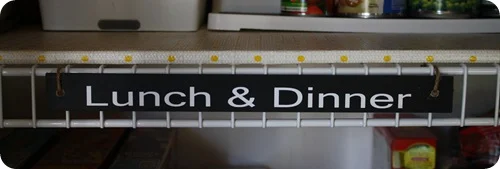
I adjusted my little labels so they were centered on the shelves:
And I LOVE it.
But I wasn’t done yet. :) Remember how I wanted to light up the inside of the pantry? Dad and I talked and figured out how we’re going to do it – but for now, I rigged it up with an extension cord just to see how it would look:

SWOOOOON. Exactly how I pictured it in my head all those years ago when this project first popped in my head. ;)
I used rope lights around the door frame to get the “glow” look. And now I can see to find my sour cream and onion chips at night:
Awwwww yeah. All is right in my world. :)
**The instructions on the rope lights say to not put them in an area with no ventilation, as they get just slightly warm. I called the hotline on the package to confirm a pantry is OK, and the man on the phone had no record of the product number – the product they make – so he was zero help. But I have talked to two people experienced in wiring/lighting, and they said it’s absolutely fine. When the manual says the lights get slightly warm, they mean slightly warm. :)
The contact paper idea would be perfect for any smallish window where you want privacy but don’t want to block the light – for cheap! The roll was $5 and even with all of my mess ups, I barely used half of it. This would be a great solution for windows above tubs, sidelights by a front door – whatever!
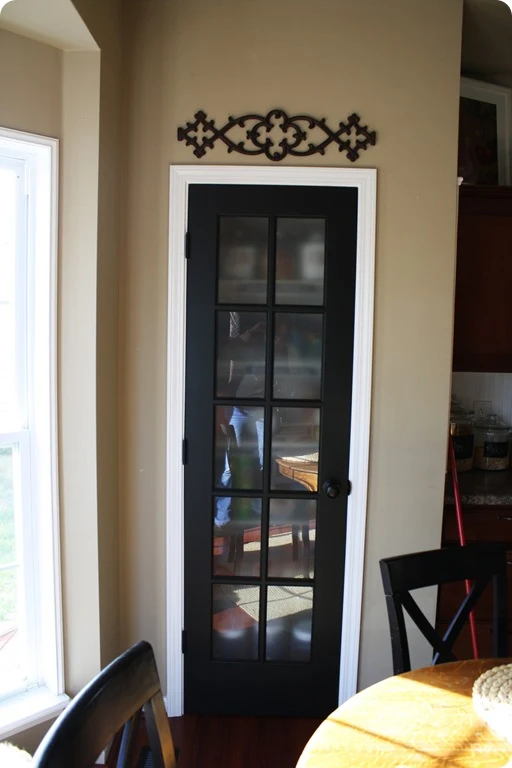
So there’s my before and after for this month…I don’t have a before, before picture handy of the white door we had up initially, but here’s the new door unpainted:
Here it is painted:
And here it is all soft and purdy and lit up:

This wasn’t an easy project…but totally worth it. And only five bucks for the privacy! (Which, by the way, is WAY cheaper than the window stuff you can buy.)
See more of our home here. To shop items in our home, click here! Never miss a post by signing up to get posts via email.
This post may contain affiliate links for your convenience.
See my policies and disclosure page for more information.
Dad and I installed it and it wasn’t the easiest project ever. Actually, it was really quite annoying. And the part I finished up this weekend didn’t help it’s cause. Sheesh!
I mentioned I wanted to cover the windows on the door with something – I originally bought window film -- but it wasn’t the texture I was looking for. (I ended up using it for the ghost in our foyer!)
So when I posted this project, a few of you mentioned you had used plain old contact paper to get the look I was going for. Bahhhrilliant!
I admit I was a little teeny tiny bit doubtful – I picked up some clear contact paper at Target, and when I got home I tore it open, I was expecting it to be perfectly clear.
Well…you were right (I know, I should just believe) – it was exactly what I wanted! A very soft, hazy look – just enough to let light in, but block the view to the canned goods. :)
What I didn't realize was it was a TOTAL AND COMPLETE pain in the booty to install. Gah. OK, maybe you did. I may have blocked it out.
I started with my supplies – not much needed:

I tried a few things, and the pan scraper worked best for this project by far! I cut out a piece of contact paper, slightly larger than the window pane. When I installed it, I used a razor to trim the contact paper so it would fit perfectly in the pane.
The problem was…1.) the contact paper is supersonic and I tried four razors and not one would cut it easily 2.) when I would push hard to get through the “paper,” the knife would grab at the painted trim around the panel and little itty bitty flecks of black paint were coming off and getting stuck under the plastic:

It was driving me batty. I tried everything possible, and finally gave up. I decided to just cut a piece that was the exact size of each window pane, so I wouldn’t have to do anymore cutting with the contact paper on the window.
It was a lot of trial and error. Lots of cutting, holding it up, cutting, holding it up, cutting, realizing I had cut it too small, starting over. :)
When I would finally get the right size, I’d make sure it was perfect one more time:
Then I soaked the window with window cleaner:
You can try to do this without soaking the window but you will realize quickly it’s next to impossible. :)
When it’s wet, you can move it around and make it fit just so:
Then use your scraper (or any flat surface) to push out the bubbles:
You’ll want a paper towel handy to soak up the cleaner as you go. Lots of pushing, wiping, pushing, wiping.
It took FOREVER. Mostly because I would cut it the wrong size, or scratch it when peeling it off the backing. I lost my mind a little more with each window pane. :) I think it took four days of me tackling it whenever I had a few minutes. FUN stuff.
Did I mention I couldn’t use the same size cut out of the contact paper for every window pane? You’d think they were all the same size, but amazingly – NO. Most were just a tad different. How is that possible? Because it’s a Sarah project, that’s why. :)
BUT. Dare I say it…SO worth it!!
It helps just a tad that I decluttered and moved some items around in the pantry:

I adjusted my little labels so they were centered on the shelves:

And I LOVE it.
But I wasn’t done yet. :) Remember how I wanted to light up the inside of the pantry? Dad and I talked and figured out how we’re going to do it – but for now, I rigged it up with an extension cord just to see how it would look:
SWOOOOON. Exactly how I pictured it in my head all those years ago when this project first popped in my head. ;)
I used rope lights around the door frame to get the “glow” look. And now I can see to find my sour cream and onion chips at night:
Awwwww yeah. All is right in my world. :)
**The instructions on the rope lights say to not put them in an area with no ventilation, as they get just slightly warm. I called the hotline on the package to confirm a pantry is OK, and the man on the phone had no record of the product number – the product they make – so he was zero help. But I have talked to two people experienced in wiring/lighting, and they said it’s absolutely fine. When the manual says the lights get slightly warm, they mean slightly warm. :)
The contact paper idea would be perfect for any smallish window where you want privacy but don’t want to block the light – for cheap! The roll was $5 and even with all of my mess ups, I barely used half of it. This would be a great solution for windows above tubs, sidelights by a front door – whatever!
So there’s my before and after for this month…I don’t have a before, before picture handy of the white door we had up initially, but here’s the new door unpainted:
Here it is painted:
And here it is all soft and purdy and lit up:

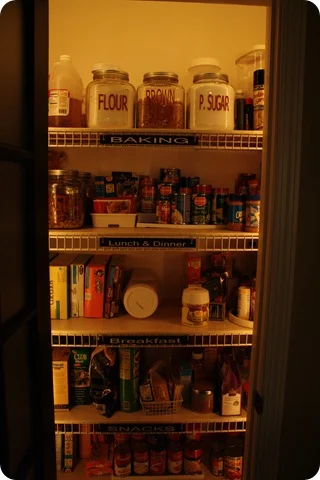
This is how all of our food looked before the contact paper:
This wasn’t an easy project…but totally worth it. And only five bucks for the privacy! (Which, by the way, is WAY cheaper than the window stuff you can buy.)
See more of our home here. To shop items in our home, click here! Never miss a post by signing up to get posts via email.
That turned out REALLY good! I love the black and I absolutely love how the contact paper looks! Great JOB!
ReplyDeleteLove it! I would really like to do something like that on the little transom windows on our front door. I think they have the reflective kind where you can see out but others can't see in.... or so the hubby says! Beautiful job and I just love the way the kitchen is coming together!!! Thanks for hosting too!! :)
ReplyDeleteThank you for hosting! I had NO idea that "clear" contact paper would give a frosted look. I'll file that away for sure. Your door looks fantastic. I love the color! It really stands out in a good way. This has been on my forever "to do" list as well...still debating between a door like yours & a painted screen door.
ReplyDeletei LOVE the look! amazing job!!
ReplyDeleteso sorry to tell you this... but if you go to any windowed store and they have a sign on the window (one that has text but is mostly see-thru) this is the EXACT way that they get it sooooo perfect... spray LOTS of glass cleaner on the window, slap on the vinyl sign, and then use a straight-edge to get the bubbles out. the fact that you figured this out on your own makes you AMAZING!! :)
congrats on achieving your vision... and on the cheap! :)
That looks wonderful, but I might not have enough patience for it. You did good!
ReplyDeleteSherry
Niiiiice!! Love the soft glow. :)
ReplyDeleteIt looks awesome!
ReplyDeleteMy before and after to share is a pantry, too...
http://housebella.wordpress.com/2010/10/14/pantry-makeover/
I love how your pantry turned out! And with the lights on and glowing, and the door shut, it looks like a super special secret room for only the coolest of the cool people - like Narnia or something! It makes me wonder if your cute little one will want to play in it...mine totally would! Great job!
ReplyDeleteSarah,
ReplyDeleteThanks for hosting another B&A party. I love your parties and look forward to them each month.
Also, your windows look perfect. I have a long narrow window next to my front door that lets everyone AND their dog see in (and lets my dog see OUT and growl and bark at cats all day). This idea with the contact paper, AND ESPECIALLY with getting the window wet first! is perfect for my window next to my door. I'm going to buy this stuff tomorrow! I'll let you know how it goes. And as always, as soon as I post about it I'll make sure to link back to you. ;)
Thanks again. Love your blog (but you already know that b/c I tell you all.the.time.
~Allison @ House of Hepworths
Wow, that looks great! I love how it looks with the lights!
ReplyDeleteThis is the first time I've participated in one of your link parties; thanks for hosting! Great blog!
You are awesome. It looks seriously amazing! One question though, do you think this would be easy to remove if you needed to? We're renting and can't do anything permanent.
ReplyDeleteGorgeous! It's amazing what adding light can do, too. The whole look of the kitchen and dining area is so warm and inviting. Well done!
ReplyDeletesarah, your door looks amazing. thanks for sharing the how-to. i think everyone will have a black pantry door at this time next year ;)
ReplyDeleteI love the pantry door and the contact paper looks perfect on it. I love the soft look it gives it. Thanks for hosting a great party too.
ReplyDeleteThat came out so nice! I'll have to experiment with contact paper!
ReplyDeletelooks great! with your example, I will be using spray paint (frosted glass) because I am not nearly as patient as you.
ReplyDeletetotally.jealous. [in a good way ^_^]
Sarah...love how the pantry turned out!!! The lighting and contact paper give's it beautiful ambiance...love it!! I agree...contact paper can be so hard to work with...kudos to you for your patience...it paid off!
ReplyDeleteHugs to you!
Victoria
I love it! You just always take it up that extra notch! Thanks so much for hosting this fun party!
ReplyDeleteVanessa
So beautiful! You must want to leave the light on in there all night! Great job, as usual!
ReplyDeleteAnd thanks so much for hosting!
That looks amazing, thanks for the step by step. I'm reminded how much I love your labels in your pantry too. Saw those a while back and have been meaning to do this.
ReplyDeleteI love the look! I used a scroll-patterned version on my side windows by the front door. You're right that it's a pain to work with, but it's been there for 2 years now and is holding strong. My home office is just inside the front door and has similar glass panes in the french doors...I've been trying to talk myself into that project for 2 years now with no success! :)
ReplyDeleteWhat a neat trick with the contact paper! I really like the finished look :) Thanks for hosting, love your blog with a big fat L.
ReplyDeleteOooo, I like it! I especially love how it looks all lit up at night. Nicely done!
ReplyDeleteDon't you just luuuuuvvv contact paper!?! A person can do so many things with it. Your project is great! Love the privacy! Had no idea the clear paper would provide that. Thanks for sharing.
ReplyDeleteThe pantry door looks great!! I love the warm cozy feel it brings to the room. Great inexpensive solution :)
ReplyDeleteI linked up my bench transformation...thanks for hosting!! :)
Awesome-ness at its finest! I love the addition of the contact paper ... and the rope lights? Fantastic! I'm envious of your super organized pantry, as well. Thanks for hosting such a great gathering. *Becca*
ReplyDeleteIt turned out great, Sarah! I might have missed it, but had you considered the frosted spray paint?
ReplyDeleteI love the final product. I like the lighting too. I'm wondering if you could have achieved the same look without all the work by possibly installing a sheer curtain panel (ungathered) to the inside of the door to soften the view inside?
ReplyDeleteI just LOVE it! GREAT job! I may use that contact paper on my bedroom windows that face my neighbors house! I still want light, but I have that stained glass film up now-and it darkens the room a lot. hmmm.. :)
ReplyDeleteI would have been doubtful too, but what a perfect solution! It turned out great. Thanks for hosting the party. Hope you're having a good week...
ReplyDeleteOh my goodness, I love it! It's just beautiful!
ReplyDeleteI love love love the door!! I was thinking about painting my bathroom closet black. This has inspired me to give it a try!
ReplyDeleteYour pantry door looks fabulous! I love the rope lights, what a great look! Thanks for hosting today!
ReplyDeleteSwoooon is right! What an absolutely stunning transformation. Nice job. It's absolutely awful when you have to grit your teeth and pray for salvation to get through a project like that. We did this recovering some chairs - I think it took a month for each chair - came down to a crappy staple gun. =) Beautifully done. P.S. I want your fantastic labeled flour and sugar canisters! Where did you get them?
ReplyDeleteThanks for hosting! Your pantry door looks great, but it is still the window trim that catches my eye :-)
ReplyDeleteAhhh, if only I could transport your kitchen into my house without having to do any of the work ;) I have been dreaming of doing this from my mud room into the breakfast room, but it won't get done for awhile
ReplyDeleteOkay so your door looks AMAZING with the light on inside at night. I was totally not a believer in this project, but it looks really good :) I love all your ambient lighting!!!
ReplyDeleteIsn't contact paper the most insanely amazing stuff on the planet!! I keep thinking I should have stock in the company as we have "invested" so much in them over the years!! Being a military family many of our projects had to be "temporary" in nature as we were living in military housing. I've installed "privacy" panes in bathrooms, front doors, & bedrooms as well covered more countertops than I care to admit! (We love the faux granite paper... it even stumped the housing inspector! He couldn't figure out how we got permission to have a granite countertop in base housing!!) And I love the fact that it can be taken down with no damage!!! Home "improvement" on the cheap for those who live in rentals/temporary housing situations! Yeah!!
ReplyDelete(BTW... I LOVEEEEEEEEEEEEEEE your kitchen remodel! It is too die for!! Umm mm mmm!!)
Love the look now. You have such an organized pantry.
ReplyDeleteOk,I am totally loving this final after! To be honest, when you did the door, while it was nice, all I could think of was "I would HATE having everything so you could see it!
ReplyDeleteBut the slight frosting from the contact paper is just right. Beautiful!
Nice! Much better. :)
ReplyDeleteYa know, I never thought to use clear contact paper to create that frosted look. I have a handful of windows on top of windows (does that make sense?) that I love because they bring in so much light but at certain times, the sun beats right in and blinds me...I can barely even see my computer monitor right now! I was putting off buying privacy film because it's $$$, but maybe I'll try your idea. Your pantry door looks great!
ReplyDeleteLove it!!!
ReplyDeleteSuper cute! Even just the black paint makes a huge difference! :)
ReplyDeleteWhat a great post. I seriously love your blog.
Your pantry door project looks great! ...and kudos to you for 'sticking' with it to the end. (tehehehe)
ReplyDeleteit looks great! I love the 'glow'!
ReplyDeleteand btw, love the weed whacker in the pix too!@ LOL
LOVE the difference the black doors made in your space. It really tied the room together and created an updated contemporary look!
ReplyDeleteThanks for hosting the B&A party too! I love seeing everyone's creativity and projects!!
:D Lynda
I love your new pantry. Absolutely love it. I've never seen anything like it. I just linked up (for the first time) to show off my redesigned living room. Your blog is great! I'll be coming by again to check out more thrifty decor ideas.
ReplyDeleteLOL, "Private Pantry" reminds me of Tina Turner's "Private Dancer".
ReplyDeleteHave you found any dollar bills stuck in the door?
Excellent job on the pantry door. Looks amazing. I linked up to your party today. Thanks.
ReplyDeleteThe frosted glass look is so nice. Thanks for hosting.
ReplyDeleteYou did a wonderful job. It looks terrific.
ReplyDeleteCarol
Hmmmm...didn't think of THAT when I frosted a pattern on my back door for privacy here:
ReplyDeletehttp://firsthomemakeover.blogspot.com/2010/08/curtain-alternative.html
Your door turned out great. And I love the lighting on the inside.
Wow -- I am really impressed! That turned out really cool and the light makes it so homey. :)
ReplyDeleteWhat a great tip on the contact paper. You were right to wait until you found the perfect solution. Absolutely gorgeous!
ReplyDeleteThat turned out so fabulous!! I love it! I feel a project coming on... By the way, I totally stole your "Welcome" vinyl letters idea for my front door. Looks so homey, and after they saw mine, my mom and my aunt had to have a set made too! Thanks for the idea!
ReplyDeleteThat's awesome! I never thought to put contact paper on my windows! I have a few old windows in my house that would look better with that on it.
ReplyDeleteYour pantry really does look amazing. I especially like how it lights up. What a great source of light for a late night snack. :)
Nice!!! I would totally have to do that. My kids are so messy. My pantry is always a disaster!!
ReplyDeleteHow do I always forget when your before and after party is??? I really want to join in. So fun!
xox
Jen
What a great idea!! I love your pantry and would've never thought of the contact paper. Thanks so much for letting me join in on your party!!:)
ReplyDeleteCrystal
your pantry is perfect! I dream of a pantry...one day! the black pops off so well sarah! Love the lighter look of it all!
ReplyDeleteThank you for the generous offer! I would definatley use the gift card for my newly renovated living room (after 20 years). I would buy accessories or wall art. Thank you!
ReplyDeleteIt turned out great! Even if it was a pain in the butt!
ReplyDeleteWOW, I love, love your kitchen..all of it.The pantry turned out awesome. The door painted black is a really great idea. Looks so RICH!! And looking at the before and after pictures of the counter and back splash, I just have to say that turned out great too. The before was pretty too. All the Christmas ideas you have, again WOW. Thanks for sharing. Bonnie in WI
ReplyDeleteyou are amazing! makes me want to buy a house and get crafty on the thrifty :) love the pantry door and the reading nook! fabulous!
ReplyDeleteYou just solved a problem I've been wanting to tackle FOREVER!!! I have an ugly but functional entertainment center with clear glass doors. Ugh! Fix #1? Painted it black this weekend. But what to do about the glass doors that are NOT hiding my ugly collection of photo albums? And thanks to you, along comes Fix #2 I'll be picking up some contact paper this weekend and crossing this off my to-do list! Thank you SOOOO much for the idea!
ReplyDeleteThanks so much for the idea. I love how my window turned out.
ReplyDeleteI can't believe I just stumbled upon your blog...that pantry door idea is awesome! do you have a plug in your pantry for the rope lights? I must do this...officially subscribed!!
ReplyDeleteI like the dark color you painted the door. I've been wanting doors like this for my pantry for some time now. After seeing your post, now I'm motivated.
ReplyDeleteAny chance you know how wide this pantry door is? Thanks! It looks amazing.
ReplyDeleteThank you! I don't, but it's definitely smaller than an average door. They sell this size at Home Depot.
Delete