
DIY Stacked Stone Fireplace Reveal and How To
December 07, 2016
Share this
DIY stacked stone fireplace reveal!
Turn a blank, boring wall into a cozy spot with these faux stone veneers around a fireplace.
I have a BIG reveal for you today! I worked so hard on tiling this basement fireplace and I'm so so SO thrilled it's done. I took a ridiculous amount of photos so bear with me. :)
I'll show you where we started first! We have this little bump out in our basement living room and from day one we knew what we wanted to do with it.
When we finished the basement years ago we went ahead and bought an electric fireplace for that spot. It sat on a bench for four years. 😁

A few months ago we decided to have the fireplace built in since the whole space was torn up for the new basement floors anyway:

This post may contain affiliate links for your convenience.
See my policies and disclosure page for more information.
Then I was craving a little more traditional look so we had the hearth added along with a wood mantel:

Then it was time for me to do the rest!
I knew I needed to stain the mantel and hearth before I added the stone veneer -- it would have gotten all over the tile otherwise. I sanded both down and then cleaned them really well.
A damp paper towel does fine:

I ALWAYS use a preconditioner for staining projects because it gives you an even finish when you stain:

It takes just a quick swipe (I use foam brushes) and then you can stain immediately!
I did two coats of Minwax dark walnut stain -- one of my favorites! I wanted to match the top of the wall of built in cubbies we have in the room:

I know I say it a lot but staining is one of my favorite DIY projects. It's instant gratification! I always love seeing the details of the wood coming through.
I like to remind you to make sure you have plenty of time to tackle your staining project -- you'll want to finish it all up at once and keep a "wet edge" while working.
Otherwise you may see where you stopped and started.
I usually let my stain dry for about five minutes but you can wait longer for a deeper stain. After that I wipe it down with a clean, lint-free cloth.
Wearing latex gloves helps to keep the stain off of your hands!
Here's the dark brown stain I used:

Dark walnut is a deep brown that doesn't have any red tones -- I love it! It will vary a bit depending on the wood you use, but I always love how it looks.
After the stain has dried, it's time to add the polyurethane on top to protect it and give it a beautiful sheen.
Because I was working with vertical surfaces I used this wipe on polyurethane:

I applied it with a clean cloth and it goes on really easily:

This stuff is perfect for spaces like this one where the poly would drip if you used a brush.
I sanded down with a scrap paper bag piece in between coats:

I shared more about easy sanding trick -- it's my new favorite way to knock down small bumps in between poly and after! Who would've thought brown paper bags worked so well? :)
After it all dried I started the tiling process and I shared how to tile using stacked stone:
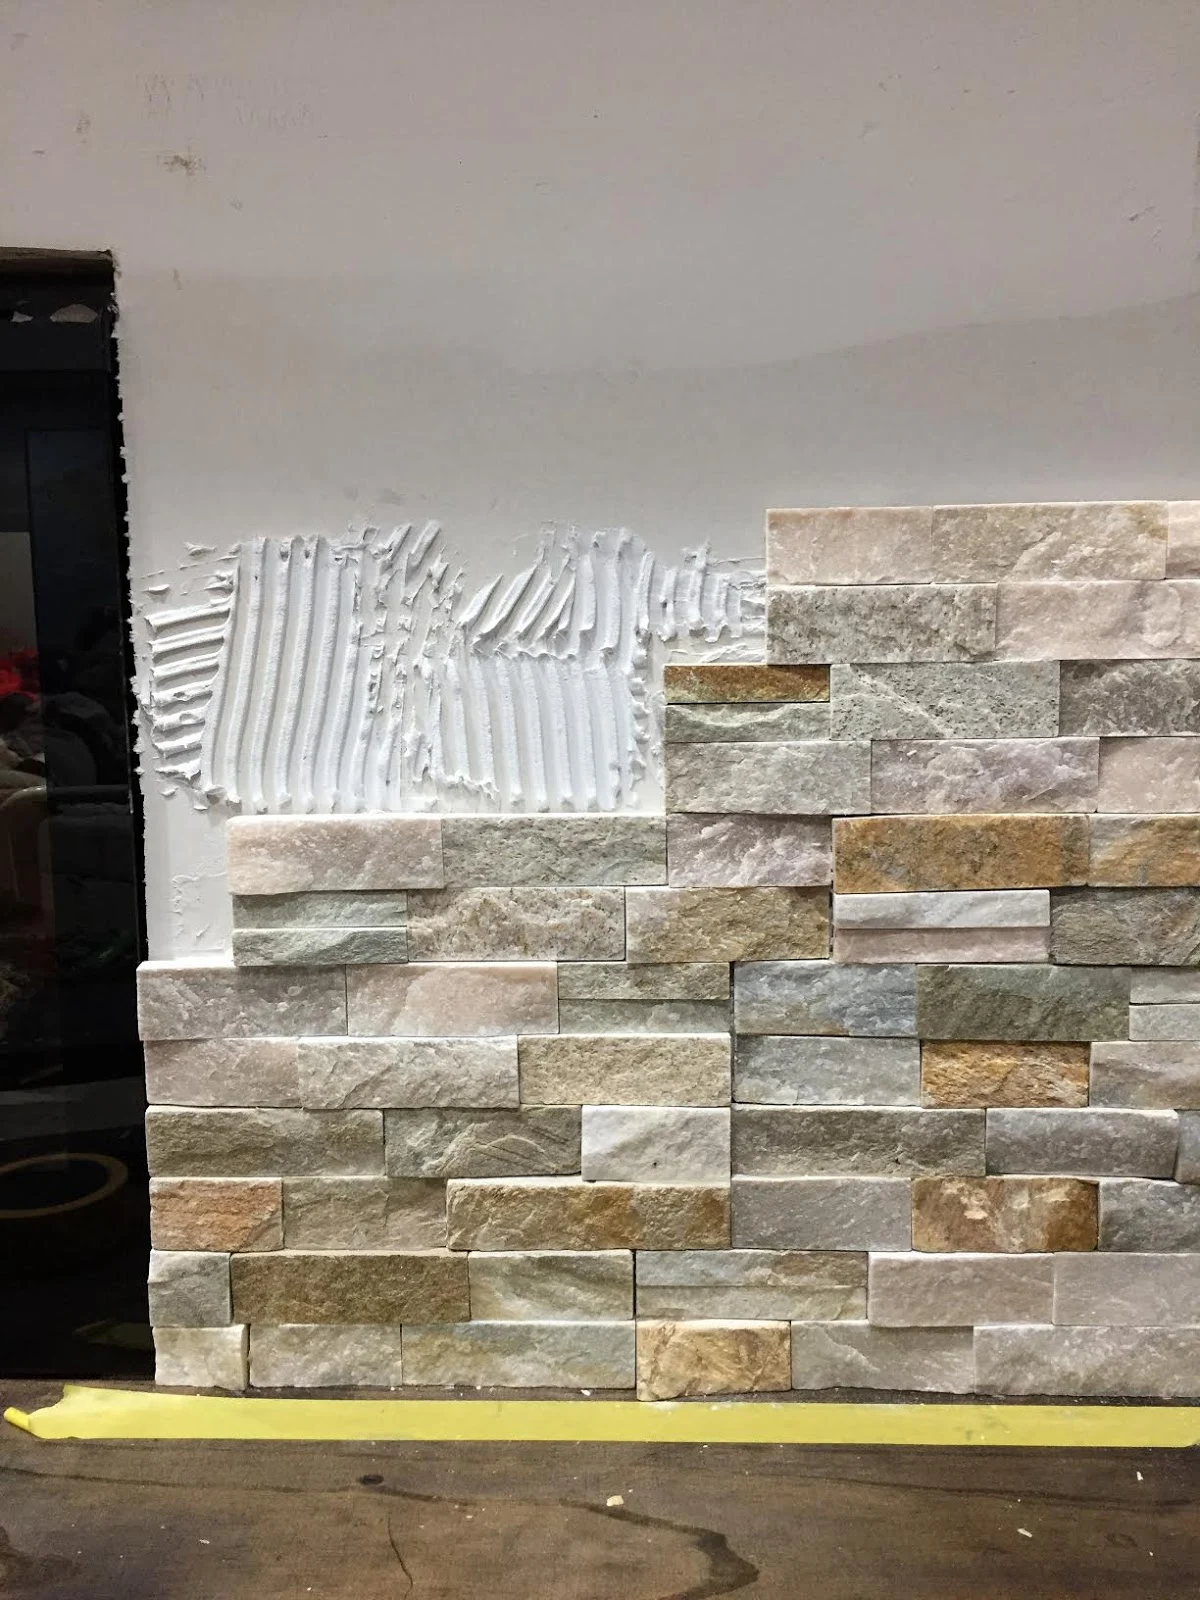
The large ledgestone pieces were pretty easy, it was the smaller sections that I had to cut just right that took the most time.
By the time I was done I may have cried tears of joy, ha! Seriously, I was ready to be done.
But it's beautiful and exactly what we envisioned for this room for years!! We are obsessed with this natural stone!
I added some Christmas touches to it of course:

I took a ton of pictures in different light so you'll see a mix here today.
I also ended up taking down the stockings and kind of like it with them down so you can really see the stone!:


I'm head over heels for the dark wood combo with the stone -- it's exactly what I wanted!
It's a rustic look but still feels modern:

I had so much fun decorating this spot! It has completely transformed the basement -- it literally looks like a brand new space.
When we finished the basement years ago and did our lighting, we made sure to add lights over this spot, knowing we were planning to do the fireplace wall.
But this time of year I think I like it better with the lights off:


The last thing I need to do here is put a dimmer on those lights -- we have them throughout the rest of the basement and I want that softer light here too:

I'm just going to keep putting up pictures and saying things cause I worked my butt off on this project. 😂

We always put our flocked tree down here and it's usually decorating with green and blue ornaments. I went much more natural and neutral this year with white, silver and bronze ornaments instead:

The hearth isn't super deep but it's the perfect size for accessories.
You can sit on it too, but it's not deep enough to sit back really far:

Stuffed reindeer butts fit perfectly!
Here's another look at the before of this spot:

And here's how it looks today!:


Here's another shot from a couple months ago:

And that same angle, just closer:

I have to clean up all of the tools and Nerf bullets and then I'll get a full shot of the room! :)
Whoohoo, I'm so thrilled to be done with this massive project! We've spent every evening down here with the fireplace on -- we're definitely enjoying this space!
Installing this stacked stone tile is a surprisingly easy way to update a dated fireplace. If you have any questions about this project, please let me know!
Never miss a post by signing up to get posts via email.
Wow, you are right, it looks like a totally different space. I love it. Gorgeous.
ReplyDeleteSTUNNING
ReplyDeleteWow, absolutely amazing ... what a fabulous transformation! I remember when it was pretty much an unfinished space ... what a long way it has come! Great job!
ReplyDeleteWow Sarah, this is absolutely beautiful!! Awesome job!
ReplyDeleteThat is so gorgeous!!!
ReplyDeletelooks beautiful and well done! enjoy with a cup of cocoa by your new fireplace!
ReplyDeleteIs this fireplace vented or is it more of an electrical insert? I do not have a fireplace but would love to add one and yours turned out beautifully. Such an inspiring project!
ReplyDeleteIt's electric! You can add them anywhere you have an outlet!
DeleteSo pretty! I love everything about it. Also, just a staining tip..if you get stain on your hands, clean them with a baking soda/dishwashing soap paste. Washes right off. :)
ReplyDeleteYou are awesome!! I love it.
ReplyDeleteCan I hire you to come to my house?!
ReplyDeleteIt.is.amazing!! Love it so much!
ReplyDeleteit looks amazing! we went with a gas fireplace, and we are regretting that decision...even with the venting we did it still has a gas smell. so we never use it, and it bums me out. what do you think about your electric one, do i have to resolve myself to the fact that it will never look realistic?
ReplyDeletethanks,
b
Sorry to hear this. We have one and have never had that issue as well as many friends I know that have them. Hope you can find out the issue.
DeleteBeautiful! What brand and color of stone did you use?
DeleteI would definitely get that checked -- you shouldn't have any kind of gas smell! The electric ones don't look nearly as "real" if you compare them but it gives the same feel and some warmth! They are always coming out with new ones that look more realistic! :)
DeleteRobyn you can find all of the details about the stone here :) --http://www.thriftydecorchick.com/2016/11/how-to-install-stacked-stone-tile-on.html
We live in Oregon so it costs about 350.00-400.00 a month during winter to heat a 1500 sq ft home with electric. We had a pellet stove in our other home & going to go with another one in this house. It will heat our home for appx. $4.00 per day and it's a radiant heat that fills the house. You can plug in to a generator so it keeps heating during power outages which we experience several times a winter. No gas smell & still have heat. However if your just looking for aesthetics then electric should be fine.
DeleteLooks terrific. Totally transformed that space into a focal point. No matter the season or holiday you can now personalize the mantel and surrounding area. Awesome job!! Gives me a few ideas for creating a mantle area for our pellet stove we are going to install.
DeleteYou did a great job! The space looks beautiful. :)
ReplyDeleteYou certainly have bragging rights!! This is amazing!!!
ReplyDeleteThis is beautiful! I just love it. What did you use for your hearth? We are looking to refinish our fireplace and am looking for ideas.
ReplyDeleteSince the fireplace is electric we did wood. :)
DeleteThe fireplace turned out beautifully! Great job!
ReplyDeleteLooks awesome! We went with an electric fireplace in our basement too due to venting issues and cost. We don't regret it at all. Our fireplace can pump our lots of heat or just turn on the fire with no heat.
ReplyDeleteSarah - were looking for stone for our fireplace. What brand did you use? Not loving what we've found so far.
Hello Laurie! Here's a post with the stone and how I installed it! http://www.thriftydecorchick.com/2016/11/how-to-install-stacked-stone-tile-on.html
DeleteThat's amazing, what a transformation! Curious, how did you hang the mirror on your new stone wall?
ReplyDeleteSince you don't have to grout there are small spaces in between the tiles -- I just put a nail through one of those into the drywall. ;)
DeleteI had the same question!
ReplyDeleteWOW. AMAZING.
ReplyDeleteI love every project I have seen you do. This is turning into such an awesome space. I am so glad I subscribed to this site.
ReplyDeleteYou are always so creative, ingenious, thrifty, and end up with such impressive projects. This is probably one of my favorites. How you took a basement wall and an electric fireplace and created THIS is AMAZING!!!
ReplyDeleteWhat a gorgeous transformation! Love it! :)
ReplyDeleteWell, Sarah, the highest compliment I can pay you is that this stunning fireplace looks like it has always been there...even as I look back at the before photos. It's so beautiful and fits so perfectly. Well done you, indeed. Cheers and Happy Holidays, Ardith
ReplyDeleteBeautiful! Great job!
ReplyDeleteIt is beautiful! The tile is stunning.
ReplyDeleteStunning! You did an amazing job...again. Love it :)
ReplyDeleteYou have every right to be proud! That is gorgeous!!! I wish you could do my fireplace over. I love stacked stone. BTW we used paper bags to sand wood back in my decorative painting classes. Works great! Enjoy your new space!
ReplyDeleteThis is beautiful! We're building a house and moving in at the end of the month. We opted out of paying to have a gas fireplace installed, but really want a fireplace in our family room. We don't have a bump out wall, but something similar can be done to a flat wall, I imagine. How is the electric fireplace situated behind the new wall? Is it up against the original wall? Any help is greatly appreciated! I want to be sure I don't catch anything on fire when we do ours. :)
ReplyDeleteThere's an open bay window behind there so the fireplace sits on a stand inside the wall. :) You can definitely do it on a flat wall, you'd just have to build out a box for it.
DeletePerfect, thank you! I'll let my husband know that I'm adding another project to our "to do" list. :)
DeleteLove everything about this.. great job! I would love to see a post about your electric fireplace choice and how you like it. We are building a new (Beazer) home and I want to add one to the bedroom.
ReplyDeleteJust lovely! Where did you get your electric fireplace. Would you be able to take a close-up photo of it.
ReplyDeleteThank you! Here's a post with the link to the site! http://www.thriftydecorchick.com/2014/03/the-finished-basement.html
DeleteLooks great! I was wondering how you access the electrical? I would think that a home inspector wouldn't like it if you couldn't unplug it.
ReplyDeleteIt's made to be installed that way -- you just pull it out to unplug. :)
DeleteWhat a cozy feel and amazing transformation! Love it!
ReplyDeleteIt looks fantastic! You did an amazing job!
ReplyDeleteWOW!! That turned out beautiful. Love your tree too!
ReplyDeleteAbsolutely beautiful!! I love everything about it!! We're about to do something similar with bookshelves around an electric fireplace. Where did you get your fireplace? It looks like an insert.
ReplyDeleteThank you!! I link to where we got it here: http://www.thriftydecorchick.com/2014/03/the-finished-basement.html
DeleteAbsolutely beautiful! You should be so proud of yourself. Your hard work paid off with gorgeous results.
ReplyDeleteStunning! Absolutely stunning!! How did you install the crown molding to the stone?
ReplyDeleteThere's actually an open space along the top with no stone, the crown covers it. And you can nail into the ceiling joists too. :)
DeleteABSOLUTELY GORGEOUS!!! You did such an amazing job, Sarah, you deserve a GIGANTIC pat on the back....or maybe a super incredible surprise under the tree!! I adore your house, I know I tell you that all the time....between the kitchen and the fireplace you have completed so many huge projects this year - love, love, LOVE!!!
ReplyDeleteAnother beautiful project. Wish I had your energy!
ReplyDeleteIt looks beautiful! I can't believe the difference. I am planning on putting in an electric fireplace in my office and in my master bedroom so it's nice to see how real they look. I would never know it wasn't built with the house.
ReplyDeleteFrom the most boring, invisible fireplace to a show stopping focal point! Your hard work sure paid off!
ReplyDeleteGah! I love this so so much - it's just gorgeous.
ReplyDeleteWe actually used the same stacked stone in a different color on our fireplace. (I actually chose the same color you used - love - but Ryan liked a different colorway. He pretty much never has opinions so we went for it.)
Anyhow, all that to say - I loved seeing your fireplace come to life. What a transformation.
I really liked that version too! Now I have to go find it to see!
DeleteWhere did you buy that electric fireplace?
ReplyDeleteWe got it online -- I link to it in this post! http://www.thriftydecorchick.com/2014/03/the-finished-basement.html
DeleteWow! Another fantastic fireplace makeover! Love it - what a great addition to a great space!
ReplyDeleteThat looks incredible! Great job!
ReplyDeleteI would also like to hear more about your electric fireplace. Thank you!
ReplyDeleteThat looks fantastic! You are a talented woman!
ReplyDeleteThis looks so good!! I'm curious what type of respirator you use or how you sufficiently ventilate to do your staining indoors. The odor from the stain and even wood conditioner is so strong even when I work outdoors in open air; I can't imagine doing it inside without protection.
ReplyDeleteWe have air purifiers and open the windows. :)
DeleteIt's beautiful! So cozy!
ReplyDeleteI noticed you said you were going to get a dimmer switch. I was looking at getting on for our Living Room the other day, and I noticed that the GE Z-wave dimmer switches were about $15 more than the $22 dimmers at Lowes. We recently got an Amazon Echo, and one of my goals for 2017 is to make our home more smart & automated. I picked up a Samsung Smart Things Hub for half price on Amazon and one of the Z-Wave Dimmer switches, and now I can tell Alexa to turn on/dim/turn off the lights without removing my butt from the couch! I can also turn it on, dim it from anywhere in the world on my Smart Phone! It's really fantastic, and would make a great post series. That's what I'm going to do on my blog next year. Anyway, I thought I'd pass that along in case you're interested in getting really lazy by that fireplace!
We want to incorporate some of that stuff too! Thanks for letting me know, I'll look into it!
DeleteEverything you do turns out awesome but I have to say this is probably one of my favorites. It looks really beautiful and not 'basement-ey' at all. Love it
ReplyDeleteAmazing!!! Absolutely gorgeous. Drooling with envy over here in PA.
ReplyDeleteAnd the wood mirror over the mantle is the perfect accessory! Where is it from?
HomeGoods! :)
DeleteLoooos great!! Wish I had a basement to do this in. ��
ReplyDeleteWhere did you find the mirror??
Darn auto correct. "Looks" great
DeleteHa! Thank you! It was from HomeGoods.
DeleteIt's incredible, Sarah! I remember when this was just unfinished space. Y'all used it then, but you must really LOVE to use it now! So happy for you and PROUD OF YOU!!
ReplyDeleteLike Richella and many of your other blog followers, I've been following your basement since it was just a basement, then all of the many upgrades...the storage shelves, little kitchen and wood planked wall, the new flooring, and now this amazing stacked stone fireplace surround. You totally Rock, Sarah.
ReplyDelete