
How to build built ins
August 06, 2012
Share this
Hello hello!! I’m back today with an update on the dining room redo. Remember looong ago in January when I talked about turning our rarely never used dining room into a library kind of space?
I realized today that this will be a year-long transformation. ;) It’s not been hard, it’s just time consuming. Dad and I have been doing it together, but today I finished up a big chunk of it myself. And I’m getting really anxious to keep moving on it…I can really see the light!
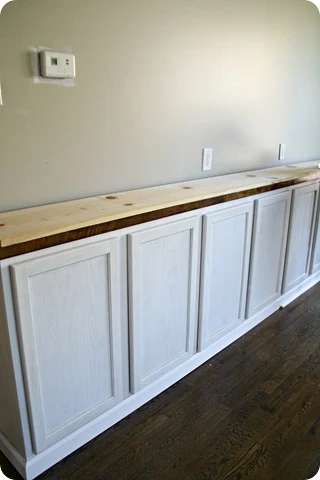
The last time I updated you on this room, I mentioned the bookcases that Dad and I built. They were more of a “shell” then, but I finally got actual shelves installed today so I figured this would be a good time to share the how to.
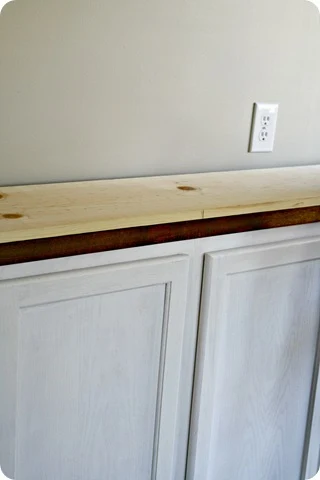
We started with a really long board that would be the top of the bookcase. The base cabinets are exactly 12 feet long (four 36 inch cabinets) so we got a 1x12x12 board.
To figure out exactly where the supports would go, we laid it down on top of the butcher block first:
That way we could mark exactly where each support would go (between each 36” base cabinet).
See the mark?:
We constructed it laying down on the floor by screwing each support into the top 12 foot board:
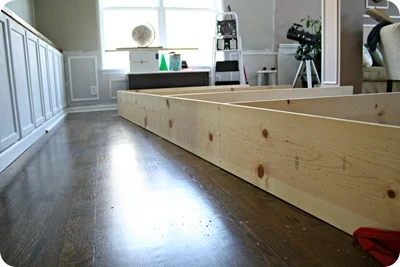
Here’s a little drawing that shows you how it looked when we were done:

We marked the EXACT middle of each board and screwed a long screw in the middle of each support (where you see arrows above). I screwed them in while Dad held the “vertical” boards and watched that the screws weren’t going off to the side or something.
Then we lifted it up on top of the bases:

I secured it to the ceiling beams and the side (where it is against the wall) with more screws to keep it stable for the time being.
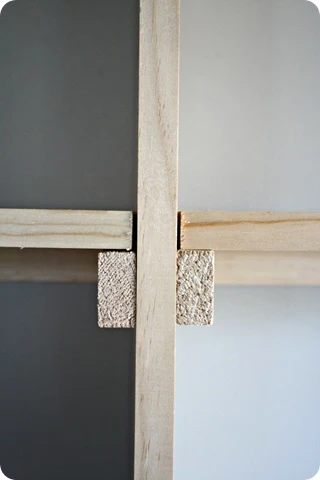
Then it was time to do the shelf supports. I showed you how I did these in the pantry as well:

The back supports are screwed into studs in the wall, and the side supports are nailed in to the vertical boards. We started out by installing the side supports with screws, but then they would hit the support behind it and mess the leveling of the shelves up. We went to long nails with the nail gun instead and it went MUCH faster that way.
The trick is trying to get each set of supports exactly even with the next:

Some are not perfectly perfect, but we felt pretty good with how they ended up. Trim will cover the supports and boards eventually, so they will (hopefully) hide all sins. :)
Then it was time to grab some more 1x12’s to make the shelves. I cut them down to the right sizes (each one is a different length – this thing is not exact) and nailed them into the supports:

A piece of trim will go vertically and horizontally to hide all the unfinished spots, and a thin piece of wood will finish off each shelf underneath:
I hope that makes sense!
Like I said, it’s not difficult, just time consuming. I always find that I try to make things much harder than they need to be. Dad always knows how to break it down to the easiest (and best) solution. :)
Annnnnd this is where we are now:

You can see that we made the bottom shelf taller, so I can put bigger accessories and books down there.
There’s still SO MUCH to do. At least it feels like it. I am painting the back of the built ins a different color, so I’ll do that next. Then we need to install the header across the top, pull the wiring through and install the lights. Then the trim will go up (basically everywhere) and after that the JOYUS job of priming and painting. :)
Seriously can’t wait for that. Yay.
Considering where we started, I guess that to do list isn’t too bad:

I’m already more in love with it this way than I was as an unused dining room:

It’s coming together! It’s going to take 12 months, but it’s coming together!! It would be so lovely to decorate these (finished?) bookcases for fall! But I’m realistically shooting for Christmas. :)
I’m sure I forgot some of the details, so if you have any questions on the progress so far, let me know and I’ll answer them in the comments.
**See the finished DIY built ins here!
See more of our home here. To shop items in our home, click here! Never miss a post by signing up to get posts via email.
I realized today that this will be a year-long transformation. ;) It’s not been hard, it’s just time consuming. Dad and I have been doing it together, but today I finished up a big chunk of it myself. And I’m getting really anxious to keep moving on it…I can really see the light!
The last time I updated you on this room, I mentioned the bookcases that Dad and I built. They were more of a “shell” then, but I finally got actual shelves installed today so I figured this would be a good time to share the how to.
We started with a really long board that would be the top of the bookcase. The base cabinets are exactly 12 feet long (four 36 inch cabinets) so we got a 1x12x12 board.
To figure out exactly where the supports would go, we laid it down on top of the butcher block first:

That way we could mark exactly where each support would go (between each 36” base cabinet).
See the mark?:

We constructed it laying down on the floor by screwing each support into the top 12 foot board:

Here’s a little drawing that shows you how it looked when we were done:

We marked the EXACT middle of each board and screwed a long screw in the middle of each support (where you see arrows above). I screwed them in while Dad held the “vertical” boards and watched that the screws weren’t going off to the side or something.
Then we lifted it up on top of the bases:

I secured it to the ceiling beams and the side (where it is against the wall) with more screws to keep it stable for the time being.
Then it was time to do the shelf supports. I showed you how I did these in the pantry as well:

The back supports are screwed into studs in the wall, and the side supports are nailed in to the vertical boards. We started out by installing the side supports with screws, but then they would hit the support behind it and mess the leveling of the shelves up. We went to long nails with the nail gun instead and it went MUCH faster that way.
The trick is trying to get each set of supports exactly even with the next:

Some are not perfectly perfect, but we felt pretty good with how they ended up. Trim will cover the supports and boards eventually, so they will (hopefully) hide all sins. :)
Then it was time to grab some more 1x12’s to make the shelves. I cut them down to the right sizes (each one is a different length – this thing is not exact) and nailed them into the supports:

A piece of trim will go vertically and horizontally to hide all the unfinished spots, and a thin piece of wood will finish off each shelf underneath:

I hope that makes sense!
Like I said, it’s not difficult, just time consuming. I always find that I try to make things much harder than they need to be. Dad always knows how to break it down to the easiest (and best) solution. :)
Annnnnd this is where we are now:

You can see that we made the bottom shelf taller, so I can put bigger accessories and books down there.
There’s still SO MUCH to do. At least it feels like it. I am painting the back of the built ins a different color, so I’ll do that next. Then we need to install the header across the top, pull the wiring through and install the lights. Then the trim will go up (basically everywhere) and after that the JOYUS job of priming and painting. :)
Seriously can’t wait for that. Yay.
Considering where we started, I guess that to do list isn’t too bad:
I’m already more in love with it this way than I was as an unused dining room:

It’s coming together! It’s going to take 12 months, but it’s coming together!! It would be so lovely to decorate these (finished?) bookcases for fall! But I’m realistically shooting for Christmas. :)
I’m sure I forgot some of the details, so if you have any questions on the progress so far, let me know and I’ll answer them in the comments.
**See the finished DIY built ins here!
See more of our home here. To shop items in our home, click here! Never miss a post by signing up to get posts via email.
Okay here is a question. We also have a dinning room/library. Are you going to put a table in there or just use an eat-in? I am really struggling with whether to keep mine a library or dinning room!
ReplyDeleteThat is already looking fantastic! Great job!!
ReplyDeleteif you are painting the 'back' of the shelves a different color, why didn't you paint the wall first before installing the shelves so you wouldn't have to do all of the tedious cutting in? Just a thought....
ReplyDeleteNicole
Details can get lost in the execution sometimes. You're correct, it probably would have been easier but not a deal breaker.
DeleteNo need for throw shade.
I love the way it's coming along. Everything we redo, or redesign, it's time consuming! You don't know all I went thru with my laundry room reveal, goodness, it took me two weeks to install the cupboards, they just didn't fit in the wall space 3 times..YES, 3 TIMES!! I can't wait to see your dining room-library reveal too! Enjoy your week.
ReplyDeleteFABBY
It looks wonderful and it's so nice that you are doing this project with your dad! ~ Maureen
ReplyDeleteI know it can be discouraging when projects take for.ev.er. But that is looking so fantastic! What a transformation already!
ReplyDeleteLooks Great! would love to do something like this in our spare bedroom.
ReplyDeleteWe have a lot of books - hard and soft cover and the shelves of the cheapie book cases tend to bow under the weight of them. How much weight do you think your shelves will carry? Would narrower be better if we have a lot of heavy books??
Lookin' good, girl! You will be so proud of the finished product.
ReplyDeleteOh! I am loving it so far!!! I am waiting with baited breath to see more!! We had a big open living/formal dining (or is it family room/formal dining...whatever you call the front room) and we just closed the front in to make it an office for my hubby and now I have to figure out what I am going to do with the empty formal dining room!!
ReplyDeleteIs your dad available for hire?? I'm contemplating built-ins in my son's bedroom, but my toolbox and my carpentry skills are pretty lacking!
ReplyDeleteCan't wait to see yours all done. I'm jealous already :)
This is looking great, Sarah! I think it's going to be absolutely beautiful. The shelves are going to add such a nice library feel. But if you ever decided to sell your house, someone could still use the space as a dining room if they wanted--what dining room couldn't use lots of built-in cupboards and shelves?
ReplyDeleteI'm really impressed that you and your dad are DIY'ing this. You should get an award for this! Thank you for pointing out that the shelves are not perfectly even--knowing that things don't have to be completely, exactly perfect in order to look beautiful and to work well is very empowering!
I love how there will be a light in each column of bookcases. I'm assuming they will be actual fixtures, not just bulbs, right?
ReplyDelete:) Jessica
I know I'm not supposed to covet, but seriously. Can I have your library, or can I have your awesome brain? Either one. You pick. ;) The bookshelves look amazing. And I know I offered to take the pretty chandelier off you hands if you didn't need it, but I think it looks so great in there...finished room or not.
ReplyDeleteYou make it look so easy! Can't wait to see the final transformation!
ReplyDeleteBarbara @ Chase the Star
http://chase-thestar.blogspot.com
I saw that Nicole above took my question...wouldn't it have been easier to paint the back before attaching the unit to the wall? And for that matter....painting (or staining) the unit as well?
ReplyDeleteGreat job! What a great transformation and the opportunities for display are endless. Beautiful.
ReplyDeleteI is looking terrific! That is a great way to use that space! I have a question. Are the bases of the bookshelf kitchen bottom cabinets or top cabinets?
ReplyDeleteWhat is the depth of them? I sure would love to do this
in my family room!
I have serious built-in envy right now. ;) We have some built-ins in our addition, but they are used for housing Barbies with one shoe, Little Golden Books, etc. How exciting to have such a cool project going on...they look great already!
ReplyDeleteOhhhh, you are definitely at the point where I'd be dreaming of decor. Their coming together great, I bet you guys are going to LOVE that space ... I'm picturing the Bub doing 'homework' in there ... not that we're talking about that. ;)
ReplyDeleteI'm do glad you put this up. I'm wanting to build a breakfast bench wall and have some shelves on each side and this is exactly what I've been thinking. I can't wait to see the final pictures of it all decorated, you've done such a good job so far.
ReplyDeleteI'm loving this! Where did you get your chandelier?
ReplyDeleteI love it, I am hoping to something similar in a nook in our living room. This is handy info!!
ReplyDeleteOh, it's coming together so well! I'm definitely going to have to do this someday! I really, really love the idea of turning an unused dining room into a space that functions for YOUR FAMILY. It's your house, right? Use it in a way that works for you! :)
ReplyDeleteLooks great!! I've decided there should be 26 hours in every day ... if that might help you too : )
ReplyDeleteCindy, right now the plan is to do a circle of upholstered chairs, but as many readers have mentioned, a table would look great with the built ins! If I needed an office, a big long table (desk) would look great in there! :)
ReplyDeleteNicole, I haven't painted it for a number of reasons -- I wasn't sure what the exact dimensions of the bookcases were going to be, I wasn't sure of the color I wanted to use and I just didn't have time to get to anyway when we started. My Dad can only make it every couple of weeks so when he was available I wanted to go ahead with building. The cutting in won't be that bad, it won't have to be neat because the wood will be painted later, and caulk will hide a lot.
ReplyDeleteHeidi, these shelves are pretty thick, so I think it will take a lot to make them bow. The support along the back will help with that too, but only time will tell! I'll let you know how they hold up when it's done!
ReplyDeleteCarolyn, it depends on how much you'd pay him. ;)
ReplyDeleteThanks for the response Sarah!
ReplyDeleteKim over at the money pit just backed her open kitchen cab with bead board wall paper.....might look good on the back of your shelf too :o)
Super impressed! Love watching your room transformations!!
ReplyDeleteThis is coming along so great. It already looks amazing! I can't wait to see how you decorate those shelves for the Holiday months! :-)
ReplyDeleteOkay...all the questions I had you answered so all that's left to say is "WOW"! Been trying to convince a friend we can do this in her family room...maybe this will tip her over the edge!
ReplyDeleteDoes anyone have an idea where the chandelier was purchased?
ReplyDeleteLiz
This looks great and is going to be more than worth the time and effort it's taking! I can't wait to see it finished :)
ReplyDeleteLOVE that you can't resist staging your shelves in their unfinished state! We see that globe sneaking in there to try out those built-ins! =D
ReplyDeleteShe blogged about the lovely chandelier here: http://thriftydecorchick.blogspot.com/2009/10/most-beautiful-light-and-winner_20.html hope that helps you guys!
ReplyDeleteOh wow, looks great! So fun. Love how you decorated a bit with accessories [globe, etc] for the photo. Fun to play, I totally get it.
ReplyDeleteChrissy
I've got built-ins to and I had glass shelves made for the top two rows so the light would flow down beautifully. I highly recommend having both wood and glass shelves. Love your home and blog. Thanks for sharing. I can't wait to see what great ways of decorating your built-ins you come up with.
ReplyDeleteMolly, those are upper cabinets, so they don't have the drawers and they are much thinner. They are only 12 inches deep. :)
ReplyDeleteThanks Anon! The lights will actually be outside of the built ins, at the top shining down. The plan is that each one will spread light over each bookcase. I'm hoping that's how it turns out anyway. ;)
ReplyDeleteWow! What an impact all that shelving will make! Your dining room was gorgeous, but I understand that if it wasn't used much than it wasn't worth keeping around. :)
ReplyDeleteWow, lady, it looks amazing! I think you've really come so far from where you started.
ReplyDeleteSOOOOO awesome! My Dad and I built things together too and it's such precious time--and amazing results! I'm poisting before-after pics in a week or two on my blog about the book nook I did like yours in my son's room. And then, this very week, we made a whole wall of shelves and a window seat in our master bedroom. Love projects and love your blog!
ReplyDeleteI can definitely feel where you are coming from on the unused dining room! I feel like my dining room is just a "hallway" to get from the front door to the kitchen - with a BIG table in the middle for piling STUFF onto. We have talked about turning it into a family room - and taking out the wall between the dining room and kitchen - except that wall holds the secret back stair case in this house. . . it's a dilemma!
ReplyDelete(we met at Haven - nice to see you again!)
it looks fantastic - by the way!
Super idea. I just purchased a 21/2 meter cabinet that would look great with the built ins. I think I will paint as I go to make it easier for me. Thank you so much for sharing how to do!
ReplyDeleteSuper idea. I just purchased a 21/2 meter cabinet that would look great with the built ins. I think I will paint as I go to make it easier for me. Thank you so much for sharing how to do!
ReplyDeletelooks great! it's amazing what a change some good built-ins can make in a space. we're trying to finish up a big built-in project in our house too... http://alanna-wendt-to-tennessee.blogspot.com/2012/07/wall-mounts-caulk-all-trimmings.html
ReplyDeleteI used to have a buffet just like that! The dining room is gorgeous! I'm having paint envy right now! I can't wait to see you built in finished!!
ReplyDeleteLove the wall color, do you remember the name of the color and brand? Thanks! Pinterester in PA
ReplyDeleteJust discovered your blog and this project. My husband and I want to tackle a similar project in our living room. What are the dimensions for all the shelf heights? I'm curious as to how big the big one is and how small the smaller middles are. Thanks in advance!
ReplyDeleteIs the top part attached to the butcher block/cabinets in any way? It looks like its just attached to the ceiling and the shelves provide more support. I am starting to plan my built ins and I LOVE what you have done!
ReplyDeleteI would love to see the finished product. did you guys finish it? :o)
ReplyDeleteDenise we did! You can see it here: http://thriftydecorchick.blogspot.com/2012/10/library-bookcases-done-boom.html
ReplyDeleteBianca, yes, the top part is attached at the ceiling (rafters) and the back (in studs). Hope that helps!
ReplyDeleteThis is exactly what I was looking for. We have a huge great room and one "wall" that I currently have a couple of book shelves and a small desk. The only design change I would want to do is to have a "desk area" instead of one of the cabinets. Thank you for posting a DIY on this that doesn't use pre-fab cabinets. I know I will be referring to this in the future!
ReplyDeleteHow much did it cost?
ReplyDeleteI can't remember the final total now but those cabinets were about $80 each I believe? The butcher block was $130, plus wood for the shelves and trim.
DeleteSarah - were you able to find butcher block that long or did you use two pieces? And what type of wood did you use for your shelving?
DeleteJared the piece I got from IKEA was 24 inches deep (for a regular countertop) and had it cut right down the middle since I only needed it to be 12 inches deep. So I got double the length out of one piece. It worked out perfectly for what I needed. The wood was just inexpensive pine -- I just made sure to prime it well and avoided anything with a lot of knots.
DeleteSarah,
DeleteI am wondering where you purchased your cabinets? Did you paint them or are they a prefinished white, (or cream?)
They come unfinished and you can get them at Home Depot, Menard's or Lowe's. :)
DeleteSarah, I just love this. I have been wanting to do this in my living room. I'm going to tackle this project with my husband. Can you tell me the paint colors you used, they go so well together and I have such a hard time picking the right colors.
ReplyDeleteWhat size wood did you use for the support pieces? And did you caulk or fill the spaces in between the cabinets?
ReplyDeleteThat wood was just cheap 1x2 -- just make sure to secure it into studs. There's no space between each section of bookcase but I did caulk a few spots on the whole thing overall.
DeleteHi!!! I love your built-in, it's beautiful! I'm wondering what your cabinets on the bottom are sitting on so that you can have the molding around the base. They're not sitting directly on the floor, are they?
ReplyDeleteYes we built those up to beef them up a bit and so I could wrap the base around them. I show how we did it here: http://thriftydecorchick.blogspot.com/2012/03/dining-room-transformation.html
DeleteHi! This looks great! Were the base cabinets pre-existing or did you buy them? If so, where? Thanks!
ReplyDeleteWe bought them...you can see how the whole process works here! https://www.thriftydecorchick.com/2016/06/how-to-create-custom-built-ins-with.html
DeleteHi there! You have given me so much inspiration to build these as part of my entertainment center and have "voluntold" my husband to make the bookcase :) In your post, I see that you mention you attached the vertical boards to the wall with screws (before you added the backs of the shelves which were also in studs). Could you provide a bit more detail as to how exactly you secured the vertical boards to the wall (eg: screwed in at an angle through the board into a stud, etc.)?
ReplyDeleteThanks in advance!
Amazing! Did you end up not securing the vertical parts to the butcher block cabinet top?
ReplyDeleteNo, after they are all done, they will be secure and heavy enough that they don't budge. The upper header, shelves and side supports into the walls all help to secure the upper section overall.
Delete