
How to Take Photos of Windows
May 05, 2016
Share this
I've been so excited about this trick and have been looking forward to sharing it with you. This camera tool has rocked my world! I know it's probably obvious, but as a home blogger photos are super important. Beyond that I've enjoyed photography as a side hobby for years, so I'm tickled with these results.

The room is dark and the windows are bright, which is typical. I love our view so I would like to be able to see what's outside instead of a bright orb of light (after I edit the photo to brighten it up).
Here's the same view with the Speedlite flash:


Getting bright, clear photos is important but there are many spots in our home that are a struggle to photograph. What drives me crazy is they are probably the brightest areas because they are near windows -- but they photograph horribly because of those windows.
I always end up playing around with aperture to try to get a decent shot and then editing to make it brighter. I lose the view out the windows in the the process though. They are usually blown out, but to get the rest of the photo to balance out it's all I can do sometimes.
Soooo. I bought this little tool years ago. It has sat in a drawer for all this time because I didn't take a few minutes to get it out and play around with it. Dumb. It was because of a cute cat photo I was trying to get that I finally tried it out. :) #catlady
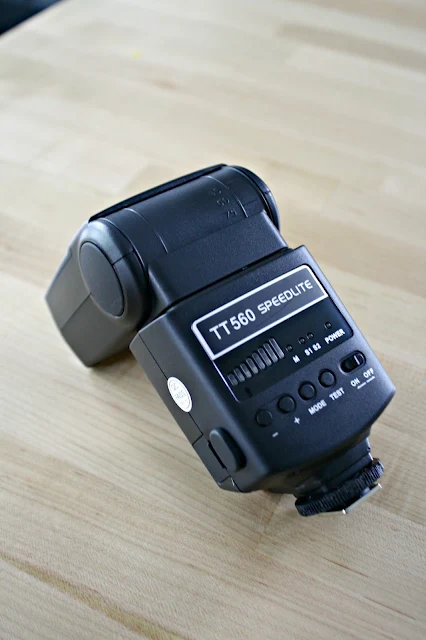
It's called the Neewer TT560 Speedlite flash:

This thing ROCKS! It's around $30 and I can't even believe the difference it makes. I'll show you some of the photos and then share some more details about how to use it.
Here's the original photo I was trying to grab the other day:

Here's the same view with the Speedlite flash:

I couldn't believe the difference!
Now using a flash is usually a no-no for interior shots. It really messes with colors and creates shadows and is overall just not good. I never ever ever use a flash for home shots. Until now. :) This thing is pretty amazing.
Here's a shot of our powder room on the manual setting I normally use (these are all just candid shots I took to try it out):

Again, I usually increase the aperture or edit to brighten it up, but you lose some detail and there are always spots that are still dark.
Look at the difference!:

Shadows are reduced, detail is there and it's bright and clean. Love it. I didn't edit this photo!
I love this spot in our kitchen but it takes a lot of editing to get it bright and the windows are always blown out with the regular settings:

Here is is using the flash attachment:

You can see out the windows! And details! Amazing.
It really helps to reduce shadows -- our sofa sits not far from this table so there's usually a shadow with a regular setting:

The Speedlite almost completely rids the photo of those shadows:

Remember when I showed you the daylight bulb I'm obsessed with now? This is like the daylight bulb for photos. ;) It looks like there's a skylight above, right?
It's a different look than I'm used to but I love it. I don't need to use it in every space but the difference really blows me away.
One of my favorite spots in our house is our window seat and it's tough to take photos of it:

I like that you can see the trees outside but when that happens you can't see the inside!
The difference is crazy with the Speedlite:

I didn't even edit this photo -- that's unheard of for this spot. I love that you can see everything -- the inside and the outside! One of my favorite parts is how you can see the true color everything. That is the real color of our walls. (So similar to that daylight bulb I talked about.) Even the trees look more their true green.
When you adjust aperture you can lose some crispness to the photos. This flash allows for an even better look without losing quality.
I've heard of a Photoshop trick for years now to take photos of windows -- you take two photos and edit them together in a way so they aren't blown out. That's beyond what I want to do every time. This little tool does all the work for me.
Here are some things to know about the Speedlite:
- You can only use it on a auto setting. I only use manual so this is an adjustment for me. (But kind of nice at the same time.)
- The flash slides in to the top of your camera (I have a Canon) and is battery operated. Remember to turn it off when you're done. :)
- You can adjust the brightness of the flash -- sometimes it blows everything out so you need to see what works.
- You can move the flash component around and from what I've learned you should not point the flash towards your object (at least for these types of photos). The point of this tool is that it's a much bigger flash than what is on your camera, so it will give your photos an even more intense flash if you point it at your subject. Instead, point it to the ceiling. It bounces and fills the room with light which is what brightens everything up.
- You need to be careful with all white horizontal surfaces that will reflect that light from the ceiling. Our kitchen table in the photo above goes super white (which is it's true color) but it can blow out the photo a little because of that.
- As I said, the results take some getting used to -- they look more true to life than I'm used to. I won't (and don't need to) use it everywhere, but I LOVE the results in some of my harder to shoot spaces.
- The one I linked to works with Canon, Nikon and at least eight other brands.
I had to share this find with you, years after I bought it. Gah. I'm sure many of you have been using it -- as always I'm super on top of things. ;)
If you are a blogger, sell items online or just love photography I highly recommend this attachment. It's about $30 and totally worth it. Have you tried this tool? Anything else I need to know about it?
Affiliate link included for your convenience!
What kind of Cannon do you have? The difference in those photos is impressive.
ReplyDeleteRight? I love what it does for photos. I use a Canon Rebel.
DeleteI will be looking of this for my camera, what a great tool and so affordable! Not only did you let us know about a tool that will help with a common problem, you spelled lose with one "o". I love that so much.
ReplyDeleteThank you! I just ordered it and was looking for something like this.
ReplyDeleteWhere did you buy the tiered wire basket above the toilet? Thanks!
ReplyDeleteAwesome! I just put it on my wishlist! It can be SO hard to photograph rooms. I am always setting up my lights in the weirdest places and then trying to NOT get them in the photos. And even then I have to edit the heck out of my photos just to get them halfway decent.
ReplyDeleteOk, you just rocked my world! I can't believe the difference of those photos! I've been an avid family scrapbooker and amatuer photographer since I was a teen, and have thought about getting an external flash for these types of indoor shots but never have. Well now I just recently starting blogging myself, and you have me sold. Thanks for this post!
ReplyDeleteMy husband asked me what I wanted for mother's day I had no clue. Now I know what to tell him.
ReplyDeleteAwesome thank you!
I'm curious how long you've had it. I had a relatively basic Vivitar external flash that up and died suddenly after just a couple of years of light use. Since moving up to a "better" flash was a lot of money, I switched to a Light Scoop, which is basically just a mirror attachment that magnifies and throws light off the camera's lackluster built in flash up and around the room. I've been happy with it since I usually bounced the external flash off the ceiling anyway. No batteries and no electronics that can fail on a holiday without warning. Please post a follow up down the road if you are still happy with it one or two years later (or sooner if it kicks the bucket).
ReplyDeleteWhat a big and great difference it made! I the window seat shot with the flash it even added a second cat!!! LOL Wink wink!
ReplyDeleteSarah you are a lifesaver! Thanks for sharing all your tips and info on this piece, I just ordered mine and can't wait to use it.
ReplyDeleteYou are very creative,Such an Amazing Work For More Ideasresidential interiors in bangalore | interior services in Bangalore | interior design solutions in Bangalore
ReplyDeleteWow what great result! I wonder if this would work taking photographs of jewellery? It would be worth purchasing one just to try it out at that price!
ReplyDeleteI have the same flash and use it fairly often, though I was reluctant at first because I had heard using a flash was such a no-no. I do use mine on manual, though. (Nikon) I love your trick for using it in the daytime so the windows aren't blown out- why didn't I know that?! Oh, I also have a filter/ screen thingie (technical term) that slides over the flash to diffuse it, which helps the glare at night.
ReplyDeleteI have the same flash and use it fairly often, though I was reluctant at first because I had heard using a flash was such a no-no. I do use mine on manual, though. (Nikon) I love your trick for using it in the daytime so the windows aren't blown out- why didn't I know that?! Oh, I also have a filter/ screen thingie (technical term) that slides over the flash to diffuse it, which helps the glare at night.
ReplyDeleteDiffuser! Just looked it up. :Do
DeleteHere's the one I have, in case you're interested, http://www.amazon.com/gp/aw/d/B00ENSKUUK/ref=mp_s_a_1_5?qid=1462533900&sr=8-5&pi=AC_SX236_SY340_QL65&keywords=neewer+flash+diffuser&dpPl=1&dpID=41QB9kiHbIL&ref=plSrch
Diffuser! Just looked it up. :Do
DeleteHere's the one I have, in case you're interested, http://www.amazon.com/gp/aw/d/B00ENSKUUK/ref=mp_s_a_1_5?qid=1462533900&sr=8-5&pi=AC_SX236_SY340_QL65&keywords=neewer+flash+diffuser&dpPl=1&dpID=41QB9kiHbIL&ref=plSrch
Oh I love this tip! I've never bought a flash for my camera because I always thought they were so expensive, but this is awesome! Love what it has done for your pictures, thanks for sharing this little gem! :)
ReplyDeleteThis is awesome! Just bought it! Thanks, Sarah!
ReplyDeleteAnother tip with flash. Point the flash it at the ceiling. It bounces off the ceiling and evens out the light below it.
ReplyDeleteYour cats are soooo cute!! Awesome tips! I need a flash!!!
ReplyDeleteMel | www.thegossipdarling.com
Okie dokie, you just changed my life. I own a window treatments business, so we are always needing good window shots. I have such terribly outdated photos on all our internet venues, because I cannot get good pics of our window treatments unless it's fairly dark outside, and then I hate all the artificial light. Thank you bunches!
ReplyDeleteThanks for posting - love this attachment!
ReplyDeletehttp://www.decoraid.com/blog
You sold me. The windows and light in our new house are going to take some serious getting used to, and I"m already having trouble getting good shots of the rooms with the windows. Thanks for sharing!
ReplyDeleteI remembering you writing this post, and just searched fro it so that I could purchase this. I just ordered it, and am hoping it will help me photograph a bathroom that has no windows that I am renovating for the ORC. Do you think this flash will be good for this purpose? I have two bathrooms that have no windows and can never get a good shot in them!
ReplyDelete