
How to make your own printables
January 08, 2012
Share this
So if you have looked at oh…a few blogs lately, or surfed Pinterest for ohhhh…a few seconds, you’ll see a TON of fun printables. They’re fun graphics or sayings and they are all the rage to print out and frame right now.
I think they are too fun and I pin pretty much any free one I see anymore.
In my old life I did a lot of graphics work – I worked in marketing and whenever possible, I created the advertising, annual reports, brochures – all that good stuff. When I had time and could really concentrate on it, I really enjoyed that part of my job. (I used Quark – is that ancient now or do people still use it?)
So when I realized I could make something fun with PicMonkey (edited because the original site I used closed down). Since I use sites like this to edit my photos anyway I was hooked!
I made a super easy, basic printable for my office today and then recreated my steps to show you how to do it! Did I mention this is totally, completely FREE?
I’m sure this has been shared a meeeellion times in blogland, but that was the first I had seen it, so I wanted to share it with you too. First, open the Paint program on your computer. I had to search mine out because I never use it. Just open it, then save the blank screen as a document:

Open up your editing site and download the blank page into it (I used Picnik when I wrote this post but they have since shut down. As I mentioned I use PicMonkey now.):
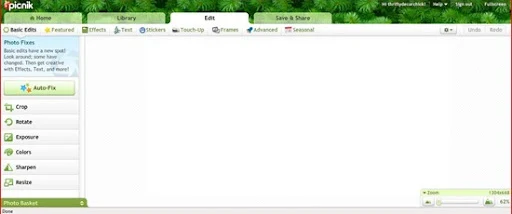
To pick a background color, go to the Effects tab and then pick the Duo-Tone option:

I just pick the same color for both since it asks for two colors (this would typically be used for a photo, hence the need for two colors).
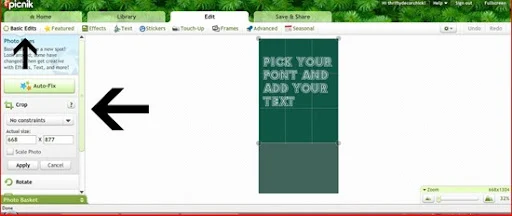
Then, because I wanted this one to run vertically, I went to the Basic Edits and rotated the image:

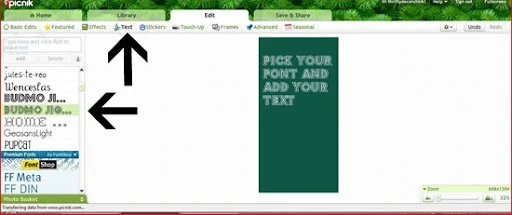
And then it’s time to have some fun! You can add graphics by going to the Stickers tab and pasting them in. I just wanted text for this one, so I chose the Text tab (duh) and then picked the fonts I wanted:
You can send the text back or forward (to layer) by right clicking on the text box. I didn’t do anything fancy schmancy on this one so it wasn’t needed.
Because I knew I wanted to print this out in an 8 by 10 size, I finished it up by going back to Basic Edits and cropping off the bottom:
Save the file to your computer, then open it in MS Word (or whatever program you’d like) to resize it and print it out.
I ended up printing mine at home and it came out beautifully. I used a ton of ink in the process I’m sure, but I really didn’t want to make a run to the printer today. ;)
I used the lyrics from the song My Life by Robin Thicke – I love that song and it’s used in the movie Dispicable Me (light. bulb.), which is one of our family favorites.
The lyrics are totally hokey but they say how I feel:
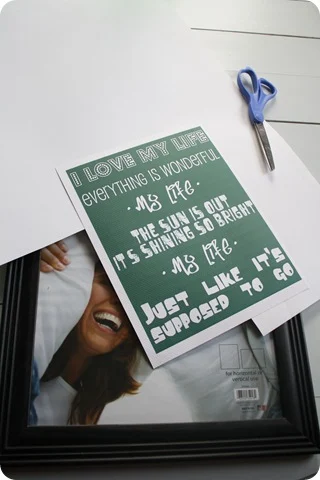
I wanted to print it out on some pretty cardstock but didn’t have any. So I cut a paper-size piece of the stuff I use for my fake photo mats and stuck it in the printer. It worked great!
I use these large pieces of poster cardstock all the time to do “mats” for my art and photos. I just laid the paper that came in the frame on the paper and cut around it to get the size I needed:

 Then used double stick tape to stick the printable on the paper. I just eyeball it but you can measure if you really want. :)
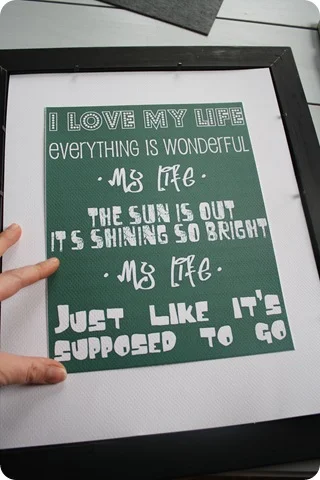
I picked random fonts that I thought were fun – they have no rhyme or reason to them. The whole thing makes me smile. :)
I LOVE how it turned out:

Aaaand it’s impossible to take a good photo of a glass surface. For real. If you look close you can see my not washed hair and glasses and pj’s still on. Scratch that -- don’t look close. And yes, I know there is a grammatical error error (its) but that font wouldn’t accept an apostrophe for some reason. I choose to overlook it, but I know some of you may not be able to. ;)
It’s hanging in the office, which I will share this week. I will. Even if it kills me. :)
I love that aqua color and how it ties in with the lovely lady lamps:

Fun, eh? You can SO do this, even if you have zero experience with graphics or computers or whatever. I pay to get a few extras with Picnik, but you can do all of this with their free options – they offer a ton of free images and fonts.
It took me a total of about 30 minutes to create this one, but I could have been sucked in for hours if I had more time. I find this kind of stuff fun cause it’s cool to play around with different images and fonts.
Hopefully this will work for you and you can create your own! The possibilities are endless! Create your own holiday cards, invites, birthday stuff like cupcake toppers, fun stuff for holidays…I could go on and on!
So have you tried to DIY your own printable yet? I’m feeling pretty behind, but now that I know I can do this, the world is my oyster! I may even create my very own blog button!! WHOOO!
I’m sure this has been shared a meeeellion times in blogland, but that was the first I had seen it, so I wanted to share it with you too. First, open the Paint program on your computer. I had to search mine out because I never use it. Just open it, then save the blank screen as a document:

Open up your editing site and download the blank page into it (I used Picnik when I wrote this post but they have since shut down. As I mentioned I use PicMonkey now.):

To pick a background color, go to the Effects tab and then pick the Duo-Tone option:

I just pick the same color for both since it asks for two colors (this would typically be used for a photo, hence the need for two colors).
Then, because I wanted this one to run vertically, I went to the Basic Edits and rotated the image:

And then it’s time to have some fun! You can add graphics by going to the Stickers tab and pasting them in. I just wanted text for this one, so I chose the Text tab (duh) and then picked the fonts I wanted:

You can send the text back or forward (to layer) by right clicking on the text box. I didn’t do anything fancy schmancy on this one so it wasn’t needed.
Because I knew I wanted to print this out in an 8 by 10 size, I finished it up by going back to Basic Edits and cropping off the bottom:

Save the file to your computer, then open it in MS Word (or whatever program you’d like) to resize it and print it out.
I ended up printing mine at home and it came out beautifully. I used a ton of ink in the process I’m sure, but I really didn’t want to make a run to the printer today. ;)
I used the lyrics from the song My Life by Robin Thicke – I love that song and it’s used in the movie Dispicable Me (light. bulb.), which is one of our family favorites.
The lyrics are totally hokey but they say how I feel:

I wanted to print it out on some pretty cardstock but didn’t have any. So I cut a paper-size piece of the stuff I use for my fake photo mats and stuck it in the printer. It worked great!
I use these large pieces of poster cardstock all the time to do “mats” for my art and photos. I just laid the paper that came in the frame on the paper and cut around it to get the size I needed:


I picked random fonts that I thought were fun – they have no rhyme or reason to them. The whole thing makes me smile. :)
I LOVE how it turned out:

Aaaand it’s impossible to take a good photo of a glass surface. For real. If you look close you can see my not washed hair and glasses and pj’s still on. Scratch that -- don’t look close. And yes, I know there is a grammatical error error (its) but that font wouldn’t accept an apostrophe for some reason. I choose to overlook it, but I know some of you may not be able to. ;)
It’s hanging in the office, which I will share this week. I will. Even if it kills me. :)
I love that aqua color and how it ties in with the lovely lady lamps:

Fun, eh? You can SO do this, even if you have zero experience with graphics or computers or whatever. I pay to get a few extras with Picnik, but you can do all of this with their free options – they offer a ton of free images and fonts.
It took me a total of about 30 minutes to create this one, but I could have been sucked in for hours if I had more time. I find this kind of stuff fun cause it’s cool to play around with different images and fonts.
Hopefully this will work for you and you can create your own! The possibilities are endless! Create your own holiday cards, invites, birthday stuff like cupcake toppers, fun stuff for holidays…I could go on and on!
So have you tried to DIY your own printable yet? I’m feeling pretty behind, but now that I know I can do this, the world is my oyster! I may even create my very own blog button!! WHOOO!
I love this! I had no idea it was sooo easy! I have been totally wanting to make my own, and now I can!! Thanks for teaching me how! Yours turned out adorable!
ReplyDeleteThank you so much for the idea!!!
ReplyDeleteHow cool is this!!!
ReplyDeleteThank you for sharing the how to. Now I just need to give it a try.
Girl you just rock!
so so so fun! I love these...I used several SUPER CUTE ones from Pinterest for Christmas Decor in my home. And I love PICNIK, so I'm so excited to learn about this! I will definitely be using this in the near future!
ReplyDeleteThis is so cool, Sarah! Thanks! And guess what . . . it's now gonna get pinned :D
ReplyDeleteI am totally pinning this!
ReplyDeleteI love using Picnik for printables/buttons!! I'm sure 800 other people will tell you, but you don't have to upload the white image. You can just go to collage and change the color there to what you want and hit done w/o adding any pics of course.
ReplyDeleteOne other fave picnik tip I read somewhere was adding triangles and flipping them upside down to add a cute banner! :)
So cool! I have to try this Sarah! Thanks for sharing it the "how to." lol You are too funny about the hair/pjs. Folks would keel over if they saw what I looked like about half the time. :)
ReplyDeleteGreat job! I am pinning it!! Picnik and Pinterest are my BFF's ... I spend lots of time with them!
ReplyDeleteThis is awesome, just today I pinned a ton of printables and went out and got a frame to change them out in. I am so excited to be able to try and make my own! Your blog is my favorite one I follow :)
ReplyDeleteAwesome! Live and love the positive! Thanks for sharing!
ReplyDeleteOh, please tell how to create your own blog button!
ReplyDeleteOMGoodness!!!! I use Picnik for recipes and photos all the time, but never even thought about doing this! Thank you so much for sharing!!!
ReplyDeletexx
I was just trying to figure this out tonight after browsing pinterest! I love that your posts are always in sync with what I'm working on! Thanks again!
ReplyDeletejust made my first printable thanks to your super easy tutorial!! thank you!!
ReplyDeleteThis is so completely AWESOME!!! I always wanted to know how to do this too! It's too late tonight, but I am sooo doing this tomorrow!!! Thanks!!
ReplyDeleteOh, yeah!!! I'm gonna blog about this and link your post!
ReplyDeleteOoooh! Even I could manage this! Thank you for the tips :)
ReplyDeleteI like to use picnik a lot, too, haven't seen this tut before. Great idea for your pics-what kind of paper is it?
ReplyDeleteGreat tutorial! (And I don't say that often. Maybe because in real life I'm a teacher.) Thanks!
ReplyDeleteWhat perfect timing! Over the weekend I was thinking about how I could make my own printables and thought maybe I'd search Pinterest. So glad I saw this post this morning! Thanks for sharing this...you make it sound easy. I can't wait to get started!
ReplyDeleteJennifer
Thanks for sharing this Sarah! I have tried to do something like this before, but it always ended up blurry when I printed! I like how you started with a paint background as the document!
ReplyDeleteThank you!!!! Can't wait to try this!!
ReplyDeleteThanks for the great tutorial! If you have Microsoft Office you can apply similar principles in PowerPoint as well. (And yes, Quark is still being used! But InDesign by Adobe is superior, in my opinion.)
ReplyDeleteWay cool! Thanks for sharing! I just made one this morning - posted it on my blog. :)
ReplyDeleteThat's so cool. Thanks for sharing.
ReplyDeleteScott
THANK YOU!! I just googled this on Friday, and didn't find anything that was too helpful. Now, I've got a great FREE way to do it, thanks to you! I'll be referencing this often.
ReplyDeleteGreat idea. I've been using Publisher to make a few, but I never thought of Picnik even though I use it for photo editing.
ReplyDeleteLove this!
ReplyDeleteYours came out great! I first learned of picnik from you last spring and LOVE it. I want to try to make some subway art in it soon.
ReplyDeleteA few blogger friends and I are collectively hosting a January challenge. It would be so fun if you wanted to participate. If you have a second, check it out http://thespacebetweenblog.wordpress.com/2012/01/09/imagine-the-impossibilities-challenge/.
Karah @ thespacebetweenblog
Thanks for the info! I do love printables.
ReplyDeleteMaxwellhouseinteriors.Blogspot.Com
Very neat! My coworker who does the marketing for the company I work for uses Quark. :-)
ReplyDeleteSara, Thanks for sharing this! I have wondered how on earth folks do this. Also, I am envious of your office lamp. I drooled over it last year at Target, but never got around to buying it. I'll have to check out the ones you mentioned in your most recent post!
ReplyDeleteThanks again!
Great job Sarah! Thanks for the rundown on how you did this, I'm totally needing some new decor for my new office. Pinning! :)
ReplyDeleteThis is PERFECT! Thank you! We will soon be moving into our new home and I need some budget friendly options for wall decor!
ReplyDeleteWhitney
www.cerniks.wordpess.com
Thank SO much for sharing. This is fantastic. I use picnik all the time for my pictures so this should be easy as pie! Thanks again!
ReplyDeleteWow, so nice of you to share this! I have zero experience doing anything like this, but with your very clear tutorial I am so going to try! Thank you for sharing!! Jamie
ReplyDeleteI love picnik too! I made my own blog banner, business cards, party printables, etc. Sprik.blogspot.com has tons of freebies that look great as backgrounds (step 1, instead of plain white/solid colros).
ReplyDeleteNo freaking way! I have been wanting to make a very particular one for a while now. Thanks for this tutorial!
ReplyDeleteThank you for sharing this, you make it look so easy….now if I only could find a Paint program on my Mac….. ;-)
ReplyDeleteHow nice of you to share this tutorial. I can't find Paint anywhere on my computer, any ideas? Thank you, Katy
ReplyDeletekaty_lunsford@yahoo.com
Thanks Sarah! What fun I can have with this!!! Thank you for sharing ;)
ReplyDeleteJust made one and love it. Thanks for the tutorial, it was so easy!
ReplyDeleteI tackled making my own printables for gifts for Christmas last month and would like to offer them up on my blog (I use blogger). How can you share them with your readers?
ReplyDeleteThis is such creative fun! I am going to be using Picnik for photo editing, and am so glad it can do this too. My next moment of pure creative fun for me, I'm doing this. It's like play.
ReplyDeleteThank you for sharing!
This is wonderful, I think It's going to be my new hobby...Thank you for sharing!
ReplyDeleteI love your Blog
from your new Follower, Sonia xo
Great tips! I've been playing more and more with Picnik lately too...it's fun, that's for sure. But DANG...are you getting the 'oops, there's a problem and it's our fault' pop up A LOT from them lately? I get it every 3 photos when I'm editing.
ReplyDeleteI did something similar a few days ago. I used Picnick and some 4 by 6 photo paper sheets to make two "important number" signs to go next to our family calendar. I always hate the way the signs look when I write them out and printing them out on regular paper just looks cheesy. The 4 by 6 paper was just right to pull my little organized space together <3
ReplyDeleteThanks for the tut! I'll have to try out Picnik.
ReplyDeleteTip: when you don't have the punctuation for the font, find a similar font and put in the punctuation, just in that different font, keeping all the other text your original desired font. I know some programs will only allow one font per text box, but sometimes it's worth it. (or just create a new text box with just the "'" in it in the other font and float it with a clear background above the word.
Another tip: when I run into this problem in a word-processing program (such as journaling for a scrapbook page), I use the Find/Replace function to find the punctuation I need to replace and replace it with the punctuation formatted with the other font.
Pinned it for a rainy (snowy?) day! Thanks :)
ReplyDeleteThanks so much for the little tutorial. I had no idea how to make those lovely printables! (I am such a n00b, as my kids would say.) Off to play now...mwah!
ReplyDeleteI had no idea how to make a printable so thank you so much for the post. Using your instructions I made one tonight. Yay! If I had a blog I'd post it. :)
ReplyDeleteCarrie
WOW! YEAH! So excited. I had no idea how to do this and am so thankful you shared!
ReplyDeleteThis is so great! I think I may go get lost in picnik now :)
ReplyDeleteHi, my name is Heather! Please email me when you can, I have a question about your blog!
ReplyDeleteHeatherVonSJ[at]gmail[dot]com
I love this! I've been trying to think of things to frame and hang in our future bedroom and this fits the bill!
ReplyDeleteOh awesome! I was wanting to make the printable using our birthdays and wedding date...perfect. Thanks for the help :)
ReplyDeleteThat is a wonderful idea! You crack me up about the reflection. i see those things too which drive me nuts! Take ithe photo without the glass....that's one solution anyways! Hehe..
ReplyDeleteGreat tutorial, thanks! Also, you are correct in using the apostrophe. Its is used for giving possession to something. Ex. "Its fur is brown." As opposed to, "It's a nice day." It's=it is. I always have to say "it is" in my head to make sure I'm using the right one and see if the sentence still makes sense! LOVE your blog! :)
ReplyDeleteThanks for the lesson. I can't wait to try this out.
ReplyDeleteYep! it worked, even for me! I am soooh not good with this stuff, but I installed Paintbrush on my Mac and followed the steps and VOILA!! Very happy with this!
ReplyDeleteThanks sooo much for posting this tutorial! I have seen so many of these on Etsy and always wanted to make my own! I have a blog as well! Feel free to stop by anytime!
ReplyDeletehttp://www.thisheroesnest.blogspot.com/
I am having a ball playing with Picnik! Thank you for encouraging those of us who aren't so computer savvy that we can do it. I DID it!
ReplyDeleteummm, i love you for this. thank. you.!!!!!
ReplyDeleteI'm having trouble with the graphics being fuzzy when I print them. Any tips? Thank you for posting the tutorial! I've been wanting to do something like this forever!
ReplyDeletethanks! been playing for hours :)
ReplyDeleteWow! how easy is that! I use picnik all the time to edit my photos, but now I have to try it to create my own personalized art. Thanks for sharing. BTW, blogging with Amy gives clear instructions on how to create your own blog button using picnik. That is how I created mine.
ReplyDeletePeople like beauty and to increase beauty of our house floor lamp is one of the most finest product now a days.to get more info you can visit
ReplyDeletehttp://www.1001floorlamps.com/ in URL field
Aaaaand this is genius. I just made three in a row, playing around with fonts/colors. There goes my weekend.... Thank you for sharing.
ReplyDeleteThanks!! I wondered if there was anyway to make it any bigger than 8x10. I tried to upload it to get it printed and the resolution was off. It just turned really blurry. Is there a way to create it bigger with a higher resolution?!
ReplyDeleteThanks for the great tutorial! I made my own sign tonight in just a short amount of time. It's already found a home on my new gallery wall. :)
ReplyDeleteThanks I am gonna do this!!
ReplyDeleteThe How-to on printables was excellent and very easy to follow. This is how I'm going to scratch my creative itch for weeks to come. I did one yesterday using the lyrics from Beyond the Sea and will print for my sky and sea themed family room wall. To see, go my my boards on Pinterest under Words and Quotes. Thanks again! Dina Calucci
ReplyDeleteI just recently found your blog and I can't stop reading! I'm finally doing my master bedroom (at almost 40 it's time for a grown up room), and that blue lamp would be perfect in my new space!! Where did you get it????
ReplyDeleteDawn
THANK YOU! I am up at almost 2 o'clock in the morning playing with this:) Found some pinterest inspirational words and had to make my own!
ReplyDeleteI've used this a few times. Thanks so much. I just made a fun family sign: http://trophyw.blogspot.com/2012/02/gallery-wall-art.html
ReplyDeleteGreat tutorial. Picnik will be leaving for Google soon. Do you know where we can find it then?
ReplyDeleteNow that Picnik is gone what do you use to make your printables?
ReplyDeletejasurprenant@gmail.com
I love making printables! Have you heard of ribbet.com? It's just like Picnik.
ReplyDeleteYou should do a tutorial about how to put printables on blogs so others can download them. I can't figure it out for the life of me and google hasn't helped much! I know I need to start with a pdf....
ReplyDeleteSince Picnik isn't around anymore (or do you just have to pay for it?) I was able to accomplish the same thing in Photobucket! Thanks for pointing me in the right direction :)
ReplyDeleteWonderful! Thanks so much :))
ReplyDeletenichellexoxo.blogspot.com