A DIY(ish) Wood Vent Hood
November 06, 2015
Share this
Hey there and HAPPY FRIDAY! So I got some big time help last week in the kitchen that I am so excited to share with you. I've done most of the work on this reno and it was SO great to get some help for this one. I titled this DIYish because I didn't do it, but I could have with the right tools. If you have skills and a table saw, you could totally do it.
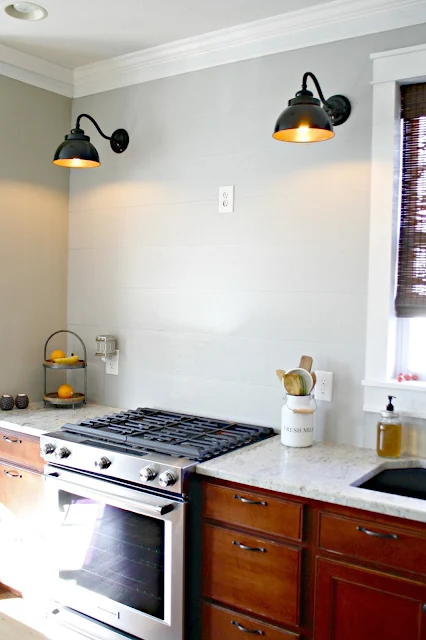
We've had a blank spot on the wall over the range all this time:
Some have asked about the off centered lights and they are that way because our range isn't centered. Beyond having two custom cabinets made there's nothing we can do about it. So I had the lights centered on the counters below so they would frame the new vent hood nicely.
I researched this for a long time and knew exactly what I wanted, I just wasn't sure how to make it work without spending a ton of money. A kind reader (thanks Ginger!) sent me info on how they used an under cabinet vent hood -- and it was a duh moment. An under cabinet hood is a lot less expensive (usually), but it's meant to be secured under a cabinet, which we didn't have. (Lots of obvious statements in that sentence.)
When I realized it could be hung and then secured to the wall, the ball got rolling. First up, I found a reasonably priced hood at Lowe's:
Ours was about $200, so a little more than this one. I wanted a few things in the hood -- it had to have the switches on the bottom because the front was being covered. I wanted stainless so it would be as pretty as possible from underneath (even though you don't really see it) and finally, it had to have decent power.
Now if you are a big cook you need to do some research into the size (as far as power) hood that you'll need. It needs to be able to handle the BTUs of a gas range. Our new range has more than our old one but this hood is fine for the new size. The details you'll need to research are the BTUs of your range and the corresponding CFMs of your hood. If you are a big cook then you want to go higher in your CFMs of your hood. They go up in price the higher you go.
I didn't go for higher CFMs for a couple reasons -- before we had an over the microwave vent that didn't vent outside. This is probably the lowest as far as cleaning the air as you can get (other than no vent at all) and it did fine. Other than the occasional, ahem…smokey meal, we never had any problems. I did do research and found if you can vent outside it's definitely better. So because we decided to do a vented (compared to non-vented), it just cleans the air better period. Also, the stinkiest food we make is bacon. Yum…bacon. I don't cook a lot of fish or anything else that stinks up the place so it wasn't a concern. And finally, because our vent goes directly outside behind the hood, it vents better than say, one that had to go up inside a wall or makes a lot of turns.
Those are all things to consider -- do some research to determine what will be best for you. I didn't get a pic of the hood on the wall by itself but it was pretty sharp. If you are looking for a stainless under cabinet hood this is great!
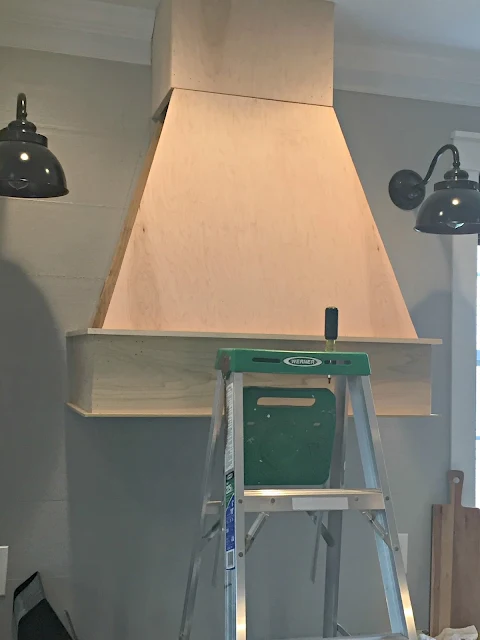
The next step was to start building a box around it. The guys secured 2x4s into the wall next to the hood and then starting building around it. The metal hood was just screwed into the wall planks and studs but it held pretty darn good just with that. For some added support you can see they added a beam into a stud as well:
This thing isn't going anywhere!
As far as height goes -- it's a personal preference. The lower you go the better cleaning of the air you'll get. My hood recommend 18 to 24 inches above the stove and that seemed way too low to me. I went higher and it's worked great. The bottom of mine is at eye level -- the hood doesn't come out as far as the stove so it would be hard to knock your head into it. I don't lean over the range while cooking anyway, but if I did I have plenty of room.
So the next step was to start framing out the design -- again they used 2x4s to create this:
Before they started this part they drew the design on the wall so I could get an idea and OK it. That helped to visualize the size and how much of a chimney I wanted.
Then it was time to start facing it -- this was probably the most difficult part. Those angles are why I hired this out. And the cutting a hole in the house thing. ;) They actually had to recut this front piece because it didn't match up on top just right:
Here is is with the sides and the bit of trim started:
I loved that small bit of trim along the bottom but it looked like it was going to take an eye out. They sanded those corners down quite a bit so they aren't dangerous anymore. :)
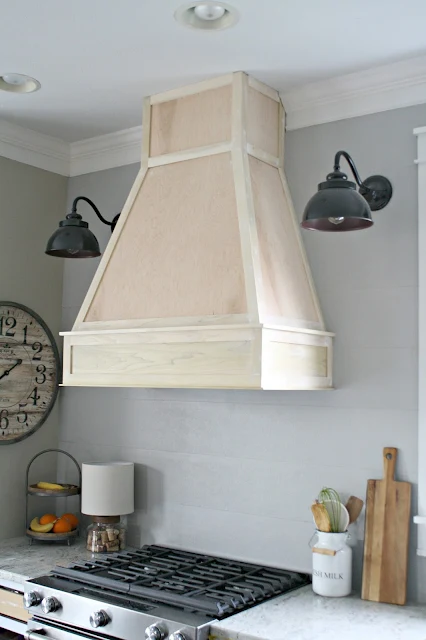
Trim and caulk are my BFFs. They make any project look finished and erase all sins. What a difference with trim right?:
We went with nice maple because my plan was to stain this. After the fact I actually had a feeling I wouldn't like it, but I felt like it was this beautiful wood piece and I needed to at least try stain...but I was right. I started last night and my son stood there and said "I hate it Mama. It needs to be white." He's SO right. The stain looks completely out of place in here, but at least I tried it. It's going white. And as my boy said, it will tie in the white uppers on the other side of the room. This child is learning. I'm so proud! :)
Here is is with holes filled before I started the staining process:
It is a huge statement in the room! I don't think I could love it more than I do. Heart eyes. :)
Proportions are hard -- if you attempt one of these you'll have to play around with them. We have nine foot ceilings so I went big and and made it wider than the range. This is a personal preference as well. Keep in mind a wider hood helps to pull steam and odors as well:
As far as details, the actual vent has two lights that have two options, dim and full. LOVE having light here again! And there are two levels on the vent -- it is most definitely stronger than our microwave before. That one worked fine but since we had the chance to vent outside I'm glad we did. I do have to get a vent cover for outside -- on windy days it gets noisy. The first time I heard it squeak I stood in the kitchen not moving for a good few minutes, trying to figure out where the noise was coming from. I was terrified it was an animal in the walls or something. Ha! Thankfully it's an easy fix.
Here's a look at the wall before again:
And with my new baby:
Ahhh! Gorgeous! It was a dream of mine to add this to our kitchen -- I actually noticed the other day that I shared my inspiration pic from Fixer Upper on Instagram almost a year ago:
I decided against the planked look because we already have enough of that going on in the room. I'd say they did a pretty great job recreating this right?
The cabinet painting is almost done (that's primer on the lowers) and I will share the full tutorial on Monday! It is STUNNING!! I am so in love with this room!
Have a great weekend!


I'm in love with this hood - it's perfect!
ReplyDeleteIt looks gorgeous! So exciting the way it's all coming together!
ReplyDeleteOh my gosh Sarah, it looks FANTASIC! It's all coming together so nicely and I can't wait to see the completed space. Have a great weekend!
ReplyDeleteYou did such an incredible job! Love it!!
ReplyDeleteShelley
LOVE it!!!! It looks amazing!
ReplyDeleteLove it .
ReplyDeleteBeautiful!
ReplyDeleteWow, Sarah, it's beautiful! Watching your vision come together is so inspiring. I wanna be you when I grow up! :)
ReplyDeleteI love this hood Sarah! We don't have a range hood and it is so frustrating. No searing meats in this house without all the windows and doors open! Maybe down the road when we reno we will put one in like this! Pinning it for reference later!
ReplyDeleteAnnie- All Things Big And Small
Ahhhh I'm in love!!! That's an absolutely gorgeous range hood - so beautiful, amazing job!! Can't wait to see the rest all finished!
ReplyDeleteBeautiful!
ReplyDeleteI love this SO much. Perfect. And, it wants to be white, your son is so right
ReplyDeleteLooks amazing! Love the inspiration picture too.
ReplyDeleteSarah I am in Indy and am curious how much they charged you for just building the hood. I have an opening outside so I would only need the hood built. Also what is the company name? Thanks!
ReplyDeleteMary feel free to email me! They are just a few guys that have their own company but you can't find them online.
DeleteYour kitchen is coming together beautifully!! I'm so glad you did yours before I do mine because I want to copy so much of what you've done. Lol! Your range hood is total perfection! Want to come out to Seattle and update my kitchen? #kidding #notkidding Well done :D
ReplyDeleteThat looks really awesome - what a statement piece! I'm curious, though, about using so much wood so close over the stove. It seems like it would be considered a hazard, and I'm doubtful (at least here in Cali) that it would pass permit inspection. What are your thoughts? Let me preface this by saying we work our kitchen really hard, and probably more than most. Otherwise, beautiful!
ReplyDeleteGood thought -- before we had cabinets that were much closer to the cook top than now and that wasn't an issue. They were to the side but those and the microwave were much closer to the burners at 18 inches off the counter. That's a standard height here.
DeleteLooks amazing! The anticipation is killing me. Love it!
ReplyDeleteI kept thinking that hood was way too low and I would constantly bump my head against it. And the I remembered I'm Dutch and not everybody is as tall as me haha! Looks great tough! So exicited for every new kitchen post!
ReplyDeleteHa! I'm 5'9" and it's not problem -- if it came out over the stove more it may be!
DeleteI absolutely adore your custom hood!! It's so beautiful...I cannot wait to see the finished product! I just wanted to mention a couple things based on the fact that you said you installed your hood higher than the manufacturer's suggested height range: (1) this may void your warranty for the hood; and (2) depending on your local building code, it may not pass inspection (although most code violations occur when a hood is LOWER, not higher, than the height range recommended by the manufacturer). Just wanted to make sure you took these issues into consideration before you installed your hood!
ReplyDeleteThank you! Yes that could be true about the warranty, but I would think it would be more of an issue if it was lower. The code isn't an issue being higher, but again, if was too close to the stove it could be!
DeleteHi Sarah,
ReplyDeleteLookin' good! Love your blog and you always make me smile. BTW, what type of range do you have and would you recommend it? Have a great day!
YES love it! It's a Kitchenaid gas slide in range.
DeleteLoving the kitchen remodel and I so want to paint my cabinets now!! Curious as to what the vent looks like on the outside. We currently have the microwave above the stove and would be able to vent outside if/when we do a kitchen remodel.
ReplyDeleteIt's like a dryer vent but longer and it's dark. There's a damper and a mesh part inside so critters can't get through. :)
DeleteWhat a difference that hood make! I love it!
ReplyDeleteWhat a difference that hood make! I love it!
ReplyDeleteThis comment has been removed by the author.
ReplyDeleteBeautiful! I would love where that clock is from?? I love it!
ReplyDeleteWorld Market! :)
DeleteLooks great! So glad I could help with it! =)
ReplyDeleteHow do you do it all Sarah? So much of your beautiful home is due to all your very hard work. Smart gal having the hood and wood around it done by professionals, not that you're not a professional, sure seems like it.Next thing we know you'll be teaching classes at Lowe's and Home Depot. Just think of all the ladies that will flock to learn from you. I will sit here and admire your talents and go get it attitude all winter and then some. Happy weekend
ReplyDeleteWow, this looks great! I can't believe it's not a pricier option that you can order from a store!
ReplyDeletexoxo, SS
The Southern Stylista
Beautiful hood!
ReplyDeleteJust curious, is interior of hood wood to vent or is it a sheet metal tube all the way to the vent?
Here our vent hoods have to be sheet metal then you can have wood around (fire, steam, grease protection)
The vent goes out directly behind the metal vent hood that is underneath the wood. The vent itself and all the ductwork is metal as well. :)
ReplyDeleteWhat a change your kitchen is getting. Can't wait to see the finished room!
ReplyDeleteI love it! I like the simplicity of the white tiles combined with the wood! It is very pretty.
ReplyDeleteSo glad for your examples and pic by pic instructions. I was able to do something very similar thanks to your generous share! What did you use to fill in the nail holes? Caulk? If so, do you remember what kind? ANd what kind of paint did you end up using? I obviously don't want to use Spray paint in the kitchen... But I want something heat resistant, right? Thanks again for your advice!
ReplyDeleteWondering how much it cost to build this. We have been pricing out purchasing one and they range from $900-$1500. Hoping we can build one for less.
ReplyDeleteI've been a fan and a follower for quite a while now and always in awe of what you do.
ReplyDeleteI'm wondering what the depth is of the bottom box you created and how that was built and anchored to the wall?
We are installing a ductless vent hood in our downstairs apartment and there is not going to be a cabinet above it. The hood we are looking at needs to be mounted from the top not the back so I'll need to build a box to attach it to with a hole in the back for electrical.
would really appreciate any feedback on the specs you can give me.