
Finally, some progress in the loft makeover!
July 15, 2016
Share this
Hey there! I didn't post on Wednesday because I thought this update would be done enough to show you…and it wasn't. ;) So I'm back to share it with you today and it's still not done, but close enough. What was supposed to take a couple days has taken all week, which shouldn't surprise me anymore when it comes to making over a space!
I'm really excited about these projects because once they are done the loft makeover will be more than halfway done. I've given myself a deadline to have this room completed before school starts -- which means I have about four weeks left. I didn't think I'd make it but now I'm feeling good about timing. I want this DONE before school and fall and the holidays so I can focus on them completely. :)
I got some help this week with a couple things -- both I was planning to do myself but for various reasons I decided to hire out at least part of them. One was the big huge wall in the room. Here's a before photo to show you what the room looked like before:

This is the best picture I can find of this view -- I hung a gallery wall above that trim but never loved that wall so obviously didn't take many pictures! I need to keep searching for a good before and after. ;)
Anyway, that wall to the left is the focus for this project. I knew I wanted lighting on the wall but what I ended up with (show you in a second) needed to go a little higher than I originally planned.
At first I was only going to take the planked wood about half way up the wall, but when the lights needed to go higher I changed the plan and decided to go all the way up with the planks. I'm so glad I did! It looks awesome!
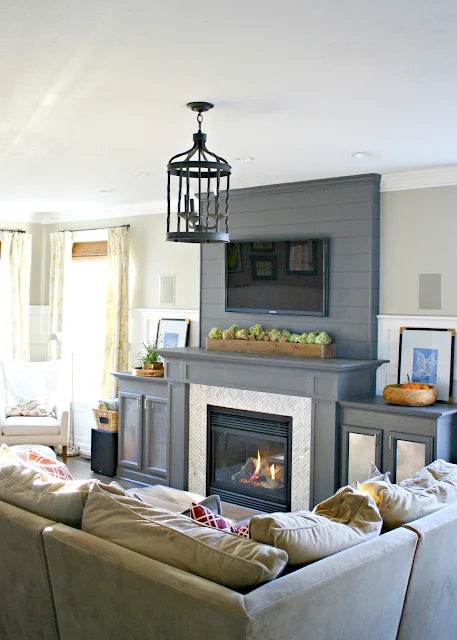
I used cheap luan like I've done a couple times. You can see it here above our fireplace:

It's called luan or underlayment and only costs $13 for a four by eight sheet. You can have them cut it down in the store or do it yourself. I love this stuff! It had a linen-like look that I love too:

It's super cheap and thin, both which I love for this kind of project! It's also really easy to install because it's so lightweight. I use a penny to get the perfect spacing between each board:

Oh, and make sure to paint the wall behind the planks the same the color you'll paint them!
Because that wall goes so high up and I don't do heights, ever, I got help with that project. The guys also showed me a slightly easier way for me to raise up the cabinets that will go along that wall:

I showed you here how I've used kitchen cabinets and raised them up and that works too -- but this requires a little less work. I'll just sit them right on top and nail them into to boards.
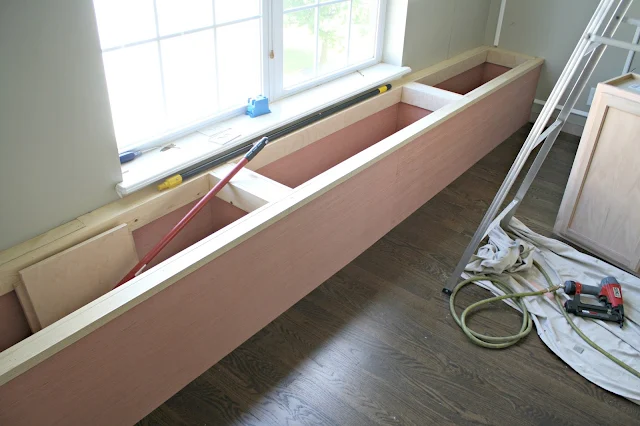
One of the projects I'm most excited about is the long window seat that went in! Again, I was planning on building this myself using cabinets like I did in the mud room, but I realized pretty quick that I'm going to need more storage in here.
Using the cabinets is great but I wanted to be able to open a lid like I do on our window seat in the kitchen:

Opening it from the top makes it much easier to access the inside and allows for a lot more storage:

Glorious! :)
The lids with hinges will be installed today. It's sectioned into three areas (and lids) and I love that I'll be able to dump all kinds of stuff in here!:

As always, I'll finish this off with trim and paint -- the trim will make it look much more custom and pretty! (We used luan again for the front and lining the inside because it's so inexpensive!)
The next addition is one I'm excited about too. When I shared some of my favorite sconces for less a couple weeks ago one of my readers shared a link to EXACTLY what I was looking for at a really great price (for these types of lights). She found them at Joss and Main:

Thank you Amanda, you rock!! They are priced at $101 right now but they were less than that when I bought them, so watch because they may go down again.
I was so excited I installed them before the planking went up, but now they need to be installed again and I haven't had time to get to them just yet. I LOVE the dark bronze against the bright white wall:

That gives you an idea of how they will look at least. ;) They are so pretty and I love that you can adjust them to the direction you want. I can't wait to show them to you installed -- they really make that whole wall!
Here's a look at where they will go and the planked wall:

I wanted these higher than originally planned because I didn't want to worry about hitting our head on them. Any lower and they would have been in the way.
We also had the TV moved to that corner of the room -- it used to be right in the middle of the planked wall but I have a bigger plan for what will go there. :) I like that it won't be the focus of the room but we will still be able to use this room to chill and watch TV.
Also, I ended up adding one more cabinet at the end of the room. You can see it at the end of the window seat. I figured it would be great additional storage -- I'm going to cut down the door so that it will fit over the opening. I'll take the shelf out inside and I may use it to hold wrapping paper if it's tall enough. It will just be nice storage to hold bigger stuff.
Also, I was planning on pulling the row of cabinets/storage away from the wall a bit originally but decided against it. I didn't want to lose more space in the room and I plan to do an extended desk in the middle that will give us plenty of work space.
None of these components are completely done but I was so excited I had to share the progress! I like sharing these rooms as they happen because it usually takes longer than you think and the little details are helpful to know. Here's where we started a couple months ago:

The room was looking so different with the new floors and door trim!:

You can see my trick for removing baseboards here and how I replaced all of our old door trim with a chunkier look here.
Half of the room is a disaster so this is the best shot I could get of how it looks now:

I will continue the planking around the room but not quite as high. It will go about half way up and be finished off with a small ledge on top.
It doesn't look like much now but it's progress and I'm thrilled! We have a busy weekend planned but I'm hoping to get the lights hung and the cabinets all installed by Sunday. I'm itching to get this moving now that so much has been finished! Be sure to follow me on Instagram so you can see up-to-date photos along the way!
The final step will be to add the countertops and when everything is installed I'll paint everything…and I mean everything. Door trim, baseboards, planked walls, cabinets, the window seat. It's going to take a good two weeks I'm sure. Good times! Anyone want to help?
Have a great weekend my friends!!
It looks great! LOVE the planking and lights :). I am planning on doing some planking in my son's room soon too. Now if this dang full-time job would stop getting in the way of all my fun DIY time... :) Looking great. Can't wait to see more.
ReplyDeleteJust finished planking, trimming, priming and painting a wall in our lil squid's cetecean-themed nursery. I'm exhausted. Looking at your cathedral-sized wall - yikes! That's a lotta work, Sister!
ReplyDeleteLove. Drooling. Do you paint your planks before you put them up??
ReplyDeleteI always paint after -- I just find with filling nail holes and all that it's worth it just to wait. :)
DeleteGreat job! We just did the same planking in a kitchen of a reno were doing. Did you prime & paint the shiplap prior or did you do it after they were nailed to the wall? I did it after. Just curious.
ReplyDeleteI painted after they were installed. It worked great!
DeleteHow wide did you cut the planks? Also did you use liquid nails adhesive on wall or just brad nail them in? Thanks , I love your projects & style!
ReplyDeleteThank you! Just nails! The planks are 5 3/4 each so I could get eight per a 4x8 foot piece of luan. I addressed some of the questions about installation here: http://www.thriftydecorchick.com/2016/07/wall-sconces-and-built-in-storage-in.html
DeleteI like those lights! So much going on!
ReplyDeleteCan remember asking you a few times if you ever rest, think I have my answer, No. What will you do when you finish every room, move to another house to start again? Don't even think about it.
ReplyDeleteEverything you do is all or nothing, do a deep job and do it right. Is way I am but at my point in life (will be 76 soon) can hold off on doing job/project til am ready. But tend not to be ready when think I should always, ah well, manana. Takes twice as long to do any job anymore but that's cause can't do things half way, have to do it well or don't bother.
Those lights you are putting up on planked wall are so incredible, so right about how well they look against white walls. Do you glue boards on wall as well as nailing? Guess you have to use ship lap boards, can't use anything less expensive like luan or did I miss that? What happens if you get tired of boards up and want them down, won't it ruin walls from gluing boards up if that's how you install them?
What an awesome big room to have for working in, watching tv, sewing whatever comes up. Love high ceiling. Enjoy your weekend
It looks great so far! Looking forward to seeing the end result! Like others, I am also wondering how you adhere the boards to your wall...?
ReplyDeleteLove following you!
I don't use glue anymore, just nails. :) Here are some more tips I addressed: http://www.thriftydecorchick.com/2016/07/wall-sconces-and-built-in-storage-in.html
DeleteLooks great! Did you consider floating the cabinets up off the floor? That would look great, and show off your new floors, too.
ReplyDeleteLooking great so far. How thick is the Luan?? We dont have it here so ws thinking about a 6mm ply. Also how is it put up? glue, nailed. Thank you so much for the inspiration!
ReplyDeleteIt's very thin! Maybe 1/4 inch? I nail it into studs but it is so light just nailing into the wall would be fine.
DeleteLooking good! Wish I lived close and could help you paint. You would get some free labor and I would get to learn from you. Win, win! ;)
ReplyDeleteI love your projects .... cant wait to try most of them.
ReplyDeleteSarah, I so love every project you've ever posted on your blog and your 'oh so helpful' step-by-step instructions. I could move into your home right now and not change anything...furniture, paint colors, accessories, etc. indoors or out. Your home is so beautiful, yet your blog is both entertaining and realistic. Like me, I would guess that a lot of your readers would love to know how you organize your life to accomplish as much as you do while still maintaining the close connection with your husband and son? In addition, you've mentioned that you are "a night owl" as am I. How do you manage all of that along with your blog and attending conferences? Hoping that one day you'll address your time management on your blog. Wishing you continued success in all your endeavors.
ReplyDelete