
How to take down upper cabinets
August 19, 2015
Share this
I'm finally moving forward on the kitchen reno I started early this year! If you missed the progress so far you can see the new window seat here, the built in fridge here and the new extended island here.
And then I stopped. Summer makes me lazy and that's the only excuse I have. Oh and I did want to figure out a few more details before I moved forward.
My Dad is newly retired, which is AWESOME. He came yesterday to help me with the next phase -- taking down about half of the cabinets in our kitchen. I've been SO excited for this day.
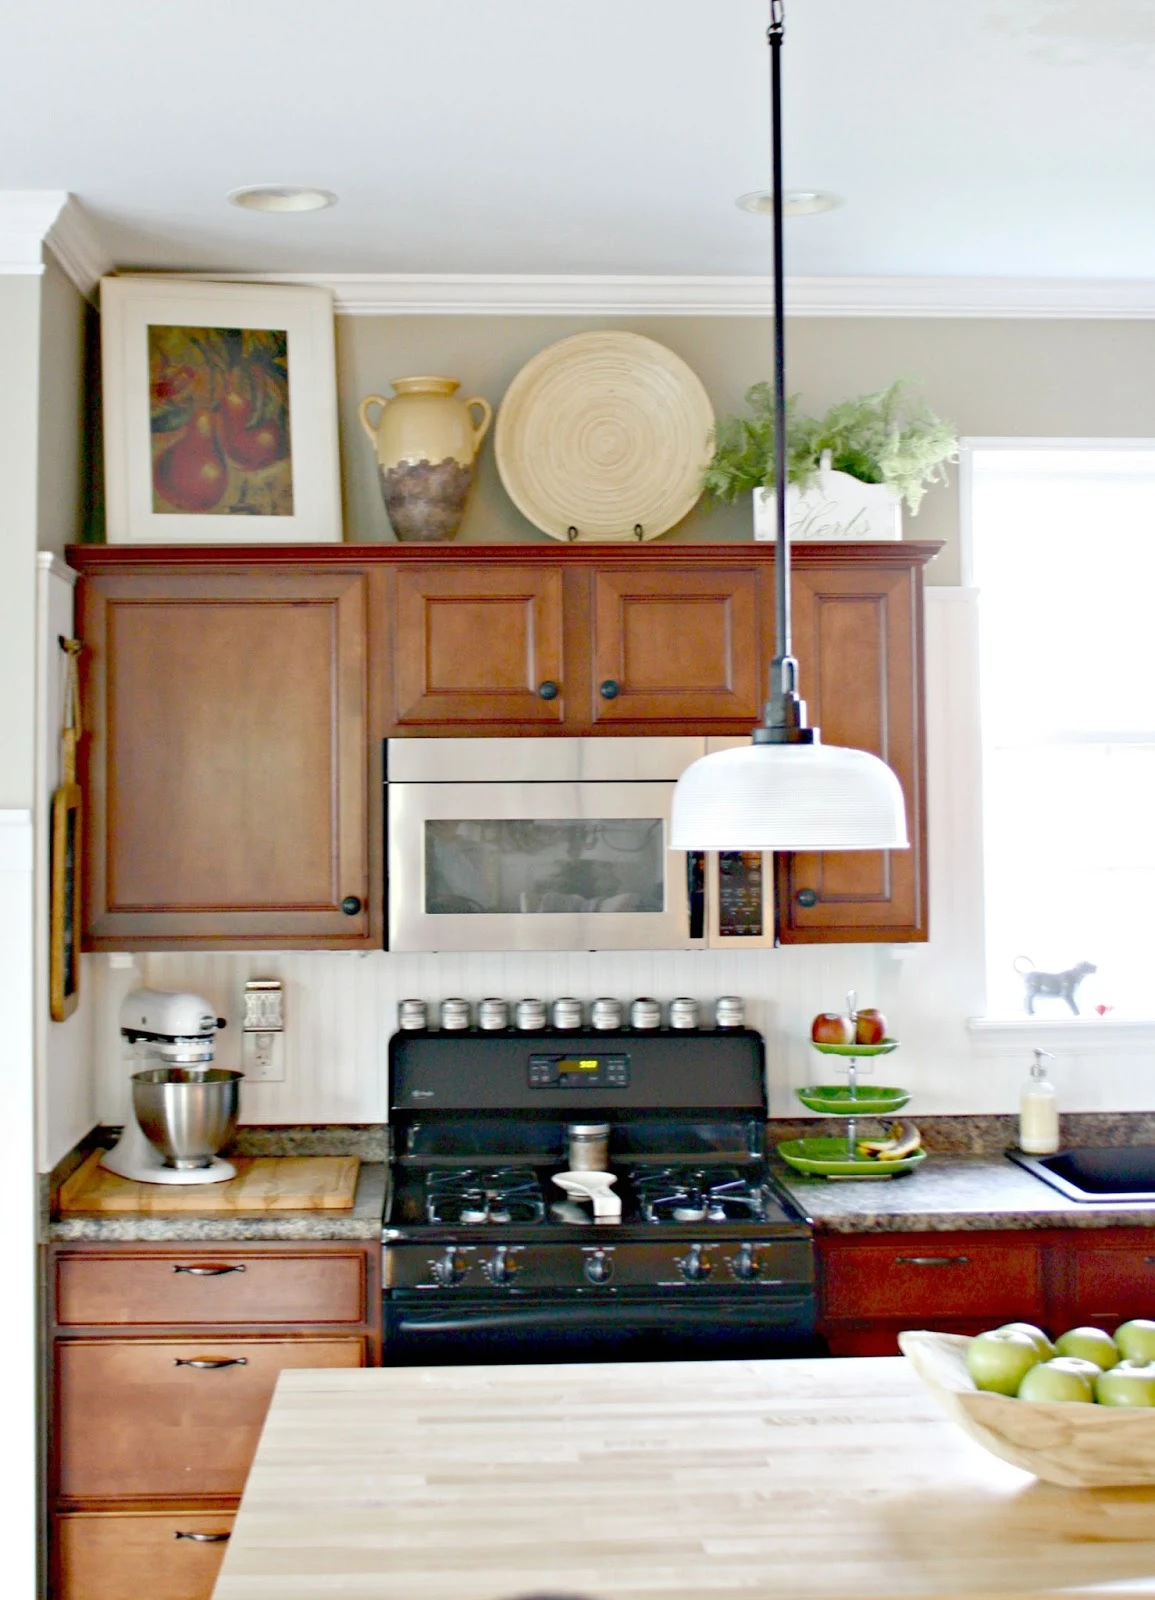
Years ago I wrote a post about decorating the tops of your cabinets and it kind of blew up and became a huge post for me. Funny because lately I have been just itching for the day I could take it all down in preparation for this:


And then I stopped. Summer makes me lazy and that's the only excuse I have. Oh and I did want to figure out a few more details before I moved forward.
My Dad is newly retired, which is AWESOME. He came yesterday to help me with the next phase -- taking down about half of the cabinets in our kitchen. I've been SO excited for this day.
Years ago I wrote a post about decorating the tops of your cabinets and it kind of blew up and became a huge post for me. Funny because lately I have been just itching for the day I could take it all down in preparation for this:

I will say when I took it all down I didn't like it -- it was too stark for me with our shorter cabinets. So I still say go for it if you do as well! I was so excited I didn't really take many photos of the cabinet removal process. But there's not much to it -- you definitely want to have two people -- one to unscrew and one to hold on to the cabinet. I can't imagine trying to do this alone!
We started with the microwave -- we removed two screws that held it in through the top cabinet (Dad did that while I held it -- make sure to hold it!) and then you just lift up and take it off the bracket on the wall. Make sure you hold it while the upper screws are removed or it will just fall.
Then we started on the cabinet to the right and worked our way over. I tell you what -- it was hard work! Getting those screws out is no joke. You need really good drill bits to get a good grip on the screws -- they are long and of course deep into the studs.
It was hard work but went really fast…until the last cabinet. Of COURSE. This is the curse I inherited from my Dad. Everything goes great until the last few minutes or the last one or the end of the project…every single time.
There was one screw that was so stripped we just couldn't get it out. Even this screw remover (that works great most of the time) didn't work. We didn't have anything to cut it off so Dad drilled and hacked at it till the head came off. We were able to get the cabinet down and then we had to get the rest of the screw out:

I told you all here how I was contemplating taking down the cabinets on the other side of our window. I did it and I'm SO glad I did! Game changer folks. We also took down the corner cabinet (that's the one that was a pain) and replaced it with a flat cabinet that was on the other side of the microwave:

You can see my under cabinet light hanging there -- most of them are burnt out so they will be replaced with LED lighting towards the end of the reno. Thankfully we only have three cabinets I'll need to add lighting to now!
That cabinet fit crazy perfect into that spot. I thought it may be a bit too small but it was like it was made for that corner. The door is different than the rest of the doors (one instead of two) but it doesn't bother me. I'm considering ordering two doors for it but it's not really an worthwhile expense in my opinion.
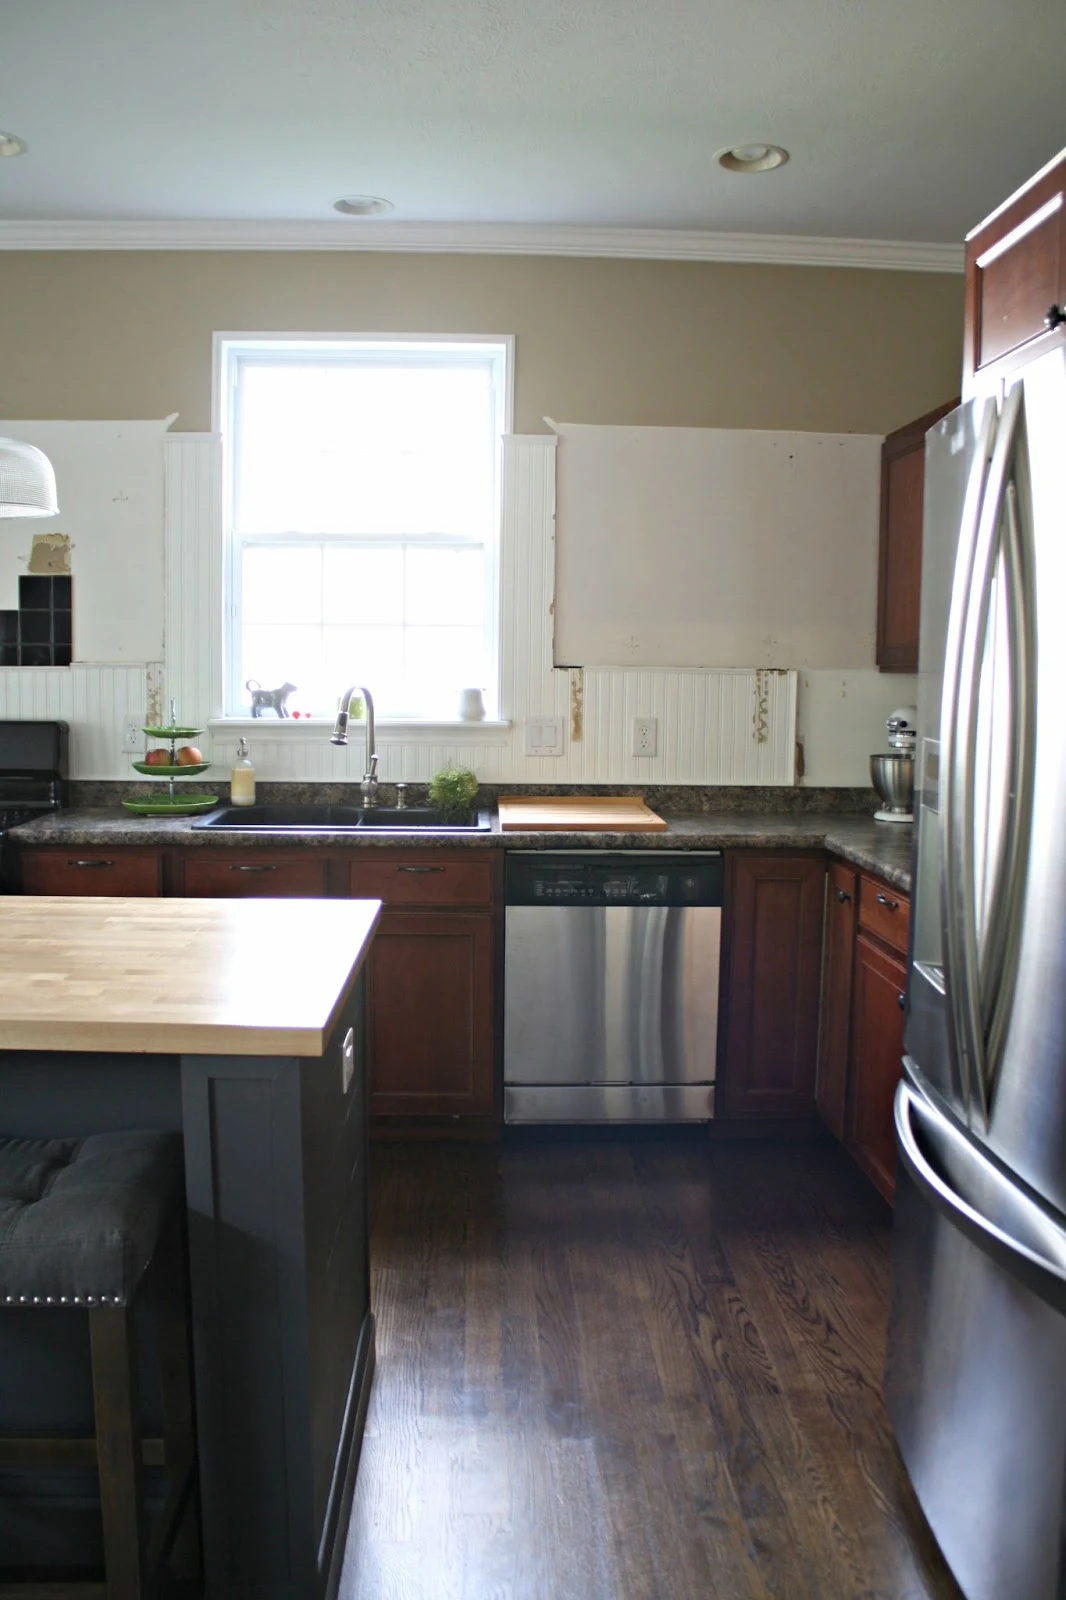
Here's how it looked when we were done -- a disaster and not pretty:

It's still not pretty but much less of a disaster now. Actually, I do kind of think it's pretty because I absolutely, positively LOVE love LOVE it without the cabinets (already!):

That black tile was what I covered over with beadboard years ago -- this part was behind the microwave.
The next step is to get all that tile and breadboard down and let me tell you -- it's going to suck. The tile will not budge. I tried years ago when I did the new backsplash and nothing has changed. Like everything else in this house it was installed very well. A good problem to have, but I'd love to pop off some tiles like I see on the reno shows. Nope. From the looks of it I think they legit used liquid nails and spread it like tile adhesive. I have a feeling we will just have to cut it all out and just replace the drywall.
It's going to suck. :)
But that's one of the next steps. I'm adding lights on the wall so that will need to happen soon too. We sold the old microwave already and I'm using that money to buy a smaller one for the island.
Here's a view of where the cabinet used to hang to the right of the window:

I also removed the appliance garage that was underneath the corner cabinet:

Here's that view now:

I cannot even tell you how much this has opened up the space. It is so much brighter and feels twice as big. If you are on the fence about doing this I don't think you'll regret it!
Yes, it's going to look so different! But that's why I'm excited. I've gone through a few of the cabinets and purged quite a bit already, and after I install the shelving for our everyday dishes I think we may even have extra space in our upper believe it or not!
Someone asked the other day if we use our appliance garage and yes, every day and I love it! I kept the rolling door and frame that it's on and will be reusing it to build a new one here next to the fridge:

It will have a shelf that pulls out so we can access everything easily. I love having a spot to tuck away the toaster and can opener out of sight. I just noticed I have another corbel to take down, missed that one. :)
Here's an older photo of that corner:

And here it is without the corner cabinets:

I LOVE the cabinets straight back to the wall. And I can reach all but the left side of the top shelf just fine. (I can still reach that too, I just have to work at it a little more.) We never used all the space in that corner cabinet anyway -- it was a dark abyss of wasted space.
Do you see what I see with the cabinet color? The ones along the right and top are bleached out from the sun. The new one in the corner is darker (more of the original color) and so are the lower cabinets. This (and a list of other reasons -- they look much better farther away than close up) is why I will be painting them, I'm just not completely sure on the color just yet.
And here's the spot I think will be my favorite -- the area over the range before:

And here it is now with primed walls, yucky black tile and glue all over the place…and yet I love it:

I tried pulling more of the tiles down this morning and it's just not happening. I'm pretty sure we'll just have to tear it all out which is a bummer. Any tips for getting tile down?
Once I get that done then I'm going to tackle building up the remaining cabinets to the ceiling. I have a long list and I've moved my I-hope-I-can-get-this-done-by-then date to November. I don't want to be stressing about the reno over the holidays. Wish me luck, I'll need it. :) Oh, and if you've installed a new vent hood (metal or wood), feel free to link to it or send me a photo -- I'd love to see the process. I'm still deciding between wood or metal but I'm leaning toward the former.
Looks good for far! About that corner cabinet though...if you do double doors it will be harder to reach into as it is already over the counter. Half a door in your way wont help. I wonder if a double door that was hinged in the middle might work more?
ReplyDeleteGood idea! We have one like that on the bottom. I think I'm going to keep it as is though since it doesn't bother me.
DeleteJust a thought... changing the doors on the new corner cabinet to 2 doors would mean having to look/reach around the right-hand one to get into the cabinet. Having it be just one might make the most sense.
ReplyDeleteWow, total game changer! It's going to look Ah-mazing when it's all said and done.
ReplyDeleteThe cabinets removed from either side of the window made a big impact. Really opened it up and I am all about that natural light! People obsess over solar lights... ugh hello windows are pretty much the same thing. ha! Can't wait to see another round of progress photos. I like real pics like these. I think first timers get overwhelmed when they are used to seeing just the before and after pictures. Your pictures have me in the mood to demo something! I know just where to start. (master bath) I think I'll surprise him by knocking out the tile ;)
ReplyDeleteLooking good already! We did a wood vent hood after our microwave died. Here's a link to that post - https://lifewiththebs.wordpress.com/2015/03/05/custom-vent-hood/
ReplyDeleteWhen we removed some hideous tile from our backsplash, even though it came off pretty easily the drywall was trashed. I think replacing it is a definite must even if it comes off 'easy.' The thinset would tear off some parts of the drywall, but then other parts had globs of thinset left over. I don't see how you could salvage it. Save the struggle and just plan on replacing the drywall!
ReplyDeleteWe yanked down our upper cabinets too! We have a really open concept 70's feel to the house that was broken up by hanging cabinets over our peninsula - No thanks! We took them down a couple months ago and are turning them into built-ins (took a page from your book!)... and haven't touched the drywall/primer since haha. The dishes are living right now in a rack on the counter – they'll move to open shelving eventually
ReplyDeleteSo pumped that this day has finally come! Lol
ReplyDeleteI am not a handy person whatsoever, but I've learned a couple things as we're going through our own kitchen renovation. Would it be possible to remove only the existing beadboard and go over the wall with backer board before tiling? Just a thought since it sounds like that black tile is a doozy to remove.
ReplyDeleteI just had to take down my parents tile backsplash and trying to take it down nicely was such a waste of time. A quarter of the way through I just started destroying it all and taking the drywall with me. Drywall sucks but it will probably take less time. Looks awesome so far!
ReplyDeleteLove it! I feel ya because I'm smack-dap in the middle of a kitchen reno myself! Go take a look when you have time.. talk about living with "not-so-pretty" and loving it :D Love following your renos!
ReplyDeleteI love it! We are working on our kitchen right now, I can't wait to have it done. When we were first looking to buy, I warned hubby right off the bat that I was taking any upper cabinets down as soon as we had the keys, I just don't like 'em! Probably partly because we all suck at closing doors, drawers, etc. Partly because of all the space they fill and pretty dishes they cover. Although I think uppers can be beautiful, my personal preference is for more open, shallow storage. It helps me not keep too much, too! ANYWAY, when we first walked through our home, I nearly giggled with delight to find NO upper cabinets in the kitchen!! All the things everybody else hated about this house, we either loved or were completely ok with, having grown up in similar houses. I can't wait to see your final product!
ReplyDeleteIt looks fabulous! Are you putting shelving on either side of the window? if so, just make sure you consider the door swing on that corner cabinet. Made a similar mistake myself once ;)
ReplyDeleteBased on what little I know about you (from just following your blog), I have faith that you will have it all done long before the holidays! I look forward to following along with your progress!
I was thinking the same thing (about the shelving to the right of the window, next to the corner cabinet). : )
DeleteLooks fabulous already, though, so excited for you!
When I took down the horrible wall tile in one of my bathrooms I had to use a sledge to break it all off the wall piece by piece. Then after I did that I had to sand the heck out of the wall to get it even, then use drywall mud to even it all out. It took a ton of work and in hindsight I don't think it was worth it. I would recommend just cutting it out. At least it's just a small area. In my bathroom the tile went up about 7 foot wrapped all around so I didn't want to replace all of it for financial reasons. If you can use backer board behind any tile you put up in the future. It makes it sooooo much easier to remove if you want to change it up later.
ReplyDeleteWhat if you moved the single panel door to the middle - so there were double doors on either side. It might help balance the wall out. Just a thought!
ReplyDeleteI have been waiting for you to do this. Mostly because I want to do this to my own kitchen. I just wanted you to go first! I always love the end result of your projects. But, I must say my favorite is watching the process. Thanks for sharing! I'm so excited! Lol !
ReplyDeleteI've been following your kitchen for a while! I am so excited for you!
ReplyDeleteI am really wanting an appliance garage to hide away all the "counter-clutter" in my own house! I hope you do a tutorial on adding one :)
Gonna be fabulous. I actually don't think the new end cabinet looks bad. If the difference bothers you eventually you could add a glass door or take the door off for more open shelving. Double would be a pain to get into. As for the tile. The first time, they pulled ours off and patched...but the second time around we had them take it down to the studs and re-drywall...mostly because we wanted to add under cabinet lighting...hence could hide all the wiring. Trust me...while it sounds daunting it was a lot less mess!!!!
ReplyDeleteI'm the crazy one that prefers the cabinets the way they were. I probably would have painted them and that would have been it. I've read so many blogs that went with the shelves vs. cabinets and regret it later due to kitchen grime and dust getting on the dishes. I guess I prefer function over looks and trends. Either way, I can't wait to see how your kitchen turns out, I've loved everything you've done over the many years I've read your blog.
ReplyDeleteI also liked the cabinets...but then I know open shelving in my home would be a crowded disaster and more of a time sucker trying to keep them organized. :) I'm sure yours will look great...more space than I have.
DeleteI love the EAT sign! excited to see the end result!
ReplyDeletexo Ellen from Ask Away
www.askawayblog.com
Since you are painting your cabinets anyway, why not add a piece of moulding vertically to the center of the one-door cabinet? It will mimic the two-door cabinets, but still function as it should (and at a fraction of the cost!)
ReplyDeleteDon't waste time and energy removing the tile. Cut and remove as much of the drywall as you can with the tile on it. It will have to be replaced anyway. Been there done that.
ReplyDeleteI managed to remove tiles above a sink in a 1970's bathroom with a small scraper and small hammer. It was really easy and the scrapper did not damage the wall.
ReplyDeleteIt must be something in the air...I just "reset" my kitchen. I was tempted to take the cabinets down but choose to "pop" them up and put floating shelves underneath. I just posted a tutorial on building floating shelves in different areas...I'm not a big fan a bracket shelving...http://beckwithstreasures.com/journal/2015/8/16/floating-shelf-tutorial
ReplyDeleteVery helpful in areas that do or do not have studs. My suggestion for the tile, after having done it a time or two...just cut through the sheetrock above and below the tile and then rip it ALL out...sheetrock is not hard to replace! But taking the tile off piece by piece is a booger and you will still probably have to replace it. I would say use a reciprocating saw, but there is too much wiring and piping in kitchen walls and you may hit something. You can use one of the little electric saws (like a Dremel) as long as your blade is no more than 1/2" deep so that you don't risk hitting electrical or plumbing...but I would still turn off the power JUST IN CASE! Good luck...I look forward to seeing your kitchen. I hope to share my reset in the next week or so...just waiting on trim!
Did you say where the microwave will end up going? Not worried...I know you will make it work:)
ReplyDeleteWaiting with bated breath to see the uppers and vent hood! Considering doing a vent hood myself.
ReplyDeleteYAY! Sarah, I'm so glad you joined the "get-rid-of-that-left-cabinet-next-to-the-window" club! Doesn't it make a HUGE difference in the space?
ReplyDeleteNot sure if you checked out my upgrade, but I DID do an outside vented range hood on my upgrade....LOVE it! It wasn't hard to do. The hardest part was mounting the ducting to the outside on our vinyl siding (house). We actually hired a siding/roofing company to do it right, but we ordered a higher-grade outside vent cap than what you could buy at Home Depot/Lowes.
Here's a few links:
http://www.justtherightsize.net/2015/04/ducting-and-wall-vents.html
http://www.justtherightsize.net/2015/05/back-in-range-hood.html
BTW, I also wanted to say we took down the drywall with our old tile too...previous owners used Liquid Nails as well. What is UP WITH THAT?
ReplyDeleteAnyway, putting up replacement drywall is very easy; you'll do fine. It's extra work, but you'll have a level and solid surface to tile on.
So exciting! I have loved seeing this kitchen project unfold. It's fun to see all of the pieces coming together, and even more inspiring that you do 99% of the work as DIY.
ReplyDeleteMy husband fixes walls for a living and he has removed tons of tile and mirrors that were glued to walls. He says to use a 6" plaster knife and a hammer and get behind the edge of the tile and gently hammer the handle of the knife. It will probably destroy the face paper, but he says that is okay. Just make sure to cover your range with a blanket and some plastic to protect it from flying pieces of tile. After removal , be sure to seal the drywall with a primer sealer or a white pigmented shellac. Then you can float the wall smooth without the fear of it blistering. By the way, everything looks great!
ReplyDeleteIf you put open shelving on the right side of the sink, how are you going to open that cabinet you just installed? Maybe leaving the corner cabinet would have worked better. You could add open shelves that adjoin it.
ReplyDelete