
How to Create Custom DIY Built Ins With Stock Cabinets
August 28, 2020
Share this
How to make your own built in cabinets using inexpensive unfinished options from the hardware store.
You can create a gorgeous, custom wall of DIY built in bookcases by using
these easy tricks with basic kitchen cabinets!

If you've read TDC for awhile, you know how much I love a good wall of
built ins. I think they create so much character without spending a ton of
money, and you get all that glorious added storage.
Thing is, there's no need to build the whole thing from scratch. You can
create a really custom look with unfinished stock cabinets as your base for
the project.
This means when you get an idea to add some storage, you can do it immediately
with in stock cabinets from the hardware store.
There's a little trick to it though!
I have a go-to for almost all of the built ins and bookcases I've built over
the years. Read on for all of the info!
This post may contain affiliate links for your convenience.
I may earn a small commission when you make a purchase through links.
See my policies and disclosure page for more information.
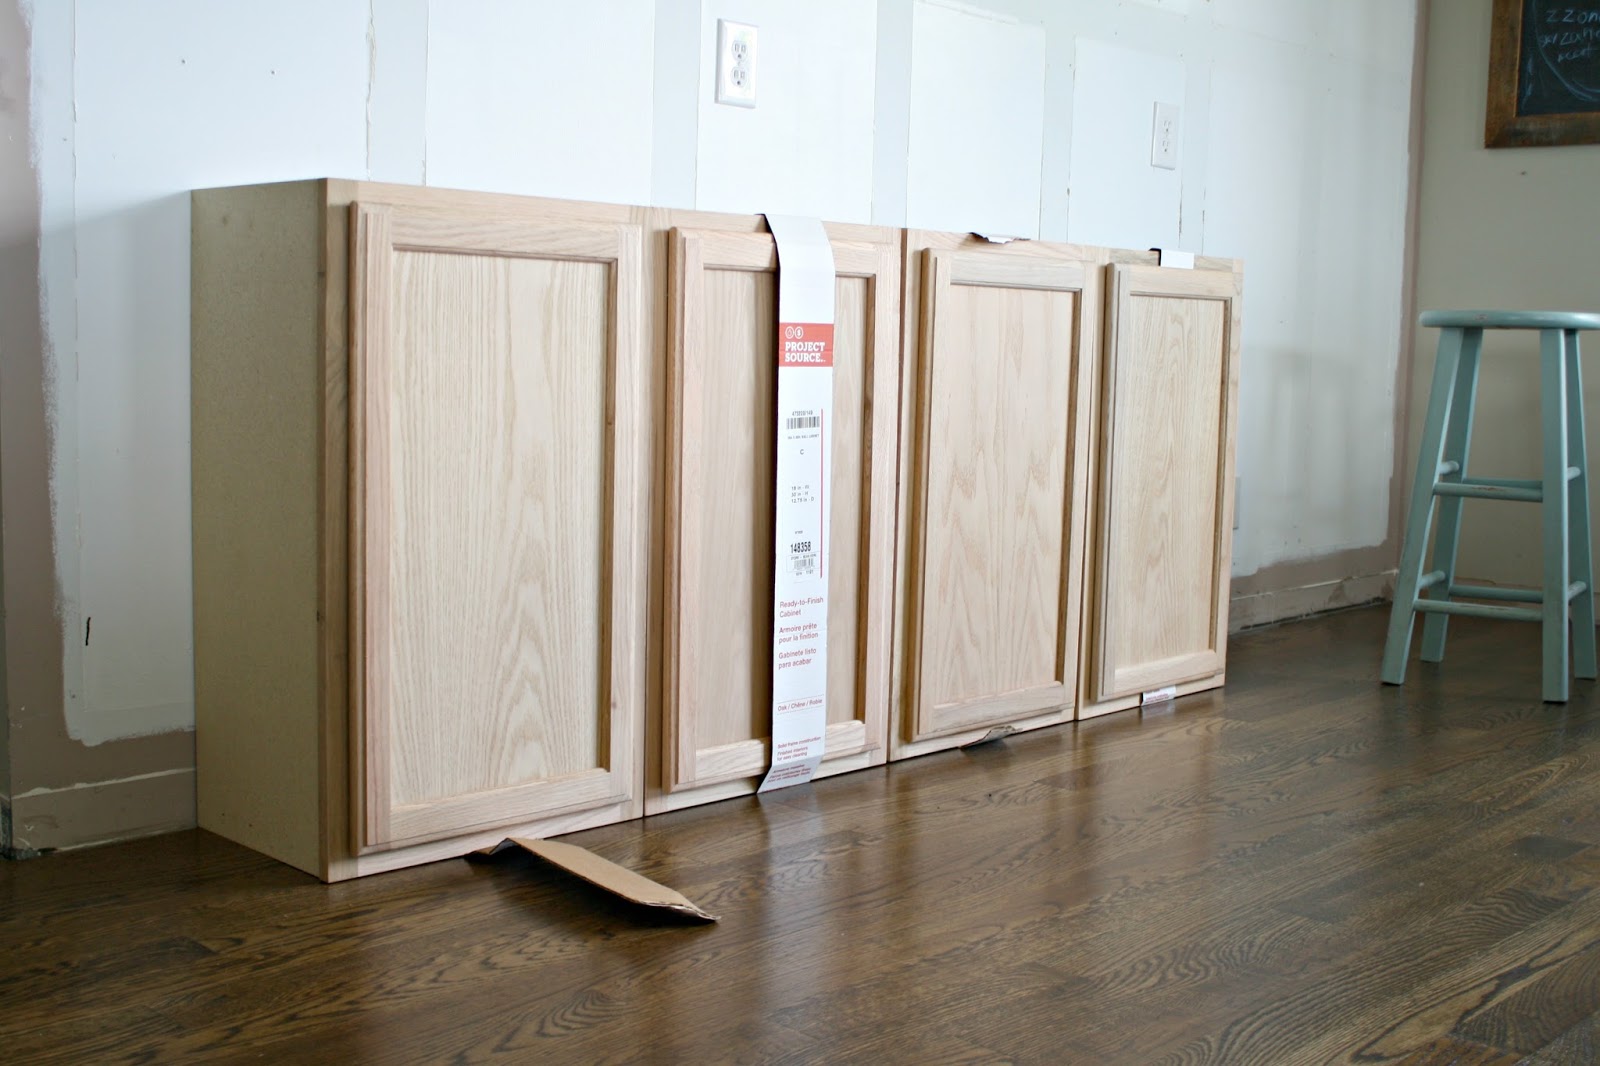
Why I use wall cabinets as my built in bases.
Instead of bottom cabinets that you'd find in a kitchen or bathroom, I use the
uppers only.
I use upper/wall cabinets for a few reasons:
- Upper cabinets don't have the top drawer that most lowers have (which makes it look more kitchen-like). If you want a deeper base, drawer units would work great instead of door options.
- Wall cabinets are generally cheaper than lowers.
- They don't take up nearly the space regular base cabinets do because they are half the depth.
Upper cabinets are only 12 inches deep, vs. the 24 inch depth of most base cabinets.
You can walk into almost any large hardware store and pick up what you need
right there. These are
the unfinished cabinets I usually use:
This post may contain affiliate links for
your convenience.
See my policies and disclosure page for more information.
The other bonus is they come in a few different widths -- so for most walls
you can find a configuration that works and just line them up to create the
base for bookcases.
Where can I find prefab or stock cabinets?
I have found the most inexpensive unfinished cabinets at Lowe's, Home Depot
and Menards.
The design at all three locations is pretty much the same, but sometimes they
vary just enough that you would notice if placed right next to each
other.
I recommend purchasing all of your prefab cabinets from one location for a consistent look.
Ikea has great options that come in various colors -- you'll just have to
match the color to the rest of your built in bookcases.
You can also find great cabinet options at Habitat Restore locations! They
sometimes want the whole set to be sold together though, so if you're working
on a smaller wall it may not work well.
I had great success with the unassembled cabinets from Home Depot for our
basement kitchenette. You can
compare all of the different kinds of store bought cabinets here.
What tools will I need to build my own custom cabinet bookcases?
The must haves for this project are a quality drill, level, stud finder and nail gun.
You can get away with not having a circular saw, as many hardware stores will cut the wood for you.
You'll need to have a detailed plan of your measurements and cut list if you have someone else cut your lumber.
If you take your time and build in sections, the cutting is not unreasonable. I've built many DIY cabinet units without a saw at home!
How to prep unfinished cabinets to make them look custom.
The first step to making kitchen uppers look like built ins is raising them up
a bit. If you just install them on the ground they won't look as built
in.
I use 1x4s or 2x4s and nail them into the sides around the bottom of the
cabinets:

Actually, the size of the wood will depend on the height of your current
baseboards (or the height of new ones you may be installing):

The center piece is for added support.
To make these look custom, I cover the bottom with baseboards and this DIY
base pulls them up off the ground so that's possible.
How to install base cabinets.
I find base cabinets much easier to install than uppers. It takes patience but
all you'll need are a powerful drill, shims and good cabinet screws:
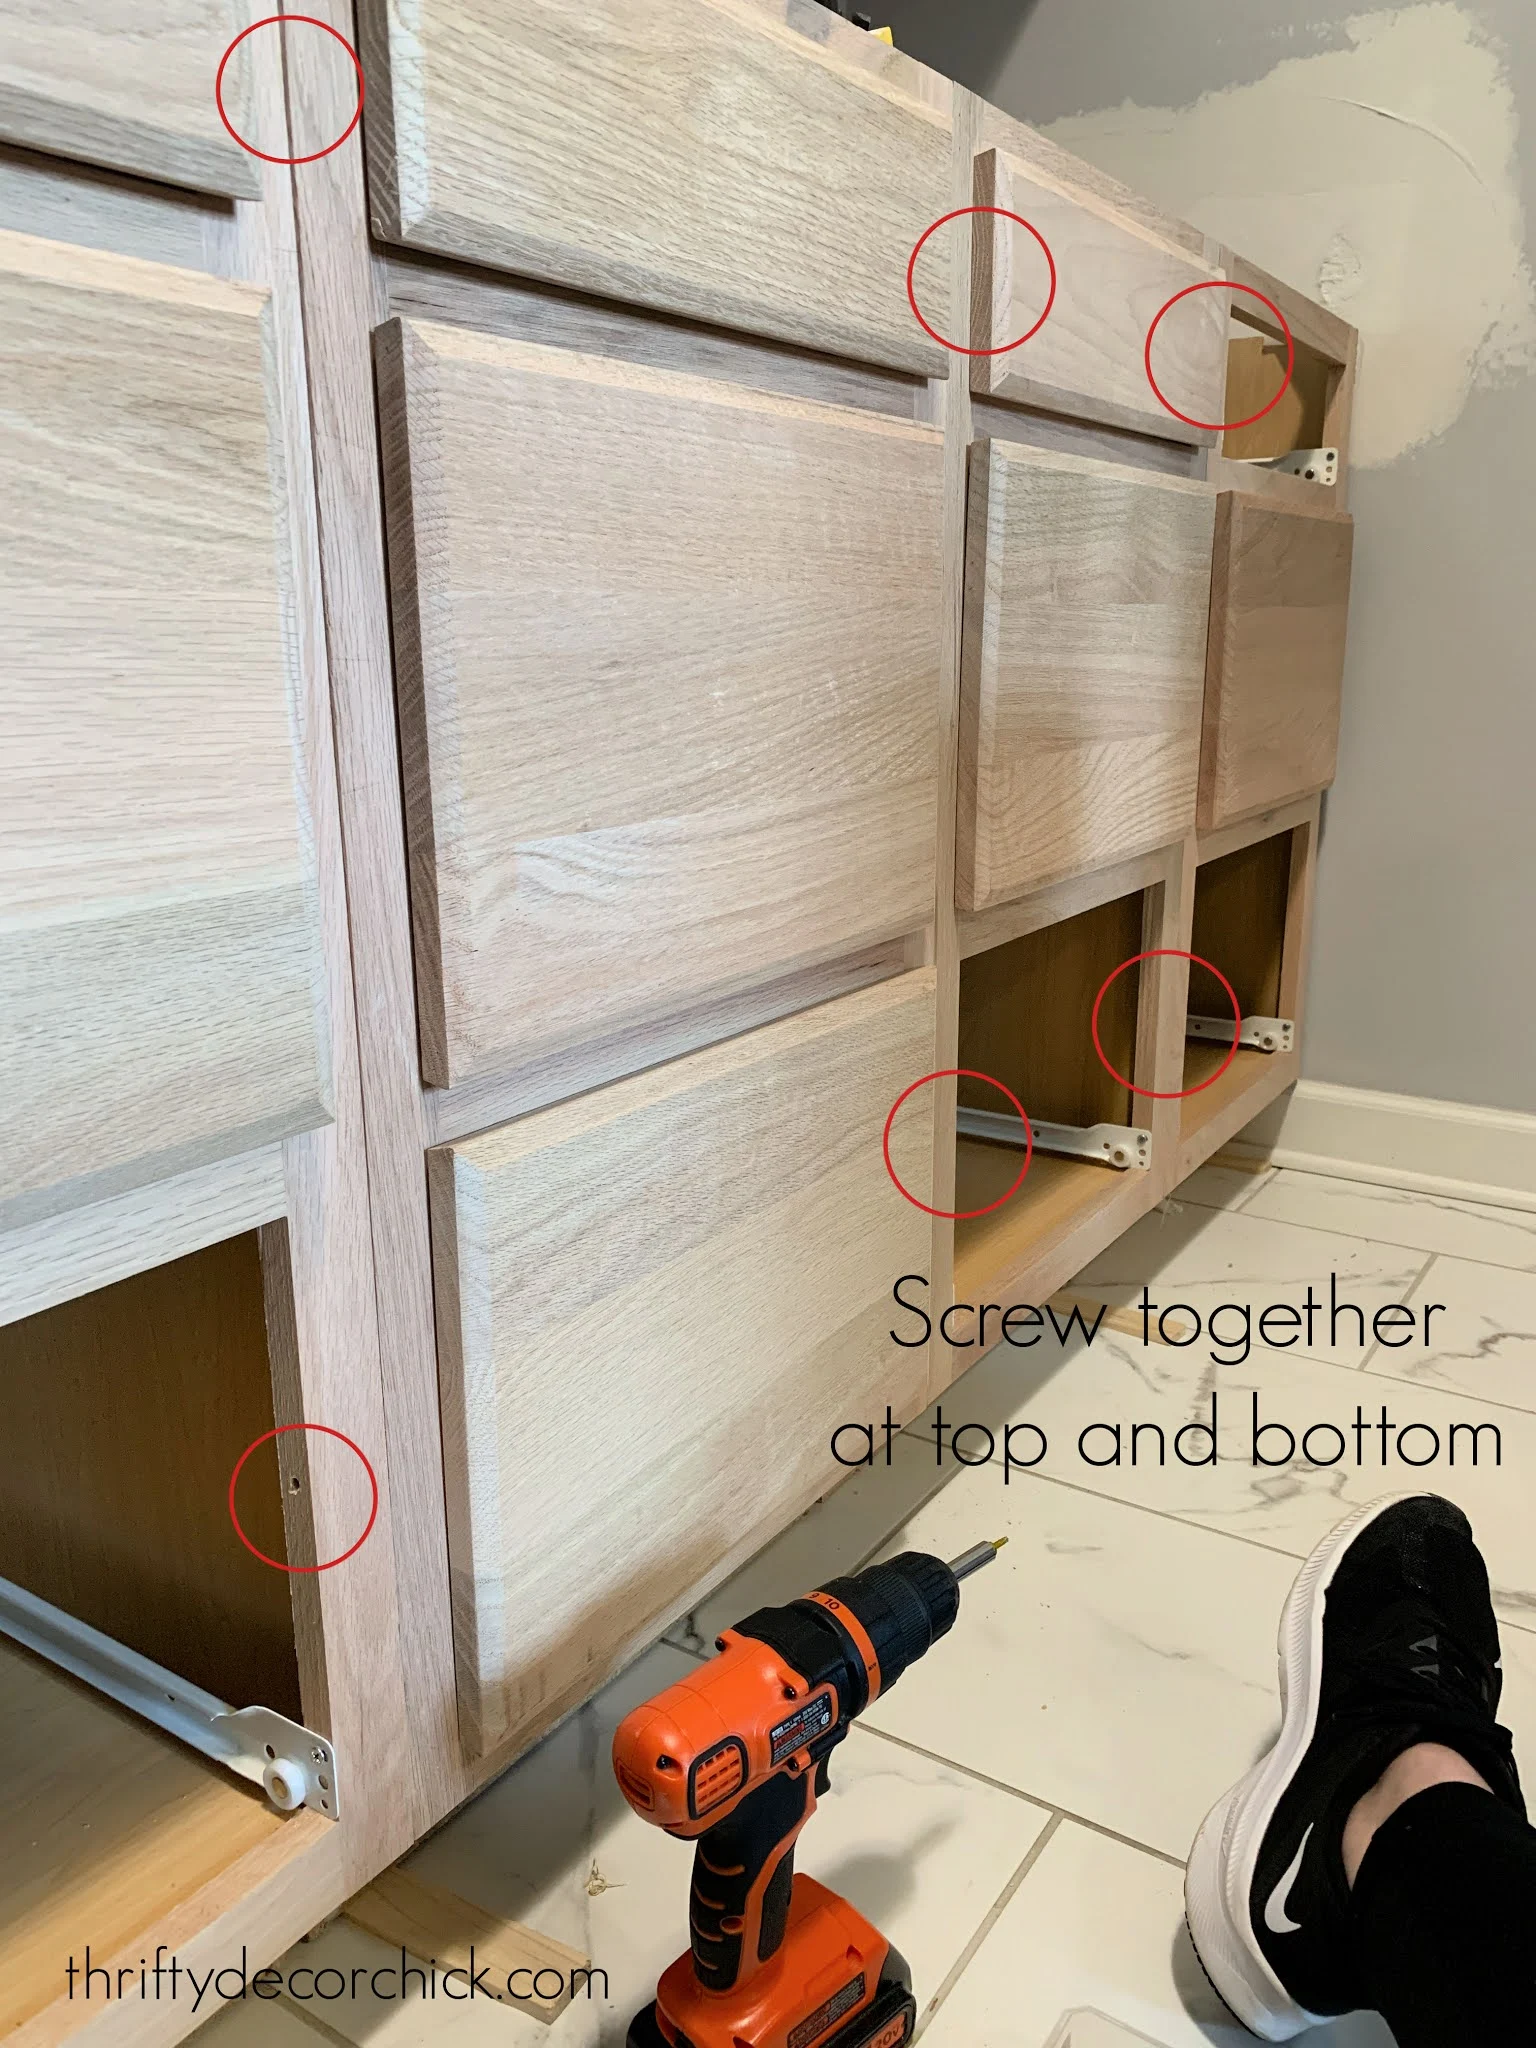
You can read more about the steps for base cabinet installation for built ins here and a few
more cabinet install tips here. Those posts explain everything in more detail.
What should I use for a countertop on the DIY built ins?
You can pick any traditional countertop -- granite or laminate counters look
great on bookcases!
I prefer to go a more inexpensive route and either use
butcher block wood counters
cut down, or
create the look of wood counters
myself. :

I like that a wood countertop adds some warmth to the bookcases. Someday I'd
love to use a honed marble or soapstone though.
How to build the bookshelves in your DIY built ins.
This part isn't as hard as it looks! You can use standard 1x12 boards for your
upper shelving, or have a sheet of plywood cut down to the sizes you
need.
I shared how to
build the shelves in your bookcases in three steps here. That tutorial includes all the steps to finish the upper shelves of your
bookcase built in.
Adding the details to get a custom look.
When you add the base and then some
simple trim on the sides of the cabinets, you're finished product will have the look of custom cabinetry:

Of course the wood butcher block counter offers some nice contrast and makes
it feel even more custom:

Adding crown molding to the top of the cabinets
is another way to create a higher end bookcase:

Adding the "jewelry" to your built ins is the perfect finishing touch!
Installing pretty knobs or pulls to your cabinet doors adds some nice contrast and beautiful
detail:

Examples of how I've incorporated these DIY built ins in our homes over the years!
A wall of stock cabinets in our old loft gave us SO much storage space for
craft and office supplies:

You can see more of that
craft room/office/loft space
here!
This built in was in our
dining room turned library
and I've shared it a million times. I easily saved a couple grand by doing
this project myself.
The inexpensive cabinets make it a really affordable project!:
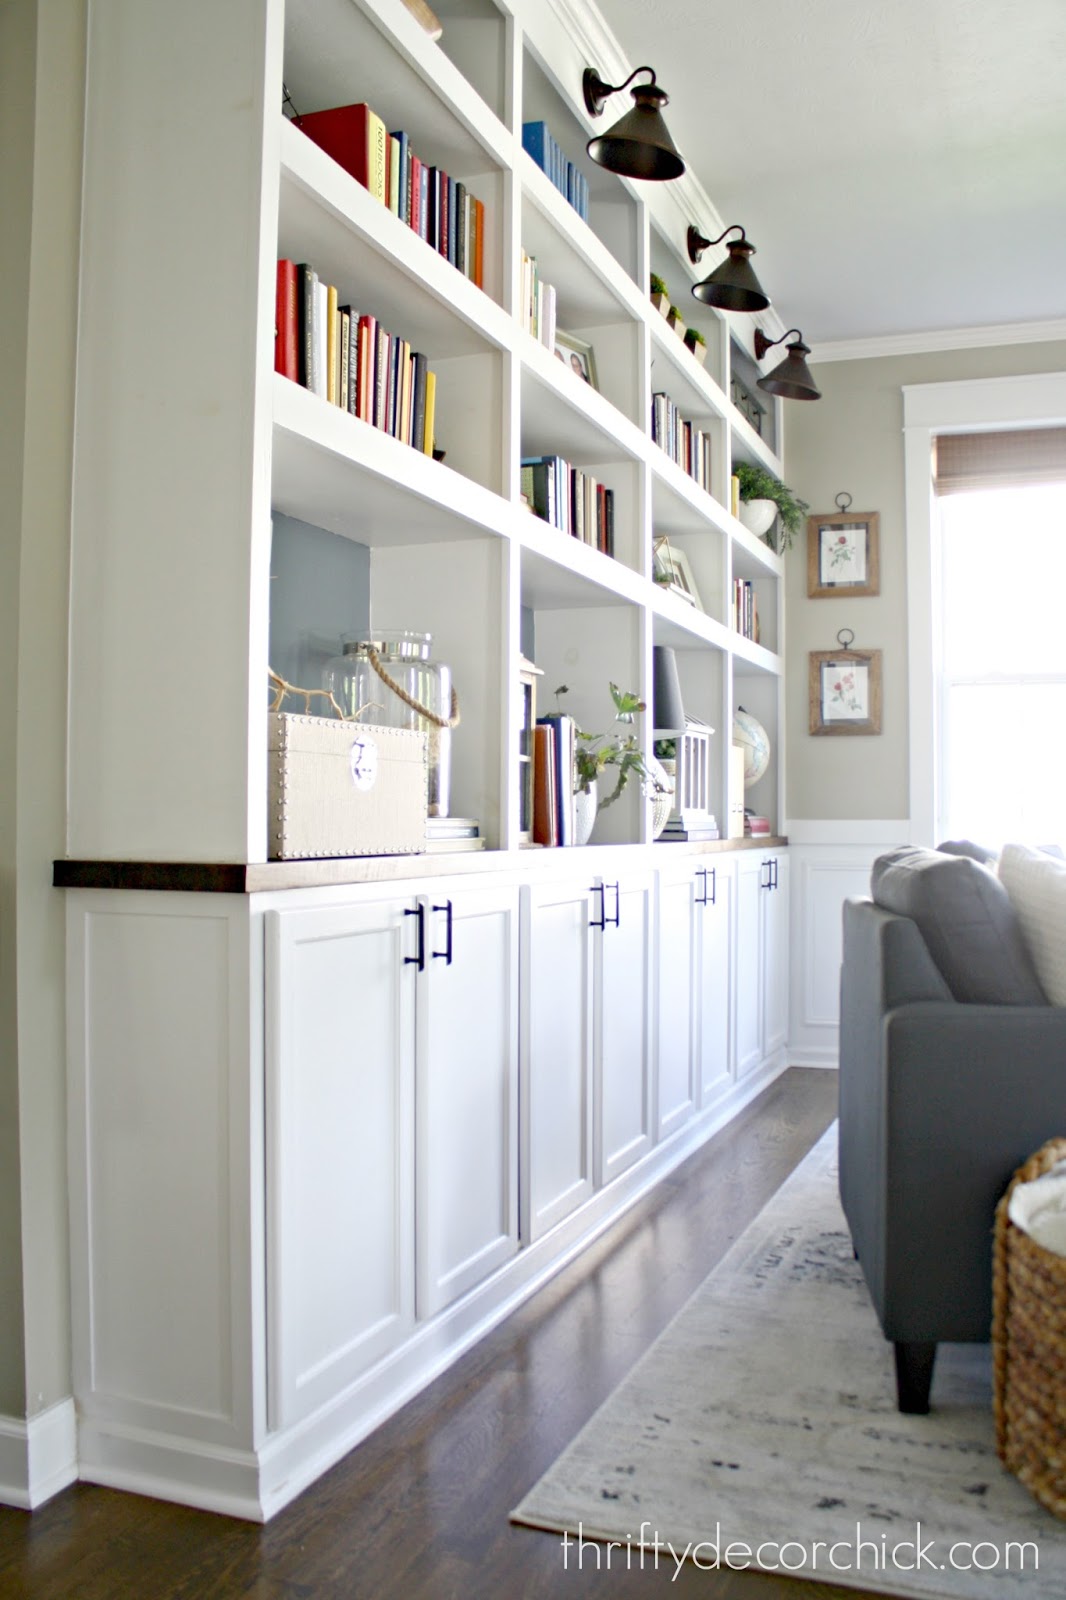
It is truly the best combo of form and function -- those cabinets are only 12 inches deep but they hold a ton! (Think of how much they hold in your kitchen.)
I used the upper cabinets that go over a fridge for our mud room bench:

And my first project with these was another project I did with my Dad for my
son's bedroom:

I have Dad to thank for this idea -- he's the one who thought of it for this
room and I've kind of taken off with it over the years. :)
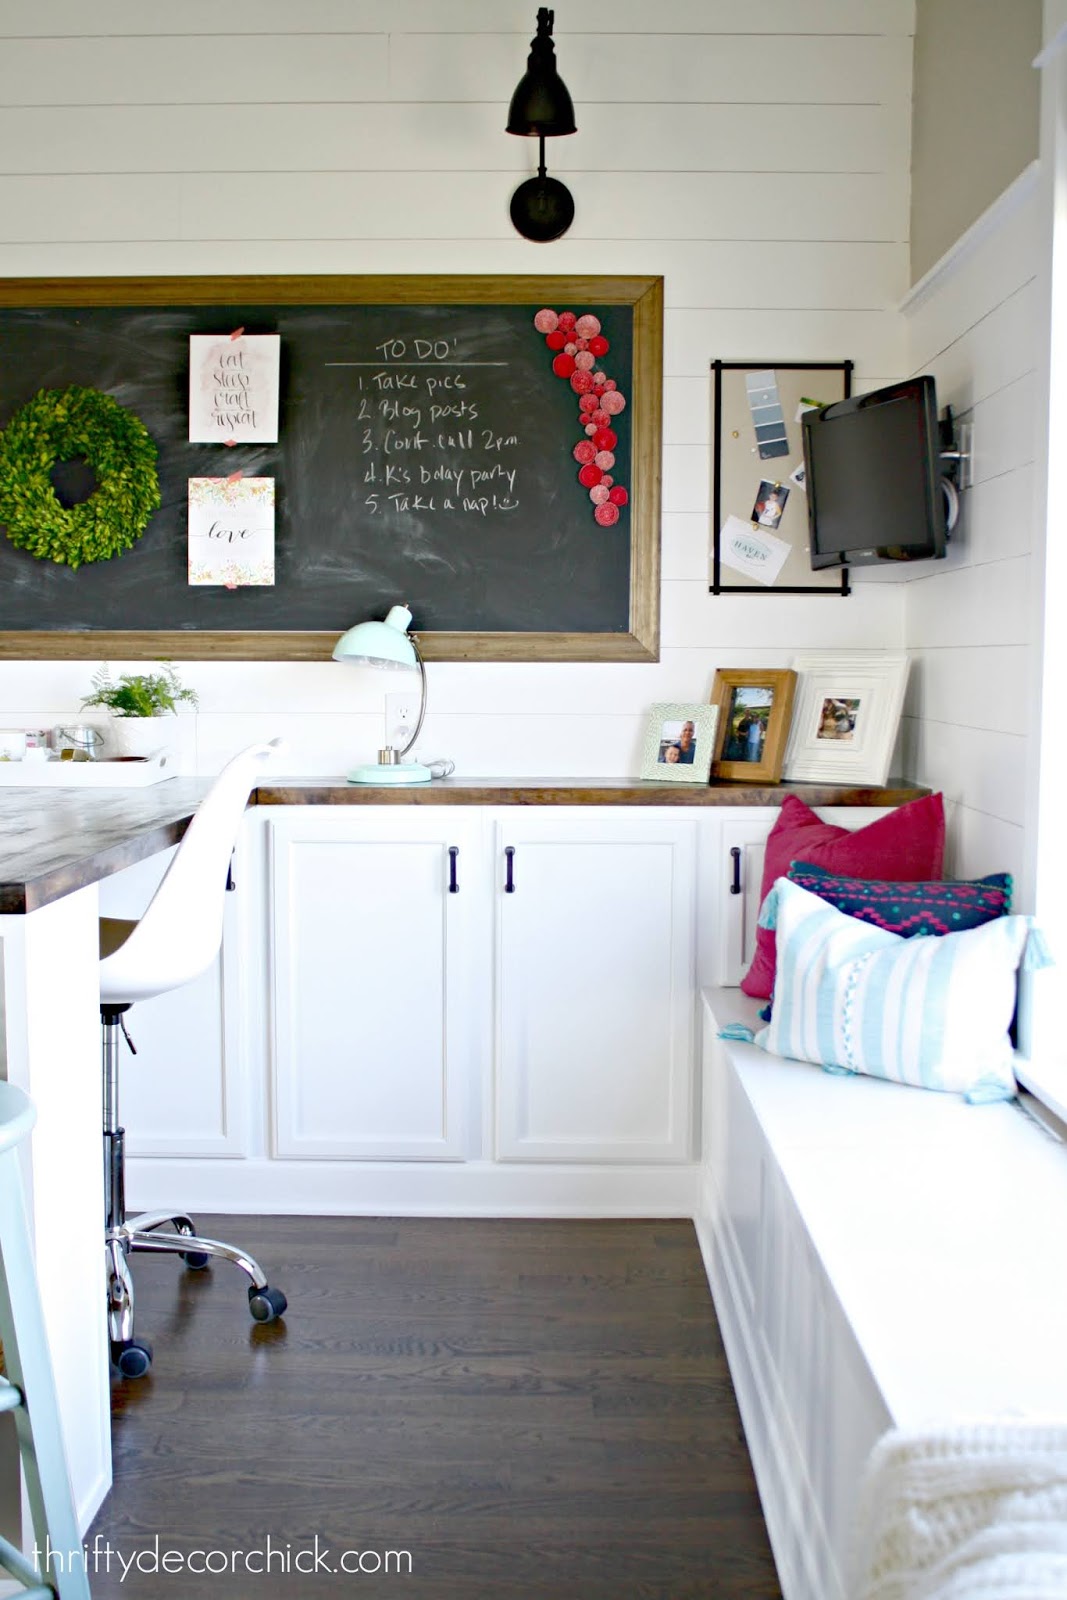
I used those same skinny, upper cabinets for the bases of
my green office built ins:

And the 18 foot wall of
stock cabinets turned gorgeous media center
in our basement!:

Have you tried this trick to build custom built ins or bookcases? They work
great as storage in offices or pantries, laundry rooms, or as built in
entertainment centers around a TV.
You'll save a significant amount of money doing it yourself compared to what a
contractor will charge.
I'm thrilled with how they look in our home and I'm sure I'll add more in the
future!
You can shop some of the items from these rooms here:

PIN THIS ONE FOR LATER!:

Never miss a post by signing up to get posts via email.
Love this idea! The mud room is my favorite!
ReplyDeleteOne of your signature moves! ;)
ReplyDeleteWe did this in our first home as well (also with upper cabinets) and loved the results! TFS! http://www.lifeinyellow.com/2012/06/bookcase-bliss-the-final-reveal/
ReplyDeleteWe used IKEA refrigerator cabinets as a very long built in bench in our playroom. I didn't put on the doors b/c I wanted it open for baskets. It worked perfectly.
ReplyDeleteBrilliant idea!
DeleteI also used refrigerator cabinets (2 36" sets) to make a window bench in my kitchen. I made a plank top from 1x lumber. People think it's a 'custom' piece, which I guess it is, but a diy custom :-) It does add a lot of storage (perfect for my cookbooks and less used kitchen stuff), and is awesome as some extra seating for guests. I created the lifted base from 2x4's (for more support for sitting), and added 1x across the top to support the planks. I didn't want anyone to feel insecure sitting on the bench. Instead of baseboard, I painted the 2x4 base flat black, and made curvy 'feet' shapes to make it look like a free standing bench - the black base recedes and you don't see it. I did something similar on my island. It's amazing how useful those humble off the shelf cabinets are!
ReplyDeleteCan you send me a photo? Love this.
DeleteI really like this. Where do you go for butcher block tops?
ReplyDeleteMy favorite place to get them is IKEA! You can also find them at Lumber Liquidators and search for local lumber suppliers.
DeleteSorry I missed this! You can find them at any big box hardware store. The price depends on the size -- the larger ones for our bookcases were about $100 each I think? I use semi gloss or satin for cabinets. I shared how I painted our kitchen cabinets here: http://www.thriftydecorchick.com/2015/11/the-epic-how-to-paintyour-kitchen.html
ReplyDeleteHello Sarah! I am trying hard to make this a reality in my home. We also have a formal dining room that I want to do this to. I noticed in your last home, you added a bigger space for the bottom shelf and the rest of the shelves the same size but with your new ones, you made the shelf spaces all the same size. Do you have a preference and why?
ReplyDeleteWe had a thermostat and light switches I had to work around at the old house. It was either a larger bottom shelf or more, smaller shelves. (I wanted to make sure there was plenty of air circulation around the thermostat.)
DeleteI showed my husband and he still says NO! "I'm not a carpenter" he says. I swear, I'm just going to hire a carpenter to build me my bookcases it would look so much better in our family room. Thank you for great ideas!
ReplyDeleteI love the look of the lowers with the bookshelves on top. I was curious what you used for the bookshelves on top of the butcher block?
ReplyDeleteHi, Did you build the shelves that are above the cabinets or were they pre-made bookcases that you just repurposed. I SO want to have this done in my livingroom! TY
ReplyDeleteI never thought of using the uppers. They look great. Getting ready to install in my daughters house. Thanks for informative article.
ReplyDeleteHi - Thank you for sharing! What did you use for the upper trim pieces for the bookshelf? I love the look of the thicker trim.
ReplyDeleteYou can use a 1x2 or 1x3 -- whatever really, just depends on how thick you want the fronts to be. :)
DeleteI love what you've done here and may run with these ideas in place of pricey built-ins. We're not carpenters, either, but... if you can do, I can do it. lol Thank you!
ReplyDeleteHow did you install the light fixtures to some of these?
Thank you Felicia! You can find more about those lights here!:
DeleteInstall Lights Anywhere
How did you build the shelving above the cabinets? Did you use pre-made bookshelves or did you custom make them? I love this look and want to try it for a walk-in pantry
ReplyDeleteHi Sarah! I love our creativity. Could you tell me the paint color of your basement cabinets? I think it's perfect.
ReplyDeleteThank you!! It's called Westchester from SW!
DeleteHi! How did you do the uppers of the bookcases. We’re you able to find a pre made unfinished product that worked for you.???? Thanks!
ReplyDeleteThis is genius and I’m copying. I got the cabinets and the front is a bit bigger so when you place them next to each other there’s a gap. Did you do anything to cover or fill in the line between cabinet boxes? Is it just secured to the base with small gaps in the middle? Do you caulk the front edges where the 2 boxes meet? Thank you! Would mean so much to get your advice
ReplyDeleteHi! Can you share the paint color used on your tv surround (w shelves and bench)?
ReplyDeleteThat's called Westchester Gray by SW. :)
DeleteThe inside of the cabinets you use …..in the description, it says they are maple laminate, not wood. I want to paint the entire cabinet/bookcase. How does painting the laminate turn out?
ReplyDeleteYou'll need to use a really good primer like Kilz first, but in my experience laminate doesn't hold paint well long term.
DeleteHi! This is amazing! I couldn't find the link for the base cabinets with drawers you used. can you please link them here. Thanks in advance. :)
ReplyDeleteI would also like a link to 12 in. deep cabinets with drawers.
DeleteThis is truely amazing, my husband and I put the built ins in 3 days . It was easy and looks great. Keep the easy tips coming. Thank you so much.
ReplyDeleteNew to your site and was looking for the links but I may have missed it. Curious what depth of uppers you typically use? Thanks for showing images of the base!
ReplyDeleteUppers are typically 12 inches deep, that's what I use!
DeleteHi, looks beautiful. Was wondering what height upper cabinets you used?
ReplyDeleteThank you! I believe most of mine are 30" tall, but you can use any height you'd like!
DeleteHi! I really love you ideas. I was wondering. Did you removed the pre existing baseboard when you install the lower cabinet? I am about to build my cabinet but I don't want the hassle of removing my baseboard. Thank you!
ReplyDeleteIf you are mounting the 2x4s inside the cabinet frame to lift them off the ground, there will be a gap equal to the width of the cabinet frame when you try to install the baseboard molding. How did you account for this? My cabinet frame is 3/4 inch thick, how can I install baseboard? Most baseboard molding is not 3/4 inch thick. Thank you so much for responding.
ReplyDeleteI usually use some scrap wood at a few spots along the base to bring the new baseboards flush with the front of the cabinets. I believe it's usually 1/4 or 1/2 inch of space to fill. (No need to do the whole length, just a few spots will do.)
DeleteUnfortunately the link to the prefab base cabinets is broken because the product doesn't exist anymore. I couldn't find any like them at HD or Lowes - they all have a riser at the top.
ReplyDeleteI fixed the link above! They are still available, but you don't want base cabinets, only uppers for this tutorial.
DeleteHello.. awesome work and we are envious of your talent.. what did you use to add the bookshelves above the cabinets to complete the wall unit?
ReplyDeleteHello and thank you! I shared a link to that tutorial under this subheading in this post: "How to build the bookshelves in your DIY built ins." That should answer all of your questions!
DeleteHoping to do a similar project! Deciding on tv, do you mind sharing what tv size you used?
ReplyDeleteHello! Can you share the paint color you used for the built in in your basement?
ReplyDeleteSure! It's called Westchester Gray (by Sherwin-Williams).
DeleteHi, I built the built in’s with Lowe’s stock kitchen cabinets and they came out beautiful. Thank you so much for the idea. I’m looking for ideas for a walk-in closet, any ideas?
ReplyDeleteHi can you tell me what cabinets you used for the green built in bench around the media center? They’re deeper and it’s the effect I’m hoping to get on my build.
ReplyDeleteI used cabinets that usually go above appliances, like over a fridge. Or at the top of upper cabinets. With the base underneath it brings them up to a bench height. :)
DeleteHow did you attach the counter top / butcher block when using the uppers? They do not have the open top like lowers for the counter top attachment brackets.
ReplyDeleteI use screws up through the top of the cabinet into the bottom of the countertop. With that and the weight of the shelves, they don't budge!
Delete