
How to Add a Bay Window Seat in the Kitchen
February 03, 2015
Share this
How to add a bay window seat in your home!
My dream? It’s always been a window seat. Ever since I was a wee one at 20 years of age – I’ve looked at them in magazines and on TV and I. loved. them.I have a couple spots in our house where we could potentially build a seat one day, but when we changed things around during our family room reno last year I found a spot that would work even better.
I knew it would be perfect and would be extra seating and would look like it was always meant to be there.
Our bay window in the kitchen was that perfect little nook for our first window seat. The first phase was to remove the old back door that used to be in between the windows.
While they were at it I had some wall sconces added since that area can get really dark:

It sat like that for the past three months. I didn’t even paint the trim because I was so busy. I lie…I knew it was going to take forever so I ignored it. :)

It sat like that for the past three months. I didn’t even paint the trim because I was so busy. I lie…I knew it was going to take forever so I ignored it. :)
But last week I finally started the painting and then at the end of the week this started as well:

If you remember I mentioned last week that our plans for the kitchen island changed a bit. Those changes resulted in a HUGE savings – the budget for the island was cut in about a third.
So when the handymen said they would build the seat for $300, I said DO IT:

I planned to do this myself but I am hosting a shower this weekend (the extra seating will be wonderful!!), I don’t have a table saw and it would take me about a month to do this on my own.
And goodness…sometimes it’s nice to have help. They framed it and put the plywood face on – and were done in less than a day.
We used scrap two by fours that I had for the frame and some other scrap wood I had for the inside of the seat. I also had them extend the outlet so we could still use it.
Most of it wasn’t too complex – but the top piece did take some precise cutting. I was impressed that they got the front perfectly flush with the wall so the baseboard flows seamlessly. And they had to build up the inside of the bench so the lid would support a few human beings. :)
They added two piano hinges for easy access to the storage space inside.
When they left my work started. Here’s how it looked (I had already started all the trim and painting on the walls last week:

I added the beefed up baseboard first – I do it this way so the vertical boards (the board and batten around the room) have something flush to sit on.
I also added a board across the top on the front of the bench:

Next up came quarter round and primer:

It was starting to come together!

Next up came quarter round and primer:

It was starting to come together!
I finished up the NINE coats of paint on the windows (three per window – I actually need to do one more quick coat on the fronts of the trim):

Next I sanded and caulked everything and did a coat of semi gloss white all over the seat.
The last step was to add the rest of the trim to the front and along the top of the white on the walls:

I actually have one more coat to do on everything and a little more caulking but I was pooped at midnight last night and had to stop.

I actually have one more coat to do on everything and a little more caulking but I was pooped at midnight last night and had to stop.
If you have a straight window with no odd angles, this window seat build would be even easier to DIY!
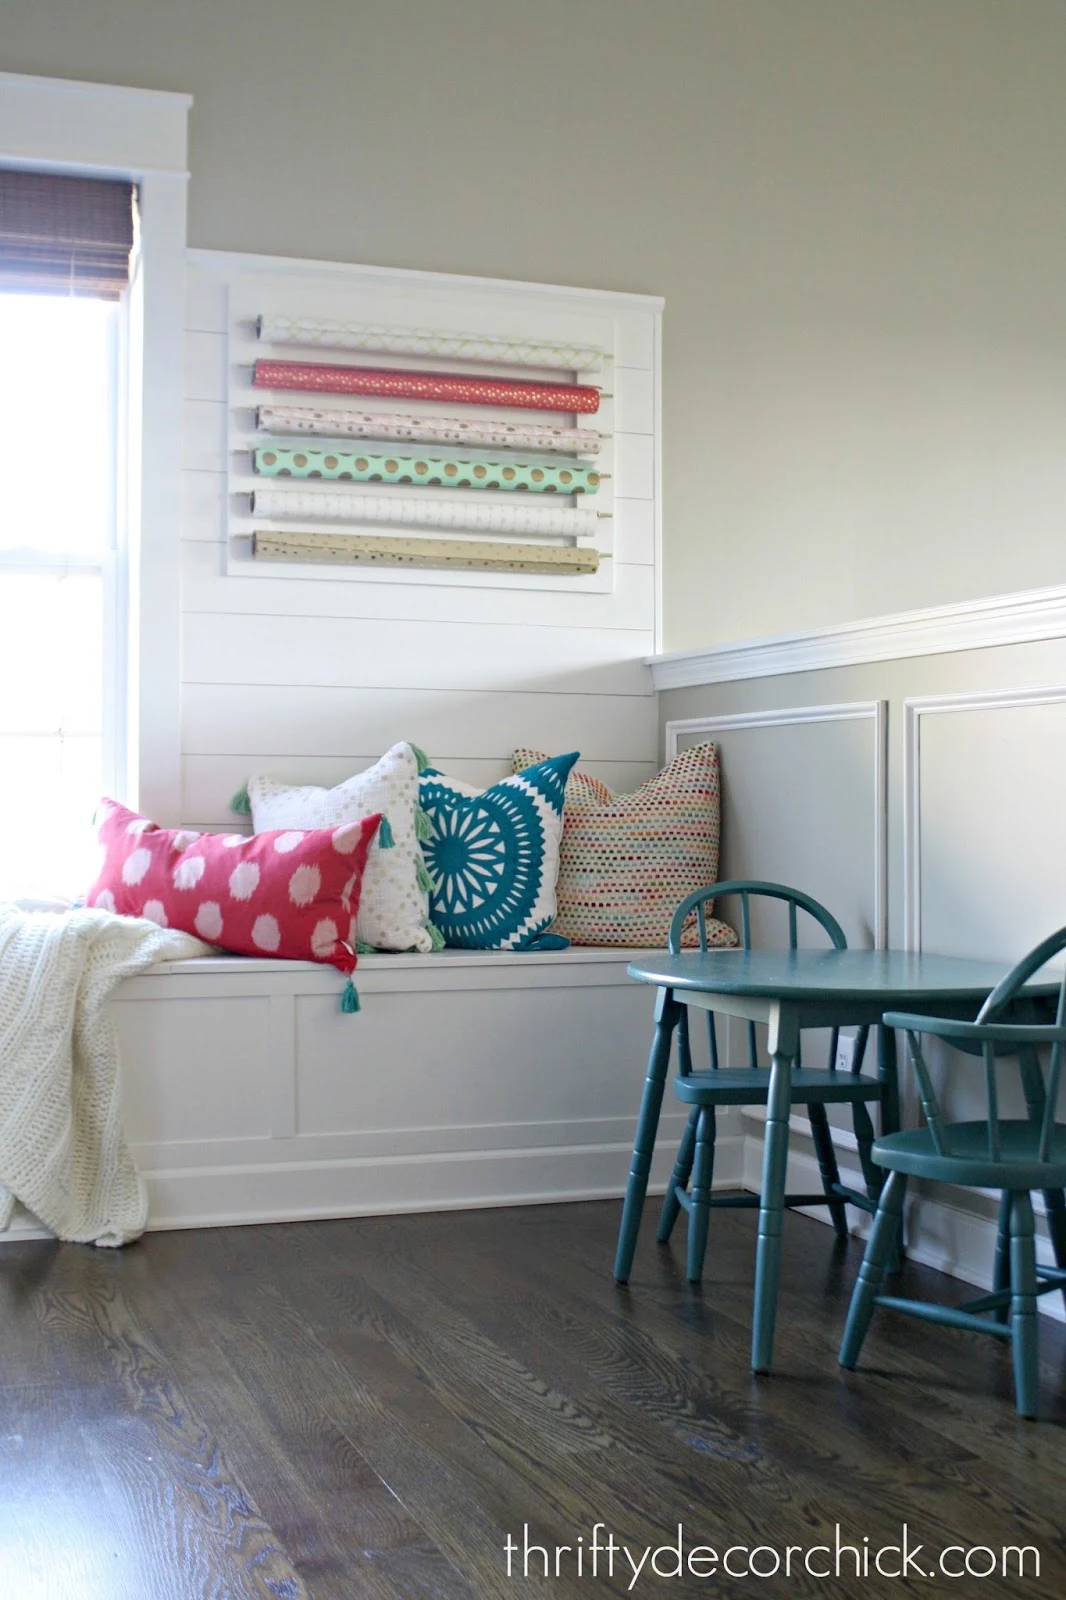
I put some throw pillows on here just to show how GREAT that white will look with some color!:

Oh, and I still need to put some trim around the edges on top to hide the small gap along the walls. I am making myself finish all these details before I can start on the island. :)

Oh, and I still need to put some trim around the edges on top to hide the small gap along the walls. I am making myself finish all these details before I can start on the island. :)
And of course eventually there will be a big seat cushion on here as well! It will take me some time to figure out what fabric and colors I want to go with here so that won’t happen for a bit:

It will definitely include some color though! Because this area gets so much sun I’m thinking I’ll have to go with an outdoor fabric.
But for now…isn’t it lovely?? Sing it to yourself:

Every night this past weekend I would stand here before going to bed and just stare at it. I’m not gonna lie, I got a little teary at one point.
Goofy I know, but sometimes it hits me hard that I get to do this stuff in our house. Better than I deserve.
This bay window bench seat looks like it was always there!
Here is it is at night with the lights on:

One more thing to add to my list – a dimmer switch. Oh yes.
Of course in this house I need things to be functional as well as pretty, so the best part is hiding under that top:

BOOM. (Fist pump and explode):

I’ve had my supplies in here for now but finally a spot for all of the basketballs!! Is this heaven??
Actually I don’t know what we’ll use all this extra storage for. It may very well be the basketballs. I can also see keeping the big kitchen stuff like the crock pot and drink dispensers in here. Oh my goodness…the possibilities.
See how I ended up using this great space to store all of our large appliances. :)
I do need to add some safety hinges that will hold up the heavy door though – I think I may have to get something online because nothing I’ve found at the store is strong enough.
There you go…a dream realized. It doesn’t take much for me folks. :)
See this full kitchen renovation reveal:

And more window seats because I love them so much! Our bookcase and window seat combo in the dining room:

We had to extend the vent under that
And the long window seat we added in our craft room/home office:
Never miss a post by signing up to get posts via email.
Just perfect!! I am envious!
ReplyDeleteLOVE it! I have a spot in my house where I would love to add a window seat too.
ReplyDeleteThat is so pretty. I hope you'll post a long shot where we can see more of the room to see how it fits together.
Congrats! It looks awesome. I can't wait to see what you do with the whole kitchen.
ReplyDeleteThat is AWESOME! and I understand why you got teary - it's just really nice to see something come together so well. Nice work! Now...what can I do in my own house with this inspiration...
ReplyDeleteIt looks amazing! What you are able to do with wood blows my mind. The fact that you make it seem doable for the rest of us is all the more amazing. I've been looking around my house trying to figure out where to put some of your board and batten.
ReplyDeleteOh it looks SO GOOD! Like it's always been there. I love it. Wish I had a place for a window seat in my house. I got teary for you...I love it when a plan comes together so perfectly.
ReplyDeleteIt looks so great! As a long time reader, I am so thrilled for you...and so jealous at the same time. ; )
ReplyDeleteAwesomely good girl!!
ReplyDeleteI have a window seat that I pretty much gave up on styling with four kids around...will be looking to see what you do. First off for me is removal of the blinds to let sun and pretty backyard in!
ReplyDeleteLike it was always meant to be! It's gorgeous! Couldn't love it more, nice going.
ReplyDeleteMary
It is fabulous! And yes, I can relate to the tearing up part. Especially since I know you and I had a few similar circumstances growing up ;-)
ReplyDeleteThis is beautiful! I love it!
ReplyDeleteI love seeing how much you love your home and I know from your stories how much your home means to you. And I love that you DIY and still show us little painting ideas and such.
ReplyDeleteThank you!!
Yay! You've been dreaming of this window seat for a long time and it IS perfect there! Love every last little detail of it! Woohoo!
ReplyDeleteLove it. Looks fabulous and can't wait to see once you get the cushion and pillows in there. Knew that this post was going to be about the window seat. I'm with you, have always wanted one. I wanted one badly in our craft room/office, however the window is too low with window cranks right in the way. So instead we have it flanked with bookcases and a nice bench that still has a bit of the effect, but the bench can be moved to access the window cranks. Made the seat cushion and pillows and it really looks pretty. I do still think of putting one in front of our living room window, but it's not a bay and therefore would have to go all the way across.....we shall see.
ReplyDeleteYay! No kidding, have had this same dream since I was a little girl. I totally understand the excitement and even the tears!! ENJOY IT!!
ReplyDeleteBetter than I deserve, isn't that a great feeling? We're still working on Step 2 so things like this are just waiting but it's okay because even though I would love to do things like this (it's gorgeous) I'm okay with waiting a little longer. We'll get there and for now, well I'm still doing much, much better than I deserve!!
ReplyDeleteBeautiful! What a great place to sit and read! And doubles as storage= bonus!
ReplyDeletehttp://madcraftingmama.blogspot.ca/
That is such a great finish! It looks perfect in the space!
ReplyDeleteThis is just beautiful! So nice to have a dream come true!
ReplyDeleteIt is SO FRIGGIN' AWESOME! I love it. And congrats on a dream realized. :)
ReplyDeleteCongrats! It looks amazing. Enjoy it for those of us with no room for one. :-)
ReplyDeleteIt's beautiful and I love all the molding...and the lights! Gorgeous! So happy to hear your dream came true!
ReplyDeleteShelley
Great work! I love the pillows. Can't wait to see once it is all staged.
ReplyDeleteI love it when a plan comes together to make our dreams come true!!! I'm not much of a DIYer and must hire most things done, but the thrill is still there when a project is completed. The window seat is beautiful!!!
ReplyDeleteBertie DeWane
It is beautiful, and looks like it was always there. Enjoy!
ReplyDeleteI'm SO happy for you! You've waited for some time. It definitely was worth every penny of $300 to get that much done. Great job.
ReplyDeleteWow - this looks amazing. Congratulations! You did an awesome jogb.
ReplyDeleteThat's the best part of DIYing, standing back and admiring your work!
ReplyDeleteLooks so, so nice Sarah!
ReplyDeleteSarah, this is absolutely lovely! I am happy for you that you finally have your very own window seat. :) Be sure to test it out with a good book and some hot cocoa. ;) Congrats!
ReplyDeleteI love the trim you added to the front of it! It is gorgeous and oh SO lovely!!:-)
ReplyDeleteThis looks amazing! I can definitely see how it is a dream come true! Love it!
ReplyDeleteIt looks fabulous! We have a very similar doorway opening in our kitchen and now I'm looking at it for a window seat possibility. Although our barbecue is literally right out the door so I doubt the hubby would ever go for it;) When we built a window seat in my son's room we used toy box hinges. They hold up fairly well and do a soft close so no fingers get pinched. We used 2 large ones per lid.
ReplyDeleteLove it! Wish I had a place for a window seat.
ReplyDeleteAbsolutely gorgrous!
ReplyDeleteThat was money well spent. The transformation you've made to that area is amazing. I really appreciate how you push through and complete projects, right down to the shoe molding.
ReplyDeleteDo you plan on having window coverings of any kind?
Marie Claire
I love it! It's beautiful!
ReplyDeleteFrom a fellow Hoosier
UNBELIEVABLE!!!! I'd be in awe too admiring the beauty; you deserve it! Great inspiring idea. :)
ReplyDeleteLinda
Your house is so lucky to have you! I bet it tears up sometimes when it looks at you, too.
ReplyDeleteomg it looks AMAZING! You cracked me up with all the stuff you already have in there! :D
ReplyDeleteLooks awesome! I also love those pillows. Can you share a source?
ReplyDeleteOh my goodness Sarah, this looks amazing!!! I love how it turned out!!!
ReplyDeletethis looks like a beautiful and cozy spot! Dang, I totally need a bay window/seat somewhere in my house. Look amazing!
ReplyDeletewww.lee-lee-land.com
It looks amazing! My great aunt had a window seat in her peach colored guest room. I used to spend all day reading in that window seat when I was a kid enjoying the view and that amazing peach room (it was the 80s). Since then I've always wanted a window seat, too. One day!
ReplyDeleteWOW!!! That looks sooo good. I wish I could do half as much as you with power tools.... or anything with power tools other than a power screwdriver. HA!!
ReplyDeleteAbsolutely gorgeeeeous!! Don't mean to be too nosy, but was this expensive to hire out? Just a ballpark would help!! Love it! Love it! You have to be in heaven!
ReplyDeleteKharper711@gmail.com
DeleteGASP!!! it looks SO good...great in fact!!!! It looks like it was supposed to be there all along. What a difference trim makes. Ok, now THIS may be my favorite of your projects.
ReplyDeleteThis looks great, I adore bay windows and wish my house had one! Thanks for posting!
ReplyDeletehttp://kissedwithcharm.blogspot.com/
Absolutely, positively STUNNING!! I cannot believe the difference. WOW!!
ReplyDeleteLove everything you do in your home, thanks so much for sharing and for not getting tired doing so (like other bloggers have done).
Love it! Look at Lee Valley Hardware for the hinges. They are weight rated depending on your load. We use them for the toy boxes my dad makes for my kids. They are amazing and no pinched fingers! Erin
ReplyDeleteWow, your new window seat looks fantastic! Thank you for sharing, not to be too sappy, but your work board and batten and such is really inspirational. Your blog is the first one I read each day. :)
ReplyDeleteI was wondering what the paint color for your room is. I need a safe neutral for a bathroom and this might be perfect
ReplyDeletemerkleyrachel@gmail.com
DeleteI was wondering the exact same thing!---the color of the walls? Planning for the next house!
ReplyDeleteAbsolutely love this! I've wanted a window seat since I was a little girl, and this makes me want one even more. I love how the pillows pop against the white. Can't wait to see the finished look with the cushion!
ReplyDeletegood for you.i have always wanted a window seat too.
ReplyDeleteThis has been a dream of mine since I was a teenager too! I have a bay window in my bedroom and I have been trying to find a way to get a window seat in here for years ) xx
ReplyDeleteThe inside of tht bench made my heart swoon!
ReplyDeleteIt looks fantastic!
ReplyDeleteI'm not really a big fan of window seats, but this looks so good! A great way to spend a no spend month!
ReplyDeleteI am so jealous......I have always wanted a window seat too....since I was a kid, I imagined myself sitting in it and reading. Still don't have one but happy you finally got your!
ReplyDeleteAbsolutely stunning...LOVE! I built bookcases when I finished out my home and originally topped the seat area with marble. I added cushions several years ago. (scroll down a bit and you can see them here) http://beckwithstreasures.com/home-tour/
ReplyDeleteJust a few suggestions. Foam can be super expensive. I bought a memory foam topper for my bed...ordered a size larger and cut off the excess so it would fit the mattress perfectly. I used the "excess" for the cushions on my window seat. Even if you don't want a mattress topper, it is worth checking out Overstock and see if they have any inexpensive (memory or regular) foam mattress toppers...MUCH less expensive than buying a piece of foam from a sewing or craft store for that top. Also, when you make the cover, make sure you put a zipper in it so it will be easy to remove and wash! It is so nice to be able to remove them without too much hassle and toss them in the wash! Adding a "hidden" zipper is honestly not that difficult!
Sarah,
ReplyDeleteYou inspired me to build a similar bench seat. I've posted my before and after photos here: http://imgur.com/gallery/F13ET
Thanks for the inspiration! - Rob
Really nice job! It looks amazing, love it :-) I've been dreaming of a window seat for a few years also, but didn't find yet the right spot in my house ;-)
ReplyDelete