The amazing bathroom renovation is done!
July 05, 2017
Share this
Well I'm finally DONE with the bathroom renovation!! I can't tell you how happy I am to say that! I felt like this one went on for.e.ver. You may remember when I got a wild hair back in March and started the renovation by knocking down a wall one day.
I guess it hasn't even been four months though, not nearly as long as it felt like. ;) Today I'm sharing before and after pics and later this week I'll do a recap of all the projects and share all of the sources as well. So stay tuned for that!
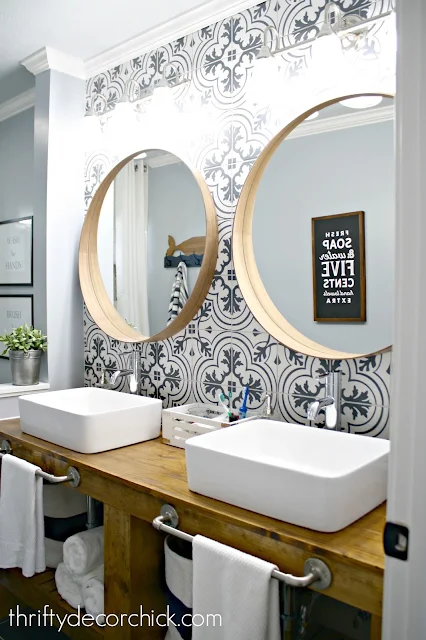
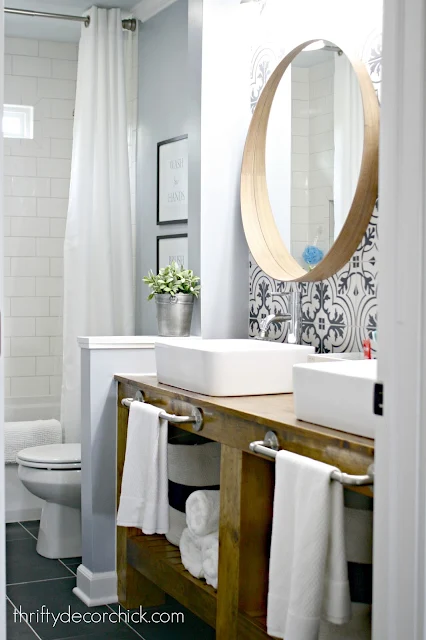
Without further ado, here is the finished bathroom -- that I'm absolutely head over heels in love with!:
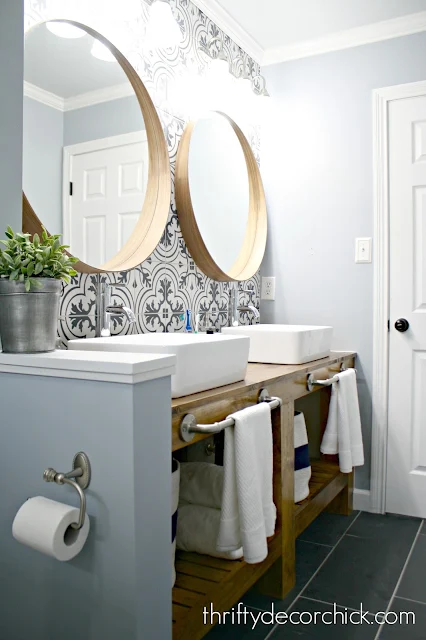
Let's look at that again, shall we? Because grouting that wall about made me cry and I'm super proud of it:
This post may contain affiliate links for your convenience.
I had this vision of an open wood vanity and that tile wall all along and it turned out even better than I hoped. I adore that wall. Such a statement!
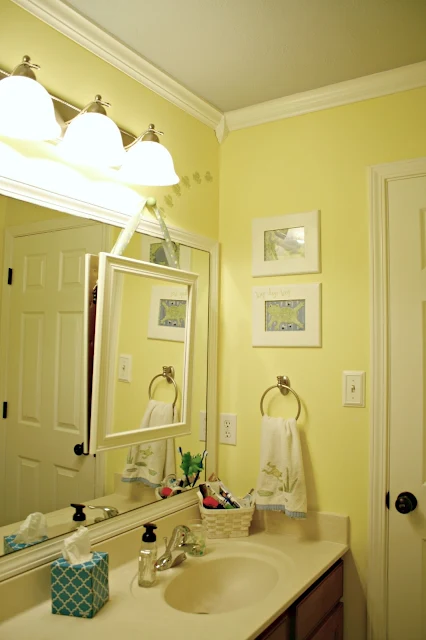
The following before photos are how the room looked before I painted the walls last year and these make for GREAT before and afters. 😂 What a difference! (To see how it looked when I repainted last year you can go here.)
Here's the room before I knocked the wall down -- it had a separation I hated because that back room was so cramped and dark:
Here's how that view looks now -- the new window makes SUCH a big difference!:
I ended up keeping a pony wall when I knocked the wall down -- and I'm so glad I did. It still gives a bit of privacy and breaks up the room just enough. We had a vent in that wall so we couldn't go back all the way, but again I'm glad for that now:
Here's the best pic I could get of the shower room back in the day:
Now it's so much brighter and custom -- the subway tile is everything. I mean, look at how pretty:
Here's how the rooms were separated on this side:
And here it is now:
This room was painted and decorated for our baby ten years ago, and now that baby is a little man!:
This room suits him and our guests so much better now:
Have I mentioned how obsessed I am with this room? I walk in, turn on the lights and just stand in here quite often:
It is SO much bigger!
I had a niche added in the shower and it's a perfect size for his needs:
I didn't add a whole lot to the room as far as decor. I kept these signs I made last year:
And I'll share the resources for everything else on Friday!
Here's one more before and after for you:
Can you even believe the difference?? I'm so extremely proud of this room -- I did most of this renovation myself and it has to be one of my favorites. (Pretty sure I say that every single time.)
It is beautiful and I'm over the MOON it's done!
If you'd like to know about anything in particular please let me know! I'll be sure to answer your questions in the next post. Thanks for hanging in there with me and waiting patiently for this reveal -- most of you know it takes me awhile to finish these rooms because I do so much myself and we cash flow all of it. I will NOT miss working on this one though -- all that tile wore me out! :)
See more of our home here. To shop items in our home, click here! Never miss a post by signing up to get posts via email.


WOW! WOW! this is truly amazing. Such good changes!!!
ReplyDeleteIncredibly beautiful...magnificent job!
ReplyDeleteIn love! WOW doesn't due justice and those tiles! Can't stop smiling!
ReplyDeleteIt looks amazing Sarah! You should be super proud.
ReplyDeleteBest job of updating a bath that I have seen so far.
ReplyDeleteJust-Amazing! Love the tile wall!!
ReplyDeleteSo in love right now! The mirrors, vanity, towel bars, just wow!!!
ReplyDeleteBeautiful job! And huge kudos for doing most of the work yourself. I'm impressed!
ReplyDeleteBeautiful! enough said :)
ReplyDeleteGorgeous! I love that you kept the one wall just paint to let the tile feature behind sink and wonderful wood vanity shine. PERFECTECTION!!!
ReplyDeleteLooks wonderful. I am curious about your towel bars.
ReplyDeleteYou have every right to be so proud of this room because it's just fabulous! I do have an odd question - what does the floor look like that adjoins the room (hall to bathroom?). We just had all our carpet pulled up and put down Pergo wood laminate everywhere except the bathrooms and laundry room. We want to do something simple and easy but am not sure what would look best next to the wood look floor.
ReplyDeleteThey are dark hardwoods. :)
DeleteI love it!
ReplyDeleteIt looks like you went from one light fixture to two above the vanity. Did you do that yourself or get an electrician to do that? I'm wanting to do the same in our master.
I used an electrician but as far as electrical projects go it's a pretty simple one. :)
DeleteIt really is fabulous. Great job.
ReplyDeleteI see you went from one sink to two. I have a set up similar to that and just wondering how hard that was to do. I would also need to add a second light fixture. Love the work you've done.
ReplyDeleteIt's actually a simple fix for a plumber to run that! :)
DeleteAMAZING transformation! Love it all!
ReplyDeleteyour bathroom reno is stunning. congrats. well done.
ReplyDeleteGorgeous!!
ReplyDeleteAwesomeness. That is all.
ReplyDeleteThat tile, SWOON!
ReplyDeleteI'd walk in there and just stare at it too. :)
Could you give your reasoning for choosing a 1/3 offset pattern for the subway tile instead of a running bond pattern? I'm trying to make a decision for my own installation.
ReplyDeleteI did the 1/3 on the floors as well so wanted to keep it consistent. For bigger tiles like on the floor the 1/3 is recommended, just in case things go off just a bit.
DeleteOh it looks SOOO good!!!! You did such a good job in there!!! 👏🏻👏🏻👏🏻
ReplyDeleteOooh, I love it! Questions - where'd you get those crazy mirrors? And I don't see any drawers in the vanity; do you have everything down below in the open area? The tile is beautiful! :)
ReplyDeleteSuper duper awesome job!!! Can't wait to read all about it, as I'm just about to demo the boys bathroom and try my first DIY reno, so I'm REALLY excited to see how you did it all!!
ReplyDeleteWow!!!! I love that proud feeling of knowing you created something this beautiful by yourself!
ReplyDeleteWow! That is one incredible transformation. It is absolutely gorgeous. Kudos on your vision, execution and all the hard work you put into this spa-like bathroom. You deserve to be extremely proud.
ReplyDeleteGorgeous!! Love the tile! LOVE THE VANITIES!!! Need to know the paint color! Can't wait for the follow up post! Great job!
ReplyDeleteEverything about this is beautiful! I love the details like the beautiful mirrors, the towel bars on the front, and the stunning statement wall-it's definitely bathroom goals!
ReplyDeletexoxo, SS
www.SouthernAndStyle.com
Wow! This is just stunning! You did a fantastic job renovating your bathroom. Pinning!
ReplyDeleteThis room is awesome!!!!!!!.....for many reasons: 1) I love everything about it. 2) My son's bathrooms upstairs looks JUST like the before pictures and I have always hated it, and 3). I plan to use this exact format if I redo his room. I absolutely love this, and it would work perfectly. Please give detailed instructions on the vanity please. If it was a diy, please provide detailed instructions as I have been looking for one like this and want to recreate it. Thanks for everything!!!! Stare at your room then get some rest. You deserve it!!!!
ReplyDeleteHoly crap, the difference is phenomenal! I love it!
ReplyDeleteCharmaine Ng | Architecture & Lifestyle Blog
http://charmainenyw.com
I absolutely love it! You did a fantastic job. That tile is so pretty and eye catching :)
ReplyDeleteIt like looks incredible Sarah! I am in love with that tile! Beautiful space! 😍😍😍
ReplyDeleteAmazing!!!! I'm like you, every renovation you do is my favorite 🤣
ReplyDeleteThis room is beautiful!! I would love a tutorial on how to build that vanity!
ReplyDeleteThat is absolutely gorgeous!!! It doesn't even look like the same room. I'm envious of your talents!! Now I'm inspired to do our master bath with a vanity like yours. Great job!!!
ReplyDeleteIts amazing when you can do it yourself and I think the rewards for hard work is more enjoyable than just dishing out money for someone to do it for you. GREAT JOB,looking forward to your next project.
ReplyDeleteYou made great design choices and it looks so open and inviting and classy. I love the subway tile too and will want the source. How did you choose the vanity tile? So unique and is the wow factor. It all came together and I'm glad you chose not to add the wall treatment. Doesn't need it!!
ReplyDeleteThat vanity! Is it DIY or did you buy it - it is exactly what I am looking for. This transformation is so inspiring 😀
ReplyDeleteAbsolutely gorgeous!!! Great job!
ReplyDeleteSoooooo lovely! I really like the towel bars in front of the vanity and the tile in the whole room. They diy vanity is perfect for the space!
ReplyDeleteThis is by far one of the most amazingly, gorgeous bathrooms that I have seen in one heck of a long time. I absolutely LOVE THIS!! It is GORGEOUS!!
ReplyDeleteYes, truly, truly amazing! Fantastic job....all of your hard work truly paid off!
ReplyDeleteWOW! It's absolutely beautiful. I love the cabinet and towel holders....well heck, I love everything about it. You should be very proud. :)
ReplyDeleteOh my goodness, this is beautiful, I've been waiting for this reveal and you did not disappoint. After your kitchen reveal, I knew this bathroom would be a showstopper.
ReplyDeleteStunning! You did a fantastic job on the reno! I love all your renovations and the "journey" to get there! I didn't think you could top the office, but this just might!
ReplyDeleteAbsolutely stunning....I'm sure I say that about all your projects 😆
ReplyDeleteIt's so perfect, Sarah, I think there will be a lot of people copying your wonderful design! Congratulations on a job well done!
ReplyDeleteWOWZERS! That is beautiful!
ReplyDeleteYour new bathroom is amazing ! It's giving me inspiration !
ReplyDeletehttp://afrenchgirlsthoughts.blogspot.fr
Love, love, love that tiled wall.
ReplyDeleteWow, I just love this reno. I'm also wanting to update our guest/boy bathroom and this gives me so much inspiration. All in all about how much would say this cost you? I'm not going to be taking down any walls but maybe replacing our tub, add subway tile, new vanity.
ReplyDeleteWords cannot express how amazing this is!!!! Great job!!!!
ReplyDeleteOhhhhh Emmmmm Geeeeee!!!! It is FABULOUS!!!!
ReplyDeleteLove how you did the shower curtains. One on either side. I haven't seen that before. Also love the towel bars. Beautiful space. Very well done.
ReplyDeletePam
www.busylifestylegal.com
It looks just wonderful...what a transformation! I love the backsplash tiles and the little touch of including those tiles in the shower nook as well. I'm curious about the placement of the towel bars. Do they get in the way of leaning over the sink to brush teeth? I'm short, so it seems like those bars protruding off the front might make it difficult to reach the sink.
ReplyDeleteOh wow!!! IT IS BEAUTIFUL! That tile and that wooden vanity and that subway tile & niche. Just everything. Great work as always! Such a big difference and I love how that little wall adds separation and privacy but opens it up so much!
ReplyDeleteSarah--It is absolutely stunning!!! LOVE it all and the fact that you did most of it! I love the tile back to the sinks and that niche--HELLO! And the subway tiles look amazing. All of it is gorgeous!!
ReplyDeleteI love it !! It looks amazing!!
ReplyDeleteHoly mackerel! It's so gorgeous! I came to your blog today to look up your kitchen sources, in preparation for painting our cabinets exactly like yours this week (we already got your countertops), and now I have to copy your bathroom too! Thanks for so much inspiration!
ReplyDelete--Valarie in PA
Great job!!! Very inspiring for my son's bathroom! I love the shower curtains. Do you leave them open on a regular basis? Are they a special length? love them!
ReplyDeleteGorgeous, Sarah. You have every right to want to go in and look at it... as much as you want. :-) I think it was a VERY good idea to not do a wall treatment on the main wall. It all looks beautiful!
ReplyDeleteJust stunning! I am truly bowled over by your talent, energy, and design expertise. You are an inspiration to so many.
ReplyDeleteI love your bathroom and am in the very beginning stages of planning a similar remodel on ours. I never would have thought to do the pony wall, but I love the look. I'm sorry if this has been answered elsewhere, but what are the approximate dimensions of the bathroom. Mine is long and skinny too, and I specifically am wondering how wide yours is. Thanks!
ReplyDeleteOH MY GOSH!!!!!!!!!!!!!!!!!!! I seriously love this bathroom - what a major change!! Absolutely gorgeous!!
ReplyDeleteAbsolutely amazing!!! Fabulous job!
ReplyDeletelove this renovation. can you tell me what you did with the light switches that were located in the wall that you made into the pony wall?
ReplyDeleteThank you! Yes, we had it run to that small wall with the pony wall. It operates the tub light and fan. (There's a picture of it above.)
DeleteI bought a home with a bathroom just like this and love the renovation you did! I have a few questions, did you hire someone to knock out and finish that pony wall and crown moulding? How about the vanity top? Also, thank you for explaining where the light switch location went in that pony wall.
ReplyDeleteI knocked down the wall myself, but I think I had help with the vanity (it's been awhile and we've moved since). It was actually fun to take down that wall! Here's more info: https://www.thriftydecorchick.com/2017/03/the-bathroom-renovation-has-started.html
Delete