
Simple and Easy DIY Fence Post Window Boxes
August 02, 2009
Share this
How to make DIY window boxes from cedar fence pickets.
These window flower boxes were so easy, so I'm sharing the tutorial on how to make these inexpensive window boxes!
This is a great beginner DIY project that adds a ton of curb appeal to any home!
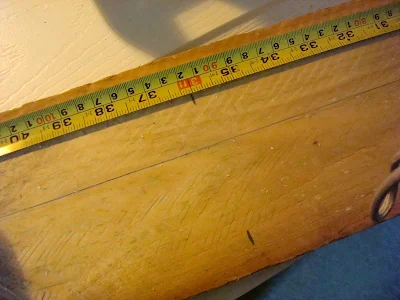
I used the leftover cedar fence boards from my DIY wood window shutters, measured the width of my windows and cut three pieces of wood to the length and depth I needed:
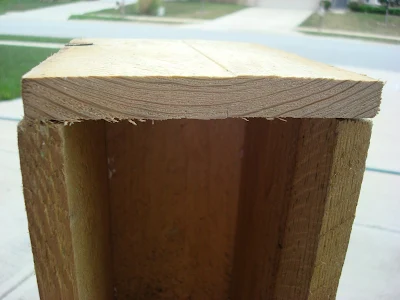
 Then I cut two end pieces the width of the wood -- five inches long. I ended up with the sides, bottom board and end pieces:

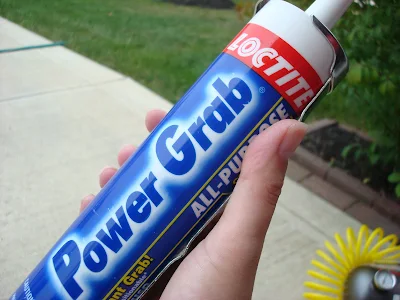
To put them together I used my super duper glue (wood glue will work as well):
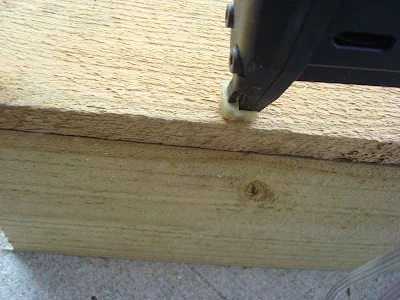
 I put a bead on the edges that were going together and then nailed them together with my nail gun:

 And yes, I get a little nail happy. I put in, oh, about 20 nails per side, just for good measure. You can also secure the boxes a bit more with a drill and a few outdoor screws.
 Then I cut two end pieces the width of the wood -- five inches long. I ended up with the sides, bottom board and end pieces:

This post may contain affiliate links for your convenience.
I may earn a small commission when you make a purchase through links.
See my policies and disclosure page for more information.
 I put a bead on the edges that were going together and then nailed them together with my nail gun:
And yes, I get a little nail happy. I put in, oh, about 20 nails per side, just for good measure. You can also secure the boxes a bit more with a drill and a few outdoor screws.
I put a bead on the edges that were going together and then nailed them together with my nail gun:
And yes, I get a little nail happy. I put in, oh, about 20 nails per side, just for good measure. You can also secure the boxes a bit more with a drill and a few outdoor screws.The nail gun is like the best thing ever in the history of man.
You'll end up with a U-shaped form -- now you just need the side pieces:
 I put a little dab of glue along the end pieces, just a smooch. (Name that movie!)
 I put a little dab of glue along the end pieces, just a smooch. (Name that movie!)
Then attached the wood on the ends with more glue and nails:

 When you get nail happy, inevitably the nails will not always go where they are supposed to.

 When you get nail happy, inevitably the nails will not always go where they are supposed to.
 Sometimes you need some pliers and muscle to pry them out:
 It happens to the best of us!
 It happens to the best of us!
 Voila! A window box:
 If you have a miter saw and a nail gun, you can knock these puppies out in no time. Each one took maybe 30 minutes total to cut and build.
 If you have a miter saw and a nail gun, you can knock these puppies out in no time. Each one took maybe 30 minutes total to cut and build.
 You can always use a staple gun to add a plastic liner to the box as well.
It's a good idea to add drainage holes in the bottom piece of these DIY planters for good drainage.
If you don't have a circular saw and nail gun, try a plastic miter box and hand saw or the helpful staff at Home Depot or Lowe's will cut them for you. You can rent a nail gun or just try hammering in finishing nails.
The result? GORG!:
 I love them!
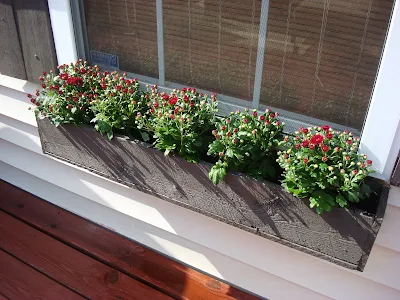

 I love them!
I hung our cute window boxes with screws into the wood supports around our windows, but these siding/vinyl brackets look like they would work well too!
With a little paint to match the trim and DIY fence post shutters, they were complete:

I had extra wood and the Bub was still napping, so I went ahead and made a couple more planter boxes for our bay windows:
I didn't hang them though -- kind of because they are so low anyway, mostly because drilling into the siding was starting to give me hives. So they will just sit on the deck. Whew.
They are NOT perfect or polished. But I'm fine with that!
Does it kill anyone else to spend so much on flowers? It does me. Up till this year I had two front window boxes and maybe three or four containers with annuals every year.


Never miss a post by signing up to get posts via email.
Love them! Any ideas how to attach these to a brick house?
ReplyDeleteThey look so good. You did a really good job!
ReplyDeleteFantastic! I'm not sure I'm as at home with power tools as you are, but I'm going to use your post to show my hubby how simple it will be for him to build the box I want in my front window. We just have to wait till it cools down a little here. They look great!
ReplyDeleteWow!! Yes, flowers are SO expensive!
ReplyDeleteThose turned out awesome!! I love it. I would have freaked drilling into the siding, you are a better woman that I!
ReplyDeleteThey look great!
ReplyDeleteI worked with a miter saw when I was learning how to build sets in high school theatre and in shop class. I so wish I could learn those skills again.
~WOW! I say that alot when I visit you Sarah. I can't help it. You really out did yourself! ~Gorgeous!
ReplyDeleteLove it! We have plenty of wood laying around from our remodel. First thing tomorrow I'll be finding me some for a window box! Thanks for the awesome idea and tutorial!
ReplyDeleteI got lots of flowers this year without spending a bundle - online! I keep an eye on imaybecheap.com blog (which is how I found your blog, by the way), and she posted some great deals that were like $10 off $25 with free shipping (which is normally another $10. I spent time on each site with a deal to get he most flowers per buck, and the plants came as little root & stem balls or bulbs and all flowered beautifully!
ReplyDeleteBeautiful window boxes. If you don't want to spend a fortune each year on plants check out the winter sowing on garden web.com (heck just google winter sowing) I've got a whole cottage garden look going for pennies!
ReplyDeleteThis is a great post because they are never the size I need - and we move a lot, the military thing, you know - and they are a fortune to buy. Thank you!
ReplyDeleteA nail gun AND a compound miter saw? I would think I had died and gone to heaven!
ReplyDeleteI am truly impressed. I am begging hubby to let me have window boxes. He's not a fan. I on the other hand love them. But, I do cringe at what is spend on flowers each year. So costly. But, what's a girl to do?
ReplyDeleteeek! Love them! You did a great job. :) I like the simple lines. I am also one of those girls who gets twitchy spending lots of $$ on flowers. That's why I mostly stick to wave petunias. Also 'cause it takes a lot to kill them. ;) I love that you chose mums. Nice and Fallish. :)
ReplyDeleteWhat kind of paint did you use on the boxes and the shutters? I LOVE it all :)
ReplyDeleteCheck with your local college in the science dept. If they offer a Botany class, chances are they might let you take cuttings to grow through the winter. They would be ready to plant next spring. They might have left over cuttings that students did for a grade, but didn't want and you could probably adopt them.
ReplyDeleteLove the boxes. Another project to add to the list.
Great job on the window boxes! When I first started re-purposing items, I couldn't decide which saw I should get first, a table saw or compound miter saw. I went with table saw. However it didn't take me long to get the com. m. saw. Gotta love it, and OH YEAH! The nailer! My best friend!
ReplyDeleteAbout the flowers, me too! I have switched to about 95% perennials.
Love you blog!
check out mine:
www.MyRepurposedLife.blogspot.com
OMG! I AM IMPRESSED AND JEALOUS!....CAN I MARRY YOU...JUST KIDDING....NEVER IN A MILLION YEARS WOULD I BE ABLE TO DO THAT!
ReplyDeleteThey look awesom. Couple of questions - did you have to drill holes on the bottom? If you did, does the water drain out and stain your siding or deck? Just some things I worry about.
ReplyDeleteYou don't have to worry about the cost of flowers if you spend so little on the containers! Great job! You've really got me wishing that I had some power tools. Maybe I need to start re-thinking my birthday wish list. . . .
ReplyDeleteperenials are your friend!
ReplyDeleteI love those! I just bought my first nail gun a couple weeks ago and LOVE IT! Having the right tools around, it's easy to get inspired!
ReplyDeleteKaren
http://savingthefamilymoney.com
I love a girl who isn't afraid of power tools!!
ReplyDeleteThis is a great follow-up to the shutters post you wrote earlier. Thanks very much for the idea to use fence panels as shutters!!! I hope you don't mind that I'm using your ingenious idea for my house too :) If we complete the project this year I'll send a before and after pic.
ReplyDeleteYou have a great blog and I really enjoy reading it!
I just love how your window looks with those shutters and windowboxes. So pretty!!! We have a saw like that, but I'm afraid my husband is the only one who has ever been near it.
ReplyDeleteSarah, you are like my complete idol! You're like the Tool Woman Taylor with your compound miter saw and nail gun. Bet you have a compressor for that nail gun, too, eh? Seriously. My hero! Love those boxes!
ReplyDeleteHi Sarah. Found your blog today and love it! I love to decorate frugally. I have wanted window boxes, but they are too expensive. Now I CAN have some! Thank you
ReplyDeletewoohoo! these look fantastic.
ReplyDeleteWoo hoo! Great job! I have GOT to get me a miter saw and nail gun. I gave in and bought my son (and myself) a grill over the weekend, but man oh man I would have preferred a saw and nail gun.
ReplyDeleteLove the window boxes. They are also on our "to do" list for the house. As far as flowers go, there are more options than just buying 50 thousand gazillion annuals each year. You could buy some that are evergreen or perennials and just fill in your pops of color with a few annuals every year. Or, if you're really ambitious, you could start your own from seed and plant them in the boxes when the weather gets warm enough. That would be really cheap. Anyway...Love it!
ReplyDeleteso cute!
ReplyDeleteYou have absolutely no idea how incredibly impressed I am! Wow!
ReplyDeleteThey look FABULOUS Sarah! You're my hero.
ReplyDeleteThose look amazing, and they match your shutters you made!
ReplyDeleteNot the first time I've spit out a drink while reading your blog. You crack me up, Sarah! Love the window boxes.
ReplyDeleteSarah, you are always up to some fun projects over here. this is a great one too!
ReplyDeleteI am ABSOLUTLY loving your blog...it is SOOO my fav! I have started talking like your blog, with like GORG, and FABULOUS, and LURVE. Anyways Im going to be moving into my FIRST house and I wanted my hus to make me a flower box(Im only having him make it because he likes to do the manly things around the house) anyways my grandpa told me not to build them because the water could seep under my vinyl siding and cause some damage...Do you something with yours so that doesnt happen???? my email is laceybug23@gmail.com I would love it if you got back to me!!!
ReplyDeleteI spend way too much on flowers each year. I should stick to perennials...
ReplyDeleteLove them! I will definetly be using this tutorial. Fantastic!
ReplyDeleteXO*Tricia
I have recently gotton over my fear of the big bad boyfriend known as the compound miter saw. Once you go CMS, you never go back. Now I too am in love.
ReplyDeleteYour window boxes are so fabulous darling !
Simply awesome. Looooove them! Now I just need to convince the hubby that it's OKAY to drill holes in the siding! :)
ReplyDeletewell. . . i've been stalking your blog for a coupla weeks now. . .always laughing out loud (while thoroughly admiring your handiwork). . . wanting to comment, but i didn't b'c of the SHEER VOLUME of comments you receive. okay. . . so i caved. you are INCREDIBLE and so MOTIVATING!!! and so dern FUNNY!!!! thanks for making me take on so diy projects that i'd been waiting on hubby to do. also. . . interested in info on your advertising. i have my own business making distressed wooden frames.
ReplyDeleteA compound miter saw... I am soooo jealous. I have the little yellow box it does the job but definitely not as fun.
ReplyDeleteI so totally agree with you on spending all that on flowers. This year I am trying to save the seed from the coleus and start my own. Then I will just buy a few flowers to round it out.
You have a blessed day
What a great use of leftover lumber! They turned out great and add so much character. :) I can't wait til we're ready to whip up some window boxes for our house...
ReplyDeleteYou are so smart! I love them and I also LOVE your shutters!
ReplyDeleteYou are too cool! Window boxes are so lovely and at $4.00...well, that just rocks my world!! They look great!
ReplyDeletelove it! very cottage chic!
ReplyDeletehttp://www.theinglenookdecor.com
o love it!!! very chic!
ReplyDeletehttp://anhesty.blogspot.com
I need to know how to install them and about the drainage holes in the bottom!!
ReplyDeleteAWESOME job. I have wanted window boxes FOREVER! thanks for giving me the push!!
I found your blog and I think your window boxes are real classy.
ReplyDeleteI've just found your blog and enjoyed so much surfing around and looking at your beautiful home. My window boxes are plastic I'm afraid, but they still do the job and I love replanting the flowers each season.
ReplyDeleteThanks for showing us all how a miter saw can be our new BFF! I just love mine, and don't know what I'd do without it! Your window boxes are just divine! Thanks for inspiring us all once again!
ReplyDeleteYou're the best,
Jules :)
you know, you really need your own show. i'm sure you've been told that before, but it's true. :)
ReplyDeleteThey turned out great...may have to get hubby to read this post. I could use some window boxed for my garden shed.
ReplyDeleteWOW!! You have inspired me to actually work on my back yard now!!!! :) Thank you!!!
ReplyDeleteThey looks awesome! I love them! Your amazing as always!
ReplyDeleteGreat job on all.
ReplyDeleteyes, you are right, nail guns, and saws, and throw in a router or two, a scroll saw, band saw, planer, and a few other small tools, and you are in woodmakers heaven. (and inside my garage). =0))
Blessings,
Barbara Jean
PS Great tip on the glue you use. thanks
Great tutorial. Window boxes can be so expensive to buy!
ReplyDeleteAwesome window boxes!
ReplyDeleteCan I ask you - what are those black stand legs that are holding the plank on top of which your compound miter saw is? would love to hear that from you, i have been looking for something like that for my projects.
I have a great porch that these boxes would look lovely on. Im going to try it...
ReplyDeleteI have always been a fan of windowboxes and I have never had them. These look easy to do for sure. And they sure do a nice job on the house. Yours are really pretty. Thanks for the idea.
ReplyDeletethis is the simple I needed...however, I want to attach table legs to them and make them standing boxes...container gardening at its finest...then I can put them in different areas of the yard or line them around the shed...easier on the back and getting food at the same time...thanks for the easy tutorial ~
ReplyDelete