
How To Add Character With DIY Decorative Air Vent Covers
November 11, 2025
Share this
Update your plain air vent and return covers with this easy DIY.
How to replace your basic metal wall grilles with custom versions that add
architectural interest in your home!

We had a long air intake vent in our foyer that bugged me because it was one
of the first things you see when walking in our front door.
This is the only noticeable wall vent that we have in the house...there's
another in our bedroom but it's not nearly as big:

I'm guessing no one else notices it, but it's a spot that I knew I
could make so much more attractive. Initially my plan was to try to paint
the existing cover to match our walls, but then I had a better idea.
I've wanted to make this DIY vent cover for years, and I finally got to it!
This is a fairly easy project that doesn't require major power tools.
You can buy these decorative covers online...but you'll save a TON by doing
this yourself. :)
1. Pick out your supplies
You'll need decorative metal sheeting for this project. I've used this stuff
many times over the years and it comes in so many beautiful designs:

This post may contain affiliate links for
your convenience.
I may earn a small commission when you make a purchase through links.
See my policies and disclosure page for more information.
It's made for vent and radiator covers, but the possibilities are
endless!
I used this pretty brass dot design to make
inserts for the cabinet doors
on our basement built ins:

I've always purchased the metal mesh sheeting
at Home Depot, but I'm kicking myself because it's priced MUCH better
online.
This "elliptical" version
is what I used for this project. I recommend going with something with
larger cut outs to allow air to flow freely. The smaller design I used on
the built in cabinet doors may be a little too intricate in this instance.
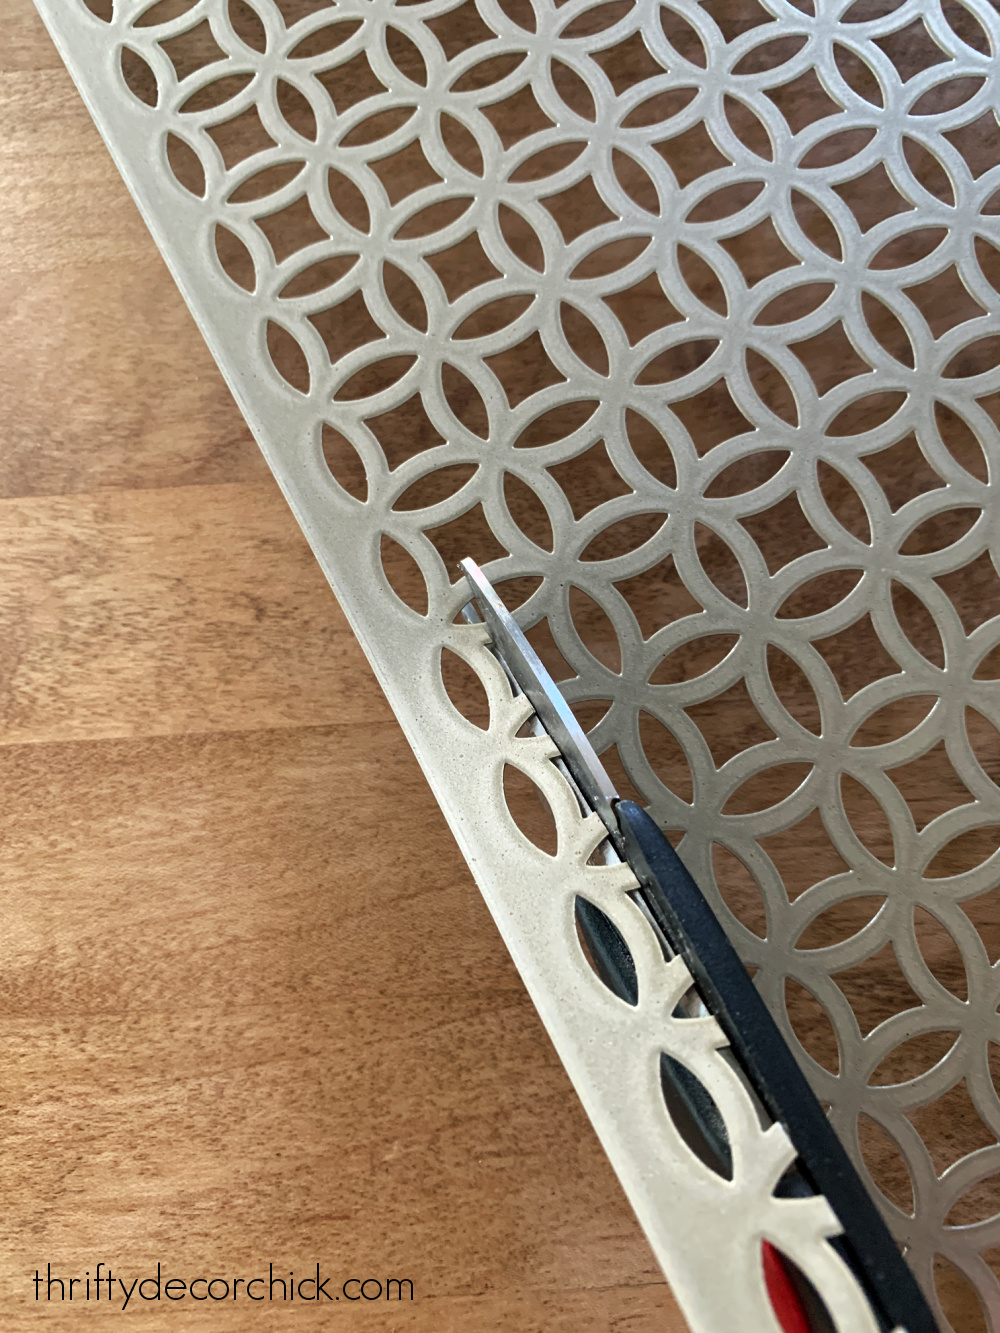
2. Measure and cut your sheeting
The first step is to measure the vent opening -- take the old one down and
measure the open space. You'll want your metal sheeting to be that size and
you can add onto the overall measurements with the frame you'll add.
The metal sheets are very thin, but keep their shape well and lay flat
nicely. You don't even need tin snips to cut it! I use old scissors and they
work perfectly:
As with many DIY projects, there are SO many ways to go about your build.
This was my first time at this one, so I winged it at the end.
I like to share my process to show you that it doesn't have to be absolutely perfect to be functional and look great!
I wanted the profile of the new air vent to be simple, so I chose 1/2 thick
wood at about two inches wide. I prefer a clean look, so mitered my corners
instead of butting the ends up against each other.
Keep in mind if you butt the ends of the wood pieces up to each other and
don't meet them at an angle, you'll have the raw/cut wood ends showing at
either the top and bottom or the sides. Even though it makes the process a
little easier, I wanted to avoid that.
I laid the trim on the metal to determine where I wanted it to lay and made
sure that the design matched at the top and bottom and then both sides
before making my final cuts:
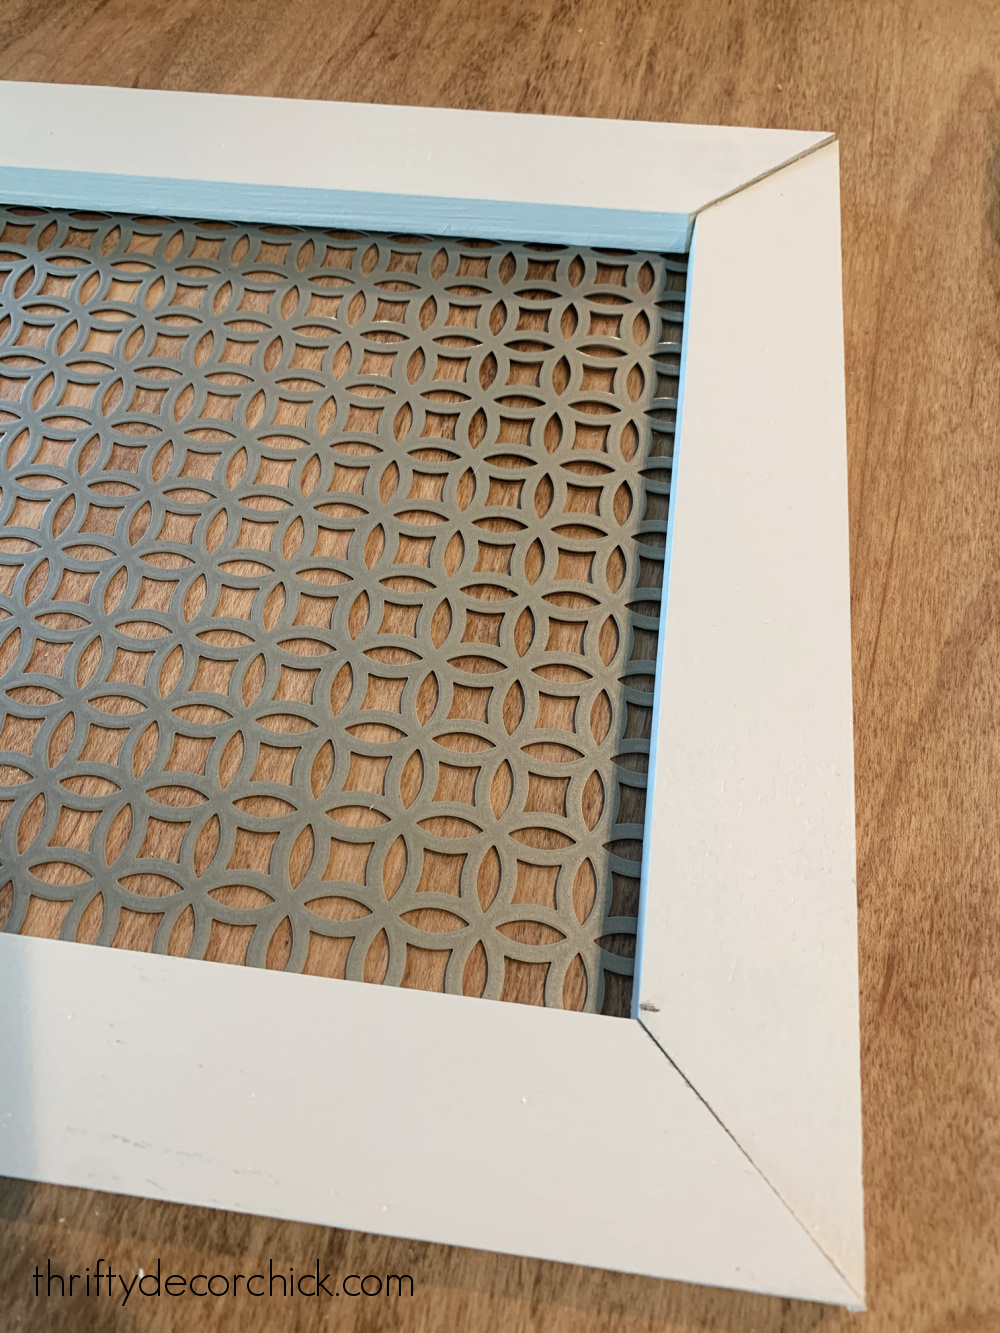
I painted the wood with a couple coats of the Agreeable Gray before building
the frame.
Once my cuts were done, I used wood glue and my handy
90 degree corner clamp
to hold the pieces together:

|
| See how I made a DIY frame for our Frame TV using this tool! |
Because I only have one clamp, I wanted to speed the process along a
little bit. I added a couple of staples on the back of the corners to
hold the pieces together as it dried.
I got impatient though, and as I worked my way around the frame
connecting the corners, a couple of them came loose as I went. The backs
were still secure, but the front was coming apart a bit.
The mitered corners do make the assembly a bit more difficult. If you butt the wood pieces together, you can drill pocket holes and screws to attach everything securely.
I could have added some
flat "L" brackets like these
to the back, but instead of running to the store, I decided to staple
once more into the front to secure that side:

These are easy to hammer in to make them flush with the wood. I used my nail
punch to drive them into the wood even further so I could putty over
them.
This
Plastic Wood filler
is my absolute favorite:
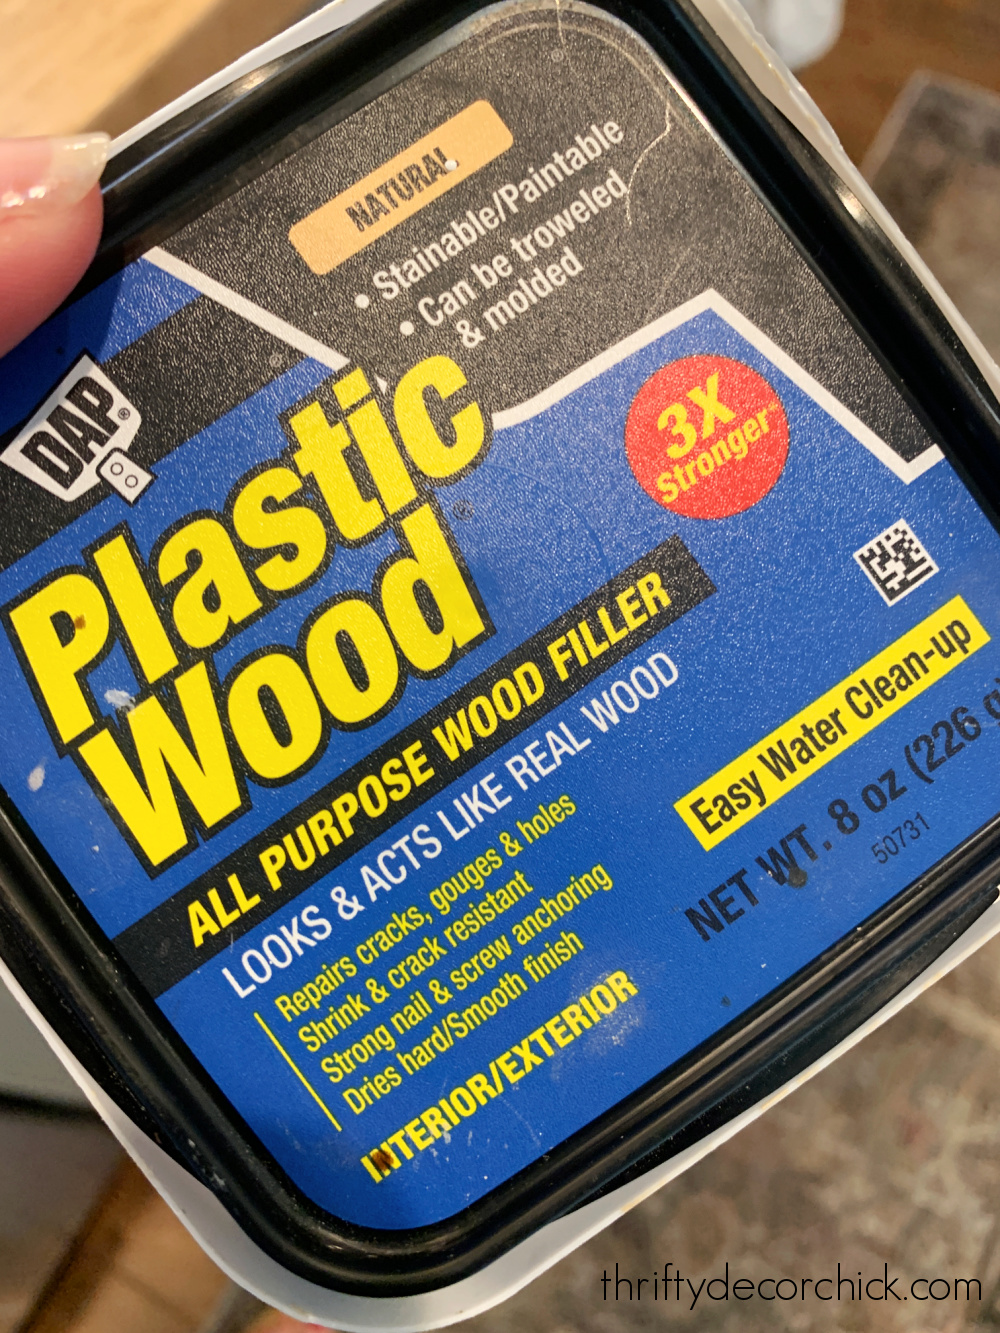
It's so easy to use and leaves a great, even finish.
After the corners were more secure and the imperfections were filled and
sanded, I laid the wood frame face down and placed the cut sheeting on the
back. After double checking that it was centered the way I wanted, I
started attaching it to the back of the frame.
This metal is so thin, a staple gun is all you need to attach it. I was
able to go in between the design for the most part, but in a few spots the
staples went right through:

I added a line of glue as well, but it's not necessary. :)
Make sure to hammer your staples in so they're flush!
3. Hang or attach the vent
I went back and forth on the metal color and ultimately decided on spraying
in the brass color I love so much. I'm SO glad I did!:
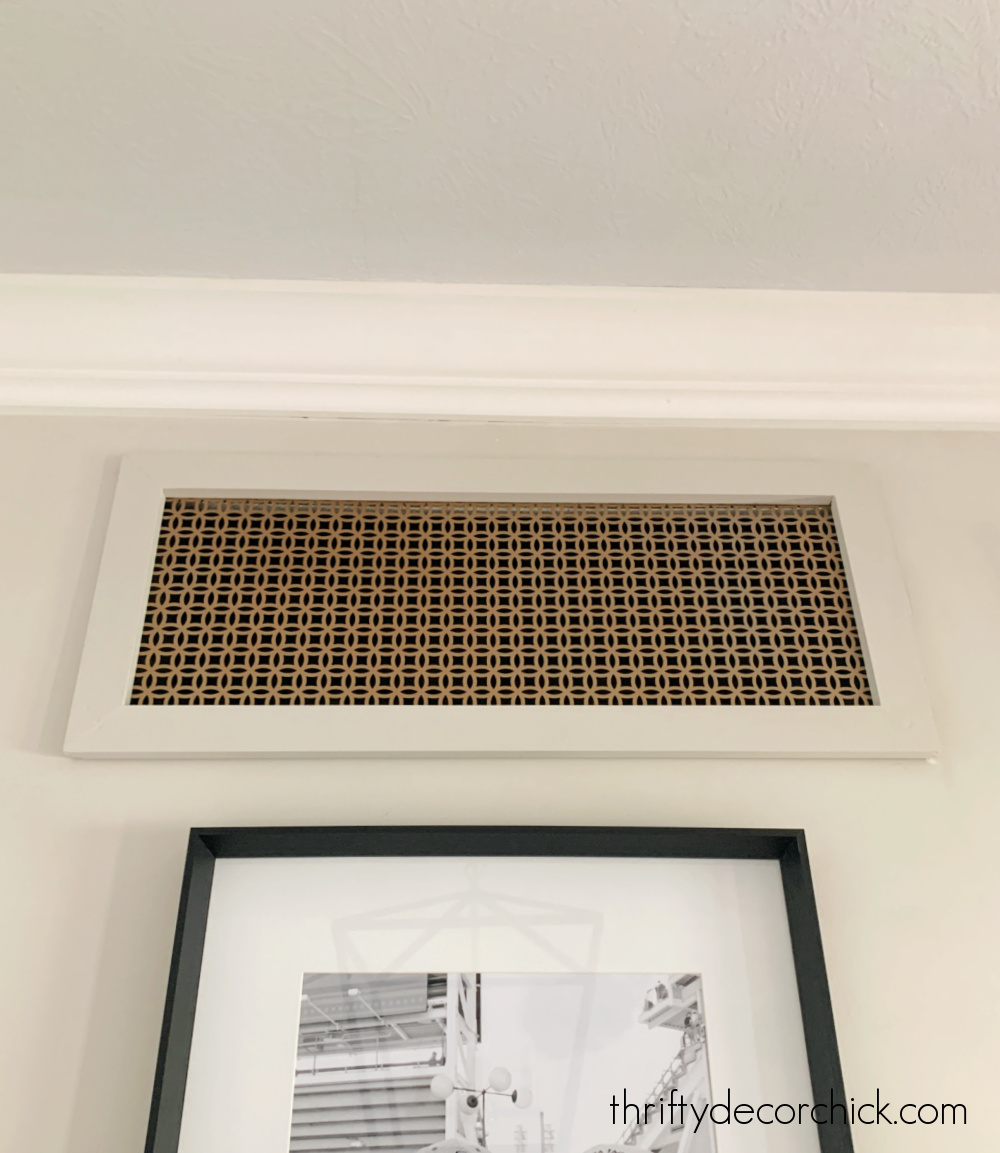
The brass tone is so lovely! I almost painted it the same color as the
walls, but I love this slight contrast.
My plan was to attach this to the wall with Velcro 3M strips so it would be
easy to take on and off to clean. We were out of the Velcro
versions, so I ended up nailing into the wall around the duct opening for
now.
I absolutely LOVE how this DIY vent turned out! I like the architectural
interest that the metal gives this space.
It's like a little piece of artwork!:

I added a decorative vent cover to the front our window seat as well! The one we had blended in just fine, but I knew something like this would add so much character:

I simplified this one a bit -- I had some leftover sheeting and cut it to a little bit bigger than the actual opening for the vent.
When I tested it out, I noticed that the white trim was super noticeable, so I did a quick coat of black paint on the edges and around the hole:

This doesn't need to be perfect -- the sheeting and frame will cover the edges.
When that was dry, I stapled the metal to the front:

If you don't have a stapler, glue would probably work as well. Once the frame is on it won't move anyway.
Then I added some simple lattice trim to the front to frame it out:

I didn't even miter the corners this time, to keep it super simple.
We haven't needed to access behind the vent in all the years we've had the window seat, so I didn't see any need to make it removable. We can easily clean it with a vacuum if dust builds up.
Once I filled in the nail holes and seams it looked like it had always been there. I LOVE it!:

Here are a few more things to consider if you want to try a DIY
decorative air vent cover:
- We don't use filters on our wall vents, but I figure you could use Command strips to attach them to the back of your vent cover.
- You can use the existing screw holes in the wall by drilling through the frame with a drill bit and attaching it with the same screws. Or countersink your screws and use wood screw covers to hide the top of the screw. (These screw hole stickers are pretty cool!)
- If your vent is larger, these metal sheets come in various sizes that should work!
- The inside of our vent is black, so you can't see the metal inside the wall. If your vent is lower on the wall, consider that you may be able to see inside if you change to this sheeting. Sometimes seeing what's inside looks worse than the basic metal grilles!
If you're looking to add an understated custom touch to your home, this is
one of those little changes that elevates the whole room. I'm so glad I
finally tackled this quick project!
Never miss a post by signing up to
get posts via email.
This looks great! I had seen your post a few months back about changing out vent covers with nicer purchased ones. But I like this even better!
ReplyDeleteThank you!
DeleteAs always, perfection!
ReplyDeleteVery kind, thank you!
DeleteGreat idea! We have a large vent, and a few smaller ones, that have always bothered me. Thank you for the idea and tutorial.
ReplyDeleteMy pleasure, thank you!
DeleteVery clever! I have painted many of these to match the wall color but this provides me with a different option in the future.
ReplyDeleteThank you!
DeleteI absolutely LOVE this!! I have a grouping of pictures on my living room wall and there is a vent right smack dab above it all! I have wanted to do something about it for years!! This just might be the thing!! Thank you so much for sharing the idea!!!
ReplyDeleteBack when you made your media cabinet I loved your idea of using the decorative sheet metal. As I have been updating my house I am using it to redo all of our wall vents. So fun to see you doing it, too! I have one vent on my stair wall, so you can see into it as you walk up the stairs. In the spring when we didn’t have the HVAC on for a few days I spray painted the inside of the opening a flat black. It works perfectly to cover up anything that would have been visible through the vent!
ReplyDeleteWhat a brilliant idea!
ReplyDeleteThis is clever and beautiful! Have you made angled baseboard vents?
ReplyDeleteWe just bought a
ReplyDeleteFlorida condo and the bedroom doors have ugly metal vents cut into them for ventilation. This will be one of my summer projects when too HOT to be outside. I LOVE your style.....wanna come visit me on Longboat Key? We could transform our 80's condo!
Love this! Wonder if you could use magnets to secure so you can remove easy to change air filters?
ReplyDeleteI wondered this too!! I think I might try it.
DeleteLove this idea; just looked on Etsy & would be $150 to use theirs!
ReplyDeleteThank you so much for sharing this! I’m so inspired now to make one of these to replace a very large, very ugly intake vent. There are so many cute options to purchase handmade ones on Etsy etc but they’re around $300-$400 for the size I need. Thanks again!
ReplyDeleteThis is exactly what I plan to do, so thank you for creating this step by step process. I have a couple of questions.
ReplyDelete1. What is the brand(manufacturer) and color name of the spray paint you used for the metal? It's lovely.
2. You mentioned that there are many other metal patterns online for less money, can you share specific websites? I've only found them at Lowe's or HD and they are pricey, looking for more economical options and designs.
Sorry I missed these questions! I know it's probably too late, but just in case...I'll see if I can find which spray paint color I used. The more affordable metal sheeting options are on Amazon, I have them linked in this post. There are SO many options!
Delete