
How to Paint Kitchen Cabinets With a Paint Sprayer
July 15, 2021
Share this
A detailed tutorial on how to paint your kitchen cabinets with a spray gun for a durable finish!
If you've ever considered painting your kitchen or bathroom cabinets, this tutorial will take you through every step! This particular process uses a paint sprayer, which will give you the absolute best, factory-looking professional finish.
If you're interested in how to paint kitchen cabinets by hand, check out this cabinet painting by hand tutorial.
Painting your cabinets is a great way to make a HUGE difference in a kitchen makeover. If you use this painting process they will look great and will stand the test of time with very little to no wear and tear for years.
This is the entire cabinet painting process, step by step to break it down for you. Painting your cabinets is NOT hard. It's a practice in patience and it can be stressful at times, but it's not hard. :)
I have to first thank my friend Jenny from Evolution of Style again -- she traveled for hours to help me get set up and go through the process with me. She is a pro at this and her advice was SO helpful!
Check out her site to see her kitchen redo as well:
 OK here we go!

This post may contain affiliate links for your convenience.
See my policies and disclosure page for more information.
Prepping your cabinets for paint
1. Remove and label all of your drawer and cabinet fronts.
Keep track of your screws and hardware in separate baggies -- and label the bags well! I had bags for door screws, drawer screws, hinges and then one for random stuff like our tip out trays and the lazy Susan cabinet doors.
If there is something you'll need to remember how to put back together, take a photo of it before you take it apart. I did that with our tip out tray doors and it helped a ton:

Number your cabinets doors when you take them off -- use painters tape and a sharpie and write the number of the cabinet on the tape. This will eliminate the guessing game of where they go back when you are done!
2. If possible, pull any appliances out of the way. If you can't remove them, then take them off well and/or cover with a drop cloth.

2. If possible, pull any appliances out of the way. If you can't remove them, then take them off well and/or cover with a drop cloth.
3. Fill any imperfections or deep scratches with wood filler. Sand well and repeat until the damaged area is smooth.
Wipe down your cabinets with a wet rag, then sand lightly. I used a 220 grit sandpaper:

You don't have to go crazy with sanding -- more on that in a minute. But you just need to get a little bit of the shine off the cabinets. I didn't sand much, just a quick pass over the fronts.
4. After sanding, clean your cabinets well.
4. After sanding, clean your cabinets well.
You will need to remove any grease or sticky residue in the crevices and flat surfaces of your cabinet doors and frames.
The BEST product I've found that I've used over the years is TSP, or trisodium phosphate:

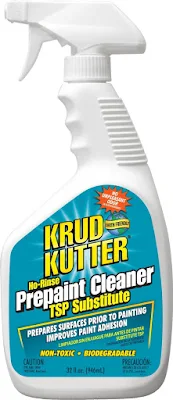


I used it in a spray bottle already mixed but I can't find that anymore. This mix works as well. Spray it on, wipe it off and then do another wipe with a clean, wet rag to make sure all of it is removed.
There are TSP substitutes, like this Krud Kutter that is good stuff too:

I really like that the spray version is already mixed up. But if you can't find the TSP spray, this is a good option.
Here's the thing -- you really do need to sand a little bit. But in my experience the MOST important step is cleaning really well. Paint will not stick to any residue left on the cabinets.
Cleaning well is by far the most important step!
It's time to prime!
After wiping down your cabinets well and letting them dry, it's time to prime.
This is where the paint sprayer comes in. Jenny recommended this primer from Porter Paints so that's what we used:

This part went incredibly fast.
We did one coat on the backs, waited an hour for them to dry (actually a bit longer but you can after an hour) and then we flipped them and did the fronts.
I could not start the topcoat (the paint color) for another 24 hours to ensure they cured well.
This is when you start to see your vision come to light!:

And it's very exciting! (More on that drying rack in a minute.)
**Please be sure to check out my post about the paint sprayer I used here. I share all of the nitty gritty details and tips on actually spraying the cabinet fronts there.
Here's our set up -- my sawhorses fell apart and I don't have new ones yet (two sawhorses would be ideal) so I dragged out two sets of Christmas bins.
We set a board across the top and then placed the cabinets on there:

I mentioned in my post about the sprayer that you'll want to be able to walk around your set up while painting. Give yourself plenty of room!
I later added a tarp so the bins wouldn't get paint on them. The spraying process goes incredibly fast!
Jenny did the priming with her gun (she does this professionally now and has a very nice spray gun) and she finished up each side in about 30-40 minutes.
That's 23 cabinet doors and drawer fronts!
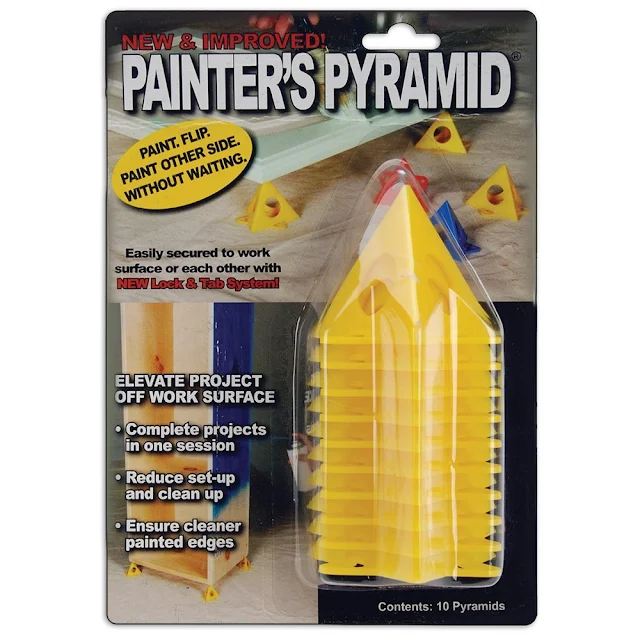
You definitely want to get these painter pyramid supports to get your cabinets up off the board:

That way you can get them higher so you can spray the sides of each door. I've used these for various projects over the years and they're handy to have.
So...that drying rack. I'll tell you what -- this thing made a HUGE difference!! Jenny graciously let me borrow it and I am SO thankful to her. I can't express how nice it was to have this thing!
Hers is an Erecta Rack and you place the wet cabinets on there and stack up the railings as you go:

We would not have parked in our garage for two weeks without it. It also was nice because it kept out of the way -- I feel like it protected the drying cabinets from dust better than if they were just laying all over the floor. It also helps them to dry faster as well.
You can absolutely still paint your cabinets without this drying rack, it just makes the drying process easier. If I didn't have it I'd use boards to lay the doors and stack them. You'll want something to let the air flow through a little bit.
Painting your cabinets
After 24 hours you can start your topcoat (your paint color).
First you'll want to give the cabinets a very light sanding if they have any imperfections. I didn't go crazy with this -- I'd run my hand over them and if I felt anything I'd sand it down lightly.
Do this between all your coats! Fuzz and small debris are sure to get in there at some point and sanding them down will get rid of that.
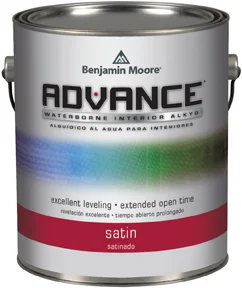
For the paint, Jenny recommended Benjamin Moore's Advance paint:

I've heard of this for years but had never tried it. A friend used it in their house years ago and didn't love it, so avoided trying it. Now I understand in some applications it's not great and I'll go into that more in a minute.
I used the satin finish and it is much glossier than I expected for satin -- it's perfect! I was pleased because I usually use semi-gloss and I think it would have been too shiny.
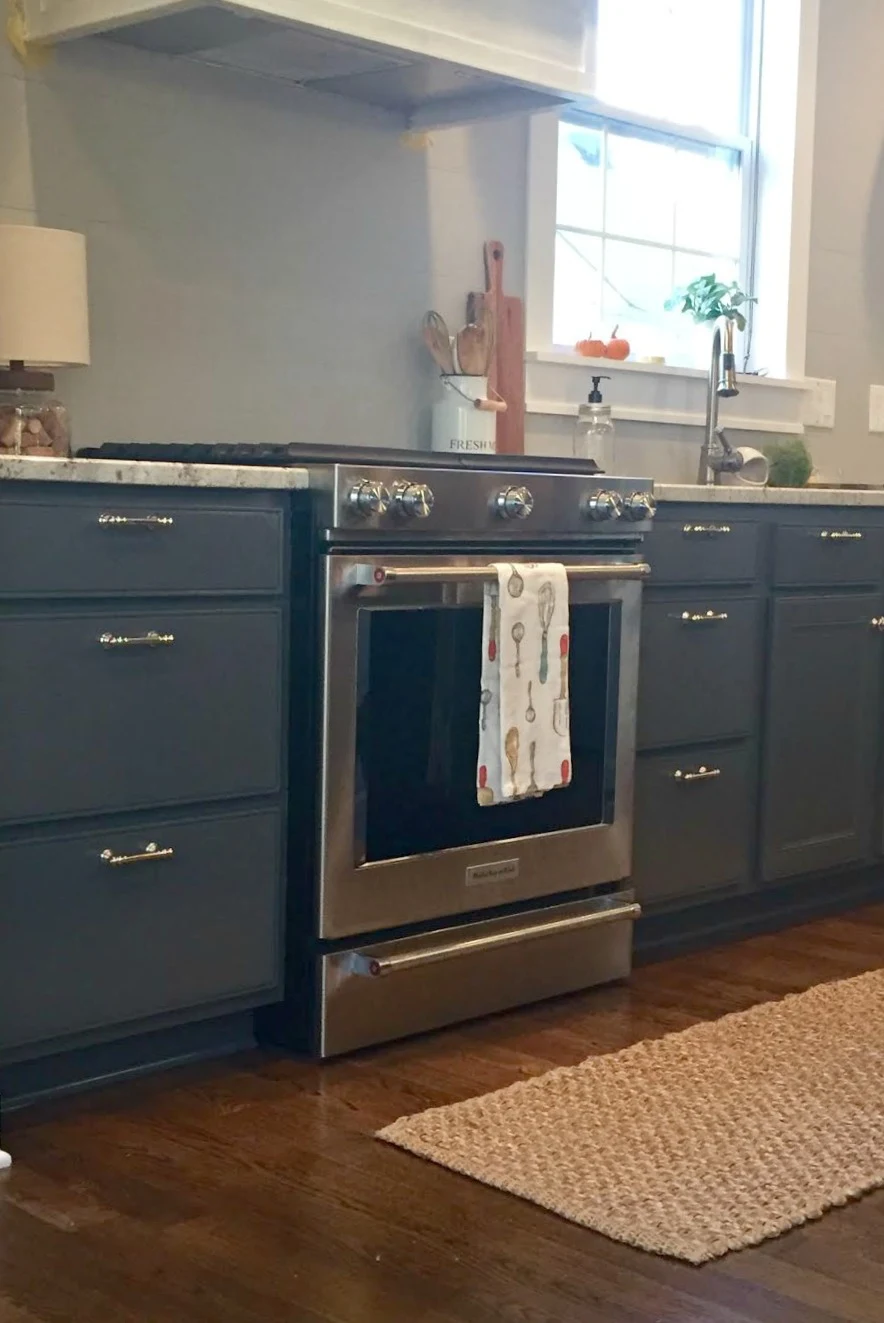
The lower cabinets were mixed in Sherwin-Williams Peppercorn, the uppers in Pure White.
This paint is crazy good when using a sprayer. The finish is fantastic!:

Things to remember about Benjamin Moore Advance paint:
- It can go on thick and will look bumpy when it's applied with a sprayer, but just hang in there!
- Your weather will affect this and drying time -- I had a bit of a freak out moment and texted Jenny the first night because they were taking forever to dry.
It was raining that night and I knew that would play a part in it, but it just looked thicker and wetter than paint I've used before.
- This paint is pretty amazing at self-leveling, so it takes a long time to dry. It should be dry to the touch by six hours but you can't recoat for 16 hours. Because of the weather I started waiting even longer between coats to be safe.
- Since we were doing a two toned look on the cabinets in dark gray and white, I could paint one color one day, then the next day do the other. This gave them a couple days to cure each time.
When the rain stopped the dry time got much shorter, but it's never a bad idea to let them dry a little longer if you can.
- Another tip from Jenny that I didn't think of -- start on the backs. This lets you get the kinks out with your sprayer and get used to using it. This is a REALLY good idea if you've never used a sprayer before.
- Sand lightly between the first and second coat of paint and then clean with a tack cloth before spraying again. Jenny recommended one coat of primer and two coats of paint on both sides of the cabinet fronts.
I cheated a bit on the backs -- I only did one coat. It covered so well I didn't need to do more. Considering I never even paint the backs of my cabinets I was impressed I even did that. Ha!
Painting the cabinet frames
The frames of your cabinets are a very similar prep process but I have some additional advice to offer here. You'll want to clean and sand them like you do the doors -- I noticed that our frames were dirtier than the doors. I guess I don't clean those as much?
Jenny recommends this mohair roller for larger areas like the side of the fridge:

They worked great! I usually use a foam roller but I quite liked these and the finish.
Here's where I wasn't thrilled with Advance paint -- I used a brush to apply it to the upper frames (those were the first ones I painted) and I didn't like the finish at all.
It was crazy because for as long as it takes this paint to dry on the doors, it was drying super fast inside and was hard to work with. I also didn't like the finish on the frames -- you could see the brush marks very easily, even with sanding in between.
It's just the nature of the paint. What should have taken two coats of white took three and honestly I could have done a fourth.
In the end no one will even notice it. Because I did the last couple of coats with a roller that helped a bunch.
Here's the frame in the middle and the sprayed cabinets on the side:

See the brush marks?
I ended up using the mohair rollers on the bottom frames and that finish is SO MUCH BETTER. So smooth. I used a brush for corners and hard to reach spots and then rolled over it as much as possible.
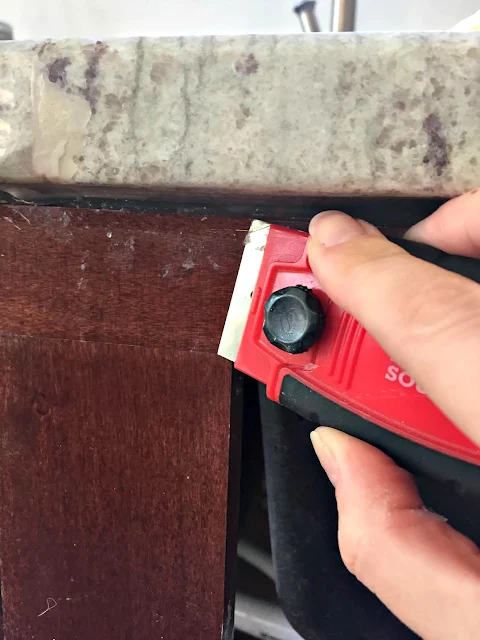
One issue I ran into along the lower frames was the silicone the granite folks added during installation. I put the painting of the cabinets at the end of my list so that they wouldn't get messed up during the install of the other parts of the room.
If you do the same, ask your granite installers to hold off on the silicone underneath and you can do it after you paint.
They really piled it on ours and some of it was so low on the cabinets I had to remove it, which is a total pain in the butt:

I gave up on the stuff higher under the counters. Thankfully our lowers are dark so you can't see it well. If you are going from dark cabinets to light all over and are having granite installed, be sure to remember this!
I tackled the doors first and the frames second -- I first thought I should have flipped that. The doors were sitting done and I had to wait days while I painted the frames.
Now...I actually would recommend the order I did it -- it gave the doors a chance to sit and cure for awhile while everything inside dried.
This paint (any paint really) takes a good month to REALLY cure well. That means it's not super hard till then. Some say even two months.
I put our new cabinet hardware on but didn't screw them in all the way -- I'll wait for another few weeks to do that.
I thought the process would take me a week, but it would be difficult for one person to get it done that fast with the dry time needed.
It ended up taking about 12 days and I finished installing the cabinets on the 13th day. The cabinets had cured for about five days at that point, the frames a few days less.
For now I'll leave you with a couple shots -- first of the uppers:

I know it can be hard to see my vision, especially when they were two-toned for so long:

WOW! I love the white uppers!! I nearly cried when I put them up, not kidding. They are so beautiful and it was so thrilling to see what was in my head all this time come to life.
I love the white but I have to tell you I think I love the dark gray lowers even more:

I'm a contrast girl and they are absolutely stunning with our floors and with our light countertops.
Here's another pic that shows the sheen a little better:

I have a lot of touch ups to do by the stove and on the quarter round -- it's never ending. :)
I hope you've found this kitchen cabinet painting tutorial helpful! Remember if you have a grain on your cabinets they will not be quite as smooth. Sanding well before and between coats will help to reduce the grain but it's hard to eliminate it.
Oh and I've been asked a ton about a protective coat. No, you don't need to add one. I've painted many pieces of furniture and cabinets and if you use a good paint you will not need to do that.
If you want to add one keep in mind if you are painting your cabinets white you need to use a water based poly so it doesn't yellow down the road.
If you have any questions, let me know in the comments.
See the full kitchen renovation reveal here!
See more of our home here.
To shop items in our home, click here!
Never miss a post by signing up to get posts via email.
We repainted our kitchen cabinets last summer and it has made a HUGE difference!
ReplyDeleteLove all of the little gadgets and racks you used to help keep things contained so they could dry. We did our cabinets in groups, on the crappy carpet in our basement (with a drop cloth). Wish we'd had a sprayer to paint...we did ours with brush and then roller to smooth out the lines.
Love love LOVE!!! Can't wait to see the finished product! Thanks did the tutorial; yours are always the best!
ReplyDeleteLooks wonderful. I've been waiting for this post! i've read on some blogs that when painting cabinets white, you should caulk like crazy...for example along the seams where two cabinets frames meet, where the trim meets the cabinet, etc. I'm guessing you did not do any caulking and its fine? Can't see any lines in the white paint where two cabinet frames meet? I know I want to paint my uppers white but would rather not have white lowers, problem is that my island is a stained deep sea green, so I'm stuck on what color the lower could be other than white. (Countertops are soapstone and backsplash is white subway with a darker grout)
ReplyDeleteGood point I forgot to include -- I didn't caulk where the panel meets the frames of the cabinet doors because that panel can move around a bit. I did end up caulking the corners of some of those frames though -- only with the white cabinets. There were gaps you don't see as much with the wood tones that I had to fill. If you get up close you can definitely see where the cabinet frames meet but that doesn't bother me -- you could see that before. You could maybe to black lowers? That would look beautiful!
DeleteJob well done! And you're totally right - painting cabinets isn't hard, it's just time consuming and tedious and requires you to pay attention to detail. I can't wait to see the full reveal - I'm loving how your upper cabinets turned out - I know that part was tedious! Thanks again for the shout out and for having me over to help. It is going to be like having a whole new room to decorate for the holidays! :-)
ReplyDeletegood job, good job!
ReplyDeleteSuch a great post! I think you did such an awesome job! I've been dying to paint our cabinets for years and just need to bite the bullet and do it! Thanks for the great list of how to do it!
ReplyDeleteSo I saw your Instagram post this weekend saying you'd be giving this tutorial today and I have been stalking your blog all morning (like seriously page up, hitting refresh). I want to paint our cabinets and needed YOUR advice first! I wanted to copy exactly what you did, but now I am wondering if you would recommend using a different paint since you weren't as happy with how it went on the frames? Also did you have any areas that were beat up or cracked that you needed to do anything other than sand? P.S. They look amazing!!! Can't wait to see the wide angle shots!
ReplyDeleteThank you Caitlin! I really love the paint so I would definitely use it -- if you use a roller it goes on really well. I had one spot that had some damage but I just sanded it down a little extra and then painted. Good luck!!
DeleteSo would you recommend the advanced paint from bm if your planning on rolling your cabinets and cabinet doors?
ReplyDeleteAs much as I love to spray paint them, I don't have the skill or the cash for that.
Yes with a roller you'll be good!
DeleteMy biggest advice with a sprayer is to practice on something else first. That way you get the hang of using the sprayer so you don't make any mistakes to your cabinets and doors. Also, I have painted my cabinets with a paint called cabinet coat. It's made especially for cabinets. It sprays beautifully and levels well. I ordered it from ace hardware. The color is perfect with carrara marble counters as it is a true white. Can't wait to see your kitchen next week.
ReplyDeleteVee
I am so excited to see the finished kitchen!!!! WOOHOO Happy Dance. Your house is such an inspiration! Now if I could just get the rest of the family (ie husband) on board with projects!!
ReplyDeleteSarah, such a great tutorial and your cabinets look absolutley amazing.
ReplyDeleteWow, you must be thrilled with how your cabinets turned out. They look fabulous. We just moved this summer into a house with yellowish oak cabinets and black Quartz counters. Although we had them professionally painted, the grain was filled first with some type of wood filler. He took the doors away, but I did see the frames after he had filled them and he had applied the filler by hand. Then they ere given a thorough sanding, followed by spray painting. The result is amazing. You can't tell they have any grain at all. If you have the time I am sure you could do this yourself and speed up the process by using a hand sander. I love your style Sarah and have used your house to get ideas for adding mouldings, panels and trim in our home. Can't wait to see what you are up to next. (Apart from a cup of tea while gazing lovingly at your new space. It's a great feeling!)
ReplyDeleteThey look amazing Sarah! I can't wait to see everything all done!! So impressed. And I never doubted you, just for the record!:)
ReplyDeleteI'm hanging off of every blog post and Instagram update for this reno! Can't wait to see the finished product! So excited for you!
ReplyDeleteJust really pretty! Would love to paint ours since they are honey oak and they are 3rd house I have had them. We just found out we are staying here for at least 8 yrs so I would love to conquer that! Great job!! Robin
ReplyDeleteIt looks great! A few years ago, I paid someone to do our cabinets and it was so worth it! He used a sprayer and it was dry so fast. It was like car paint or something!
ReplyDeleteIt looks amazing already! Wondering how you think this color scheme might work with stainless refrigerator and dishwasher but black stove top, sink and ovens?? I can't picture it.
ReplyDelete(light counters stone colored and same color floor)
Thanks!!
I think it would be fine! If you look at my kitchen posts or search my island you can see this color with our black trash compactor. And our sink is black too. :)
DeleteLove this! I'm thinking of doing the tuxedo kitchen look with white on top and navy blue on the bottom as wel, but what really strikes me here is the addition to the top of the cabinets near the ceiling! Is there a tutorial for that somewhere??? Please tell me there is :) I'd love to put that on hubby's honey-do list!
ReplyDeleteYes here you go! (you'll have to copy and paste) http://www.thriftydecorchick.com/2015/09/building-cabinets-up-to-ceiling.html
DeleteWow, such a transformation already!! I love the crisp fresh look & I never feared your vision, you're alwayssssss great!! Happy week!
ReplyDeletePaige.Rose
from
www.TheQuaintSanctuary.blogspot.com
Wonderful! So much good information.
ReplyDeleteBeautiful job! One tip tho.. With Advance paint it's recommended that you paint in one direction then paint in the other to eliminate brush marks and get a glass-like finish. I just did this on a white bedroom set and it's incredibly smooth.
ReplyDeleteGood to know, thanks!
DeleteWow, Such a great post!! Love this kitchen! Thanks for the tips!
ReplyDeleteXoxo,
Love from www.trangscorner.com {a lifestyle, fashion, beauty, and food blog}
Would you recommend a white water based poly paint if I were to paint over cabinets that have been painted before?
ReplyDeleteI would sand them well and then do a new coat of primer before you repaint (in case they added a poly) -- as long as you use a good paint you'll be good!
DeleteI've been waiting for this tutorial for several weeks!!! I have builder grade MAPLE cabinets - 10 year old now and would like to update to white. Several friends say not to paint the maple cabinets - I'm not sure why? What does this forum think about painting maple wood cabinets white? Do you pant the insides also??? Thanks.
ReplyDeleteI don't know why other than some are really lovers of wood? If you want to do it go for it! I didn't paint the insides of the cabinets -- that part is laminate and that takes more work. I don't think it's necessary anyway. :)
DeleteAre your cabinets wood? Do you have any advice for painting laminate. Thanks! They look great!!
ReplyDeleteYes they are. With laminate you need to amp up the prep work a bit (more sanding) and use a shellac-based primer like BIN. Good luck!
DeleteOh my gosh, this looks beautiful, and the tutorial is amazing. I already sent this to a client who mentioned wanting to paint her cabinets. By the way, I've pinned it, but if you end up adding a really great branded pinnable pic, let me know and I'll repin it!
ReplyDeleteGorgeous girl! Can't wait to see the reveal. The hardware looks stunning with the new paint!!
ReplyDeleteOh my gosh! These are amazing! I really have to get over my intimidation and get mine done! I think I will have to add another step since mine are builder grade oak and I want to fill in the grain.
ReplyDeleteWe are closing on a home next month that has kitchen cabinets that need to be painted. Thanks for the step by step! They look awesome!
ReplyDeleteGreat tutorial and tips. Thanks! My quandary is I have a 29 year old kitchen with original laminate cabinetry....which I hate. Mauve! Can you imagine anything worse? I've wanted to remodel the kitchen since we moved in nearly 17 yrs ago, but it's never been in the budget (appliances have been replaced, just not counters and cabinets). Fifteen years ago I SHOULD have at least painted the laminate, but I feared painting over laminate looking tacky (didn't have the same products we have today). Since then the years passed and the heavy wear and tear of a family of six left their mark. Now even painting them feels overwhelming and a waste of time. All that labor (and here's my biggest problem through the years) and what if, what IF I'm able to remodel. Why bother painting when the whole thing needs to be ripped out anyway? So there it stays for another year. Truly I've been my own worst enemy where my kitchen is concerned. I've remodeled the entire rest of the house and this darn kitchen holds me captive. Sigh. So I guess I'm asking you, is it worth trying to clean, prime, and paint these outdated laminate things?
ReplyDeleteTrudi I would do the same so I understand! Do you think you'll redo the space in the next year or so or later? If sooner than I wouldn't do it, but if it will be awhile you can try it! You need to prep even more -- sand really well. And use a shellac primer like BIN that will stick. Let everything cure well in between coats -- let me know if you do it!
DeleteBeautiful! Thanks for all the great info and enjoy....just in time for the holidays.
ReplyDeleteIve been hanging on this renovation, it is turning out amazingly!!! I actually just painted my french doors black after oogling yours for so long :) so my question is also about painting laminate! It seems like your tutorial here would work really well on laminate, but I'd love to hear your thoughts!! Baring that, do you know how/where I could purchase new doors and drawer fronts? Thank you!!
ReplyDeleteLaminate is tough! I've done it and it didn't hold up well. You have to prep more than with wood -- a good sanding especially. And I'd use a BIN primer that's a shellac -- that will stick to laminate better. It can be done but the long term result is iffy and it's more work. Let me know if you try it!
DeleteYou could never go wrong with paint, nice pics.
ReplyDeletehttp://frugaliciouschick.blogspot.com
great tutorial! thanks for the paint recommendations! your kitchen looks so bright and pretty now...well done!
ReplyDeleteYes I'm glad you mentioned this! Some I did have to caulk, but I only did it on the white cabinets and only did the corners of the cabinet fronts, not the area around the panel. I didn't do the panels because that part can move around and cause the problems you are dealing with. :( The spray covers that part well enough that it doesn't bother me.
ReplyDeleteYour kitchen is coming along beautifully! Can't wait to see the finished product.
ReplyDeleteSuch good and timely advice. Getting ready to paint our maple kitchen cabinets soon:)
Nice job Sarah! If I ever have to go through the kitchen cabinet painting thing again, I am totally using a spray gun! I LOVE how my cabinets turned out, but they took me FOREVER to prime and paint with a roller/paintbrush.
ReplyDeleteAny thoughts on re-painting kitchen cabinets?
ReplyDeleteOur house came with painted cabinets. They are in rough shape, but I think we could avoid redoing the whole kitchen by repainting them.
I am so glad I found this post! We are building our house now and want to do dark lowers and white uppers as you did. I was just as the paint store today, and gazed at the Peppercorn you used. I thought it looked to black on the store, but in some of your shots it's clearly dark gray, which is what I am looking for. Would you say it shows up more black-gray or true gray to you? I'm sure that's hard to judge with different lighting, etc. I love your whole kitchen re-do, it's beautiful !!
ReplyDeleteAmazing!!! thanks for all the great info!
ReplyDeleteI have a question? We want to paint our bathroom cabinets, but they are made of MDF and the paint is cracking and chipping!! Do you have to sand all the paint off before you paint and should you use a primer first? Or should we have them professionally done.
ReplyDelete