Dark hardwoods and farmhouse door trim
June 01, 2016
Share this
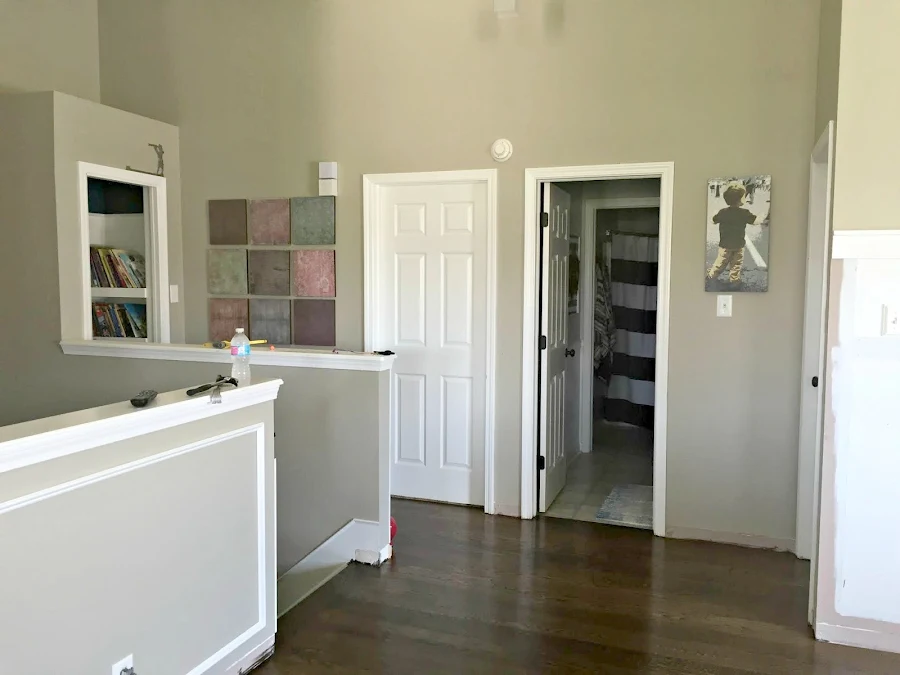
The loft hardwood floors were put in last week -- I'll show you a larger shot at the bottom of the post but you will get glimpses of it throughout. The floors are white oak, stained in Jacobean stain with a satin poly -- satin poly is my BEST FRIEND.
No foot prints can be seen, it hides dust and makes hardwoods completely, totally easy to live with. Satin is the key, you heard it here. :) You can find out more about the floors we've put throughout the house here.
I've been adding chunkier, craftsman style trim to our doors and windows for years now. It's not a hard process at all, but I loathe the painting part. So I just do it as I can -- the main floor doors and windows are completely done and our master bedroom doors are done as well. Our builder put in the basic small trim which is absolutely fine, but I'm a lover of thick molding that gives the house more character.
I should have done this first part before they laid the floors but removing the baseboards was enough work for me. Our loft has five doors -- we don't have a traditional hallway in our house, it's all open in this area. Our master door is a double door and I completely forgot to take a before or an after of that one so you'll have to just imagine it for now:
I especially love adding the thicker trim in rooms like this where the ceilings are really high. It gives them that extra oomph that they need.
I went through the entire process of removing the door trim in this post so check that out if you are interested in doing this in your home. Now that I've done it eleventy billion times it's a quick process for me:
You'll need a few tools to remove the trim -- a razor blade, a crow bar and a hammer. Also pliers to remove staples that may not come out with the old trim.
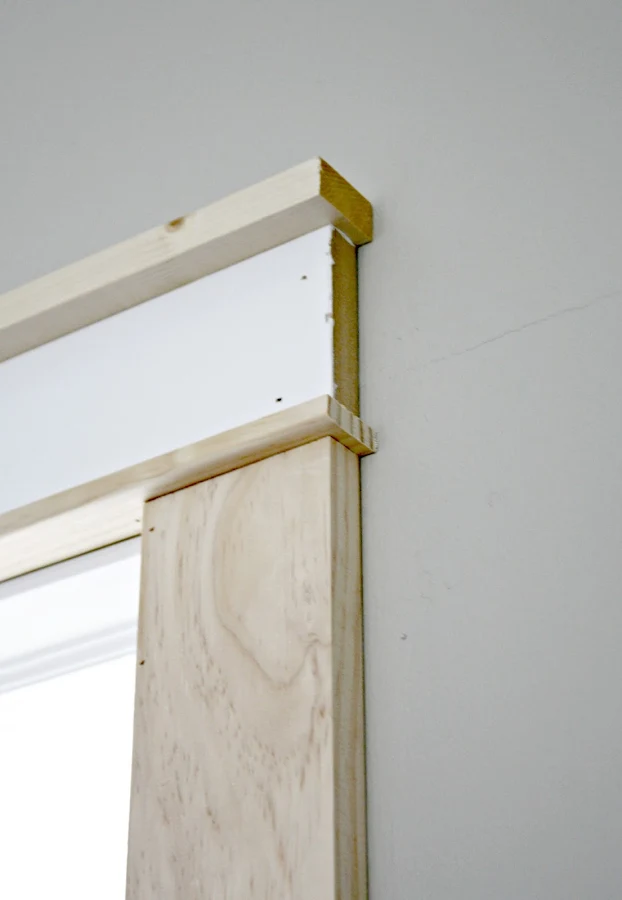
I go through the steps of adding the newer trim here as well, but here's a close up of the final result:
You'll need a 1x2, 1x4 pieces and stop trim (for the header). It's not difficult at all but the difference this makes to the overall feel of our home is huge.
I used scrap mdf from the old board and batten wall in here for the headers (that's why those are already white). I don't like to use mdf for the sides of the doors because they get more wear and tear over time. The header is a great place for it though (and it's cheaper).
These are not painted yet (this is what I mean by in between photos) but you get the idea of how they beef everything up:
I started adding the baseboards back in too but stopped because I may want to wait until the wall treatment is done before continuing.
I am a lover of thick, classic white trim and this whole area will look fantastic when it's all painted out:
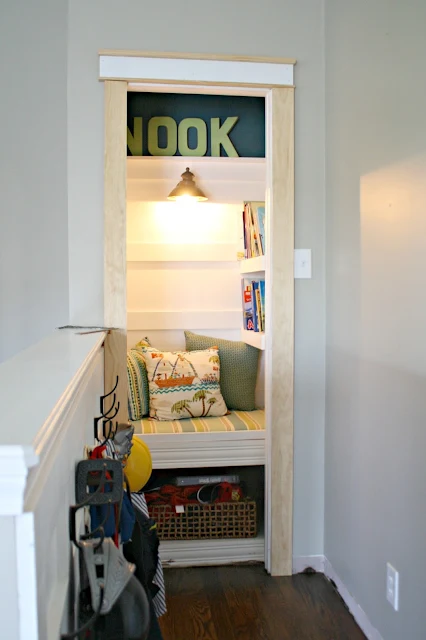
The only door I couldn't finish completely was the book nook frame -- the one side needs to be cut down just a bit so it will fit flush with the header above:
Here's a before and after to show you the difference the thicker trim makes:
It's going to look so good when it's finished up!:
I have a fun little project in mind for that corner by the nook. :)
I've painted all of the doors in our basement and main floor black and will continue that up here -- I can't wait to see it done but I can totally, completely wait to do it. ;) Doors are no fun. I think I'm going to spray them with the sprayer I used on the kitchen cabinets and that will make the process much easier!
Here's a look at a before and after of the floors as well!:
I've never been so happy to have carpet hauled out of my house!!
Here's that same view today:
So lovely! I would put these hardwoods in every single room of our house if I could!
I'm adding a lot more white to the walls so the contrast is going to be dreamy. You know how much I love contrast. :)
Dare I say it -- I think this room will go faster than I originally thought? The longest part will be the painting. All the trim, base and wall treatments will need to be painted and it's going to take forever.
Next up I have our electrician coming to add more outlets along that wall where the work space will be. I'm also adding sconces in the room so I'll share more about that soon! I can't wait to see this room continue to transform!
P.S. If you are curious about that DIY square art by the book nook, check out this post to see how I did it!:


It looks great! I enjoy seeing the 'in-between' posts too so thanks for posting the progress :)
ReplyDeleteIt's already looking great! Love the trim around the doors...I cannot wait to do this to the door frames in my new house. Thanks for posting the before pics as well.
ReplyDeleteLove the floors. They look amazing.
ReplyDeleteI love real time updates! Looking fabulous :)
ReplyDeleteWow, that space looks so much bigger with the new flooring. As always I can't wait to see the after but I'm sure it will be a dream. Love your style.
ReplyDeleteMay I ask how much the wood floors ost?
ReplyDeleteFloors look great! We are in the process of upgrading trim in our new mudroom. Eventually, we will do the whole first floor, but we have to replace floors first. I can't get over how good it is going to look! It really makes such a difference. Check ours out if you want http://www.ourcorneroftheworldblog.com/mudroom-baseboards-and-door-casings/
ReplyDeleteCan you tell me the brand and name of the hardwood floors?
ReplyDeleteThe hardwood alone transformed the space. I prefer chunkier trim too. Can't wait to see the doors painted black. That will look so good!
ReplyDeleteLove the floors!
ReplyDeletehttp://www.bluelabelsboutique.com
http://www.fashionnotfear.wordpress.com
WOW! What a difference the wood floors make, not only in beauty, but they make the space look much larger. After you started beefing up your trim a while back, I decided I could do that. Only one 6 foot wide walk through done so far, but love it. Made my 8 ft. ceilings look taller. Thank you for instilling the confidence to do it!
ReplyDeleteI haven't tried it myself but I saw an interesting trick on Pinterest that may be a huge help with the painting. When you install the new trim, slip long pieces of wax paper behind it all the way around, sticking out. The nails will hold it in. Its thin enough it won't be an issue and ridged enough to stick out and not curl up over your trim. If you need to paint the walls first, fold the paper in over the trim and tape them out of the way, then fold them back out to paint the trim.
ReplyDeleteOnce everything is painted, pull out all the wax paper and caulk!
I'm loving that new trim on the door! It looks like it'll be so fancy. Some great work here!
ReplyDeleteI am so jelly of your trim. I don't have one. single. doorway. in the WHOLE HOUSE that isn't too close to a wall! Would it be weird to do it to the windows but not the doors?
ReplyDeleteHey Sarah, I've seen posts on Pinterest, life hack posts, etc...all attributed to you, but CraZY how well I've gotten to know your home that when I spot a picture I Immediately know it's your space ;)))
ReplyDeleteSo inspired by your tidying projects...a neighbor had AmVets coming to pick up donations and my daughter and I added several bags of clothes and household items on the spot knowing it was an opportunity for outta site outta mind!
I love that shower curtain! Where did you get it?
ReplyDeleteSorry I just saw this! HomeGoods! :)
DeleteBeautiful floors! I agree with you on the satin finish. We have red oak with the Provincial stain on ours and I am glad I went with the satin finish as well. I am glad to hear even your darker color doesn't show anything. Oh - and that nook is adorable!
ReplyDeleteShelley
Looks awesome!! The floors look great and will look so good with the white. Also that trim really beefs things up I LOVE IT!
ReplyDeleteLauren | Lovely Decor
xx