How to Add a Window Seat With Built in Bookcases
August 21, 2018
Share this
Many of you saw this coming I'm sure...partly because I said it was coming 😆 and partly because many of you just know me and what I love in a home.
Give me a chance to customize a house and add storage? I'm in. I've been in love with window seats for pretty much my entire life. I made a window seat a reality in our last house:
That was one of my very favorite spaces in the whole house!
I knew when we started the process of moving that I'd want to add another one. :) I found a great spot in our morning room:
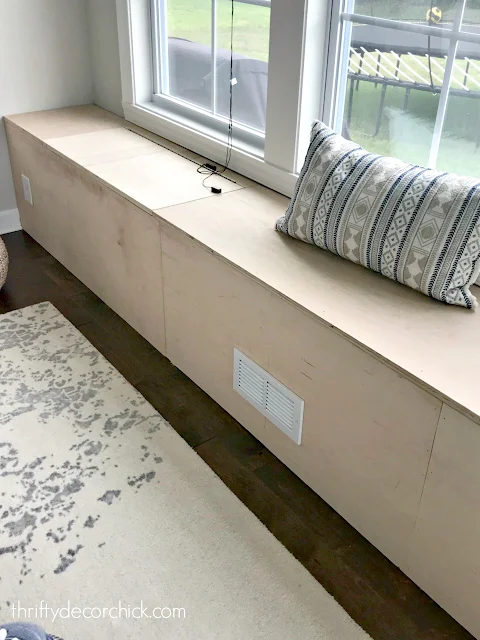
I planned for it to go along the wall of windows -- this one was going to be big! I had the light fixture location moved over about 18 inches (during our build) to accommodate it.
Like last time, we had outlets to consider. We also had a vent to work around this time too. I hired out for the build because I wanted to make sure those were done correctly. It wasn't very impressive at first:
But I know how it looks in my head and it's going to get there! After they were done it was time for me to get my hands on it.
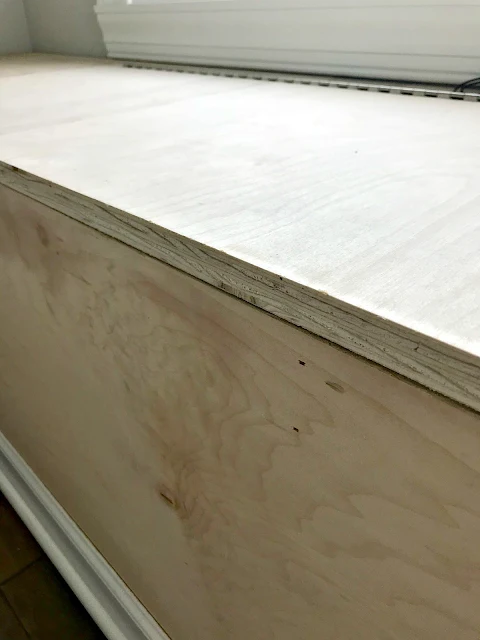
I reused the baseboards and quarter round that were under the windows and attached them to the front of the window seat. The edges of the seat were rough:
I covered those up with some simple trim:
And then started trimming out the front. Luckily I had enough extra luan strips from previous projects to complete the whole thing:
You can see this inexpensive stuff up close and how I used it our foyer here:
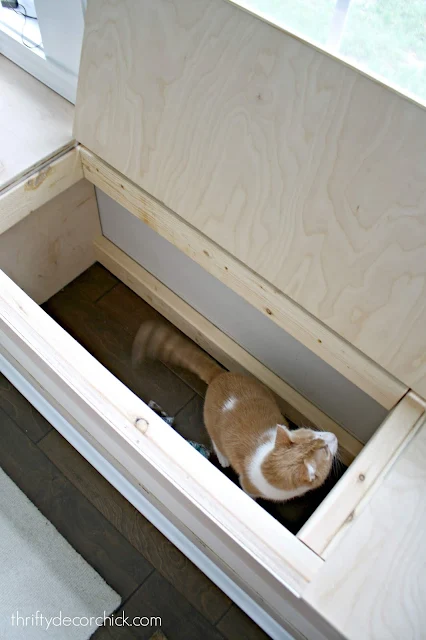
One of the best parts of window seats is the storage. For cats!:
I'm not sure what I'll put in there -- I think maybe things like outdoor candles and pillows in one side (there are two storage spots) and we'll see about the other one:
Options are always a good thing! I also caulked around the edges and then filled all the holes -- now it just needs paint.
This time I plan to make a cushion myself. I never added one to the old seat because of it's odd shape. I was going to have to have it made and just never had it done. I really want to try making this...wish me luck!
If you have any tips please send them my way! Any videos or tutorials I should follow to get it right? I know the basics but any help will be appreciated. Now I just have to decide if I'll do one long cushion or two. I'm leaning toward one but we'll see. I don't trust that I could make two perfectly identical cushions on my first try. ;)
I'll be adding safety hinges to the doors so they'll stay open at any angle. Its just safer that way and if I do one cushion it will be easier to lift them up. I'll be sure to share the process with you!
For now, I just want to get this painted -- that and some pillows will have it looking awesome:
Can't wait to see it finished up!
We're already enjoying it (especially the cats). I know this will be such a lovely spot when it's done:
Are you surprised it took me this long? :) I shared this on my Instagram stories the other day and someone asked why we didn't have the builder do this before we moved in. Two reasons -- I figured this would be a good spot, but I wanted to live with the room for awhile before deciding for sure. Also, I would have paid WAY more to have the builder do this for us.
Yes, you can roll that into your mortgage, but we didn't want to finance more when I can do it. There are tons of things I could have had them do, but I enjoy the process of doing it myself (reason number three). :)
If you moved is there anything you'd want to recreate in a new house? I still have a few more things I'll be bringing back. I'll be back soon with the final reveal of this spot!


Think about doing 2 or three cushions. Getting the Dacron covered foam into the cover can be tricky if they are big. You are also limited by the length of the foam you want to use. I recommend using zippers that wrap around the sides (for ease of inserting cushions) and piping for a professional look. Fabric choice is key. If you choose a stripe or geometric pattern it’s more time consuming to match the top with the sides.
ReplyDeleteHere’s a good tutorial: http://www.designsponge.com/2012/01/upholstery-basics-boxed-cushion-sewing.html
Good luck!
Have you seen Lauren Liess' window seat? It's spectacular! Google image it - it is the one with the 2 black accordion lights flanking the ends. You will be sold on one cushion. I used this shot as an the inspiration for the window seat we put in our family room and I am over the moon happy. I had my cushion made by a professional upholsterer. He used channels of down (much like a duvet cover) wrapped over foam. He said that the was best way to achieve the look of Lauren's window seat. It was pricey but worth every penny because it makes me happy every time I see it and use it. Good luck!
ReplyDeleteWhat is the strip of wood (?) above your windows?
ReplyDeleteMy question also????
DeleteWondering the same thing!
DeleteIt’s a bread board.
DeleteHave to agree with 2 or 3 cushions for a couple reasons. If a cat/dog/human somehow runs a part, it's easier to replace one small one at a lesser price. Second, smaller lengths of foam are easier to work with. I prefer a boxed cushion and they are much easier than they look. Were you planning boxed using lengths of foam or straight seamed and stuffed with polyfill? Very excited for you!
ReplyDelete...ruins
DeleteIt's looking so beautiful in your breakfast room!I love how you said that you can see it in your head. I do that too and it's one of the most satisfying parts of diy when you see the physical representation of what you knew it could be in your mind. Thanks for sharing it with us!
ReplyDeleteJennie
I agree with Ann to go with 2 or 3 cushions.
ReplyDeleteAnother vote for multiple cushions. If you have 3 storage sections, then 3 cushions. So much easier getting things out/putting away and that's from experience.
ReplyDeleteI love how well-lit the place is! It looks great! ❤️
ReplyDeleteAs with a rest, I agree with a few cushions! 🙂
Charmaine Ng | Architecture & Lifestyle Blog
http://charmainenyw.com
Sarah - I love the new window seat! I wish we had a place in the house for one. I’d do a 3 window cushions also, as it’ll be easier to move them when you want to get into the cubbies below. And having safety hinges on them is a great idea. You’d not want a kitty stuck inside! I have 7, and I know one would! Personality, even tho I’m a seamstress and quilter, I’d have the cushions professionally made also, with zippers. I’ve made cord wrapping pillows, but never cushions, why I’d leave it to a professional. Can’t wait to see the finished product!
ReplyDeleteTo make and attach piping, invest in a set of piping feet for your sewing machine. They’re much better and easier to use than a zipper foot. Gives very professional results. Get ‘em from amazon. Distinctive 1-4", 1-8" and 3-16" Large Piping/Welting Sewing Foot Package - Fits All... https://www.amazon.com/dp/B007AGD6RQ/ref=cm_sw_r_sms_c_api_XDtFBbYJ2VJ33
ReplyDeleteAgree, and 2 cushions gives you options for rotating them to prevent any sagging. Also, consider Sunbrella (or similar indoor/outdoor) material to prevent fading.
ReplyDeleteSarah, I’m going to suggest a simple way to cover your cushion(s), since you’ve never done it before. My mom, who is a seamstress, covered cushions on built-in benches at their lake place because she wanted simple, easy, and thrifty, though she knows how to do piping and zipper installations.
ReplyDelete1. Cut foam to size using an electric carving knife.
2. Wrap foam with batting and hand sew the batting together on the long side and ends.
3. Measure your fabric to wrap snuggly around the foam and batting, then seam it on the long edge with the right sides of fabric together.
4. Turn this cushion casing right side out and slip it onto your cushions.
5. At the ends you’ll hand sew using sturdy thread or doubled thread. Hand baste a running stitch at the edge about 5/8” in on an over hang of fabric about 2-5” depending on your cushion depth.
6. After you get around the whole edge, you’ll pull and gather until it folds in on itself.
7. When you get it gathered enough so that the cushion isn’t peeking through, hand baste over this gathered area to keep it closed.
* mom figured she’d have to cut these covers off and replace every few years or so to launder or even replace because those cushions get a lot of hard wear, but in 28 years, they still look great, and the fabric she chose was not your typical hard-wearing upholstery fabric.
Thank you so much!! This is great.
DeleteI also vote for at least 2 sets of cushions (for all the reasons listed above). I would also use Sunbrella fabric since the cushions are at a window.
ReplyDeleteWe did this in a mudroom and the extra storage can't be beat! Great place for those seldom used but essential items. We used old doors from the house we were restoring. Saved us time as the moulding was already done. Wish I had taken pictures. Sunbrella fabric is wonderful, but you can also buy sun protectant fabric spray if you find something you really like. Would recommend 3 cushions: matching fabric at seams can be a pain and one long continuous cushion would be cumbersome if you are trying to gain access to storage area. Also, did one long cushion for a client, never did look right. After a while there were "divots" where people had sat on the cushion and the cotton fabric stretched out and wouldn't lie flat. Something to consider.
ReplyDeleteVery good point about the divots!
DeleteI agree with others that you should do multiple cushions. I was thinking three cushions because it would mirror where you put the vertical trim on the front of the seat. Looking forward to seeing the finished product.
ReplyDeleteIs the window seat deep enough to sit on comfortably or is it for looks only?! We forgot to instruct our builder to to make our window seats deep enough to sit on, but then we would have been leaning back on the windows anyway...
ReplyDeleteIt’s big enough. :)
DeleteWhile I like the clean look of a single cushion, I know which ever way you choose will be my new favorite, lol. I had a single cushion for a window seat that doubled as a bench seat for my farmhouse table. I liked it because of clean lines and no shifting. Two construction suggestions for you: 1) have an upholstery supply store cut your foam for you. They also sell zippers to whatever length you decide to go with. (mine was nearly 6ft). You just assemble the parts. 2) if you use piping, stitch it as tight as you can get with your zipper foot. THEN, turn the fabric over and stitch again. You should be able to tighten up the piping, which will give you a more professional finish.
ReplyDeleteOf course the cat had to go in ! :D
ReplyDeleteIt looks great, good job !
Keep up with the great work ! :)
Sara
www.thefrenchcountryliving.com
Answering your question "If you moved is there anything you'd want to recreate in a new house?" - Nope! We are moving because our current house does not have certain features that we want to have, so our new house will be totally different and I don't want to make it like the old place!
ReplyDeleteI always wanted a window seat, but never got one. Oh well, I got so many other things I love in my house!
ReplyDeleteI adore window seats but haven't ever had a good spot for one. As soon as I read you questioning how many cushions, my immediate thought was 3 because of the number of windows above and panels below. Not only do I think it would be more visually appealing, but also easier to manage 3 smaller cushions (in the making, maintaining and moving to access the storage) than 1 or 2 larger ones.
ReplyDeleteHey Sarah the window seat looks awesome. I have two window nooks that are bumped out but have vents in them. Could you show the some pics of how the vents are redirected please? and may be the cost to have it done too?
ReplyDeleteI don’t have pics unfortunately! They worked on it when I wasn’t around to get some. They just created a “shaft” for the air to redirect through. :)
DeleteIt looks so nice! I have a bedroom window seat with no cushion, so don't do anything too tough, k? Then maybe I can do it too. haha Chrissy
ReplyDeleteHaha! Believe me it will be simple if it’s me doing it!
Delete