
Blue and White Floral Wallpapered Hallway
February 20, 2019
Share this
I've been hard at work finishing up some last minute details on the little hallway transformation. It's been awhile since I've poured so much effort into such a small space -- last time was the little book nook I created from a closet in our loft at the last house.
I think these are some of my favorite makeovers -- the small areas that are unexpected and full of detail. It adds a lot of character and charm to a home. I love it!
The first detail I wanted to finish up was the trim around the door to the hallway. I started changing some of the trim in this house to the chunky Craftsman trim we had in our last home. I shared how I added the trim to this large doorway here:
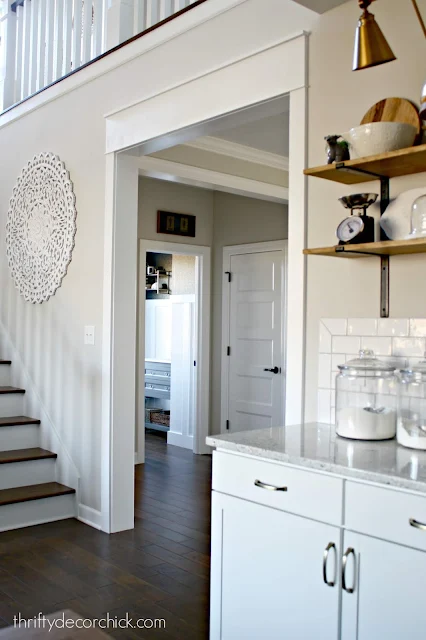

It worked great! That left me with just a small triangle-shaped, mitered cut to take off the top, as well as the top piece of trim.
I held up my header pieces to see how I like it with the trim we already have and loved it! So that saved me a ton of time. You can see what I did here -- the old side trim butts up to the new header:


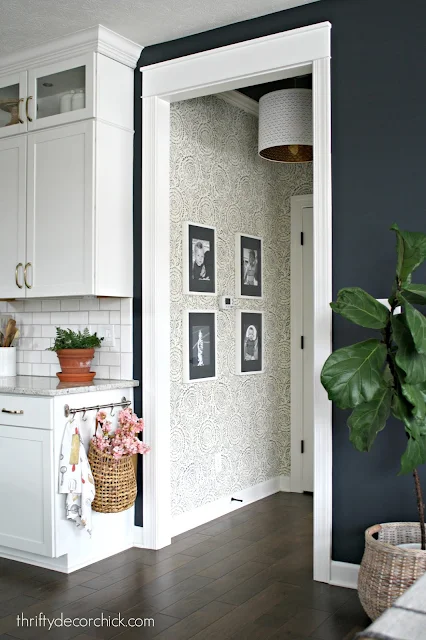
In this little spot I hung the wallpaper, painted the ceiling, changed out the light fixture, installed crown molding, added the chunky header to the doorway and painted and hung the frames.
We absolutely love it and I am definitely using this wallpaper elsewhere in the house -- not a ton...but some. It's just SO beautiful!
The pretty gold lining on the light shade is lovely when the light is on:


The wallpaper has been up for a couple weeks and still smile when I walk into this hall every day -- it makes me very happy!:


Many of you have asked about the room with the dark wall color. You can read all about that here!
I learned through this particular project that I sometimes make things much bigger and harder in my head than they really are. Hanging the wallpaper wasn't bad at all. I'd do it again in a heartbeat (and will!).
I hope you've enjoyed this little transformation! As always, thanks for joining me along the way!
If you'd like to see the book nook transformation, check it out here!:

See more of our home here. To shop items in our home, click here! Never miss a post by signing up to get posts via email.
I think these are some of my favorite makeovers -- the small areas that are unexpected and full of detail. It adds a lot of character and charm to a home. I love it!
The first detail I wanted to finish up was the trim around the door to the hallway. I started changing some of the trim in this house to the chunky Craftsman trim we had in our last home. I shared how I added the trim to this large doorway here:

I've decided I'm not going to do every doorway -- at least not yet. This house has waaaay more doors than our last one. I think too much trim may get overwhelming in spots. But I am going to continue to work on the larger areas like this pass through above (the other side) and the taller areas like to our basement, the back door, and the entrance to the little hallway I've been working on.
This time though, just because I was being a little lazy, I wanted to try something different. I don't mind our door trim -- it's nice! It's not quite as wide as the stuff I used on the doorway above, but close enough.
I tried cutting down the side trim at the top, instead of taking it down and replacing it. I marked a level line across the trim, then used my Dremel cutting tool to saw through it:

It worked great! That left me with just a small triangle-shaped, mitered cut to take off the top, as well as the top piece of trim.
I held up my header pieces to see how I like it with the trim we already have and loved it! So that saved me a ton of time. You can see what I did here -- the old side trim butts up to the new header:

It looks great! There are a few spots I plan to match the ones I've already done and replace the side pieces, but many of them I'll do like this. It saved SO MUCH time!
I also simplified the gallery wall hanging on that wall -- more on that in a bit. I went with simpler, but bigger frames instead:

They are the Ribba frames from IKEA -- the best frames ever. Simple and cheap! I painted the mats of the frames the same color as the ceiling and the dining area -- Cyberspace by Sherwin-Williams.
To see the full name of the wallpaper and the tutorial for hanging it, check out this post!
I only did four to start, but we're thinking of adding more:

I don't want to cover too much of the wall...but I think this spot needs a bit more of a statement. I'll either add one centered at the bottom and top, or add two more lined up at the top and bottom. Not sure what I'm doing just yet. (By the way, look at our baby! He was the CUTEST!!)
For now I'm just going to enjoy this spot! I haven't received the wallpaper to finish up the small little spot on the opposite wall, but that will take ten minutes to finish up. I'm going to call it done for the time being!
Here's a look at a before photo of this little spot:

And how it looks now!:

In this little spot I hung the wallpaper, painted the ceiling, changed out the light fixture, installed crown molding, added the chunky header to the doorway and painted and hung the frames.
We absolutely love it and I am definitely using this wallpaper elsewhere in the house -- not a ton...but some. It's just SO beautiful!
The pretty gold lining on the light shade is lovely when the light is on:


The wallpaper has been up for a couple weeks and still smile when I walk into this hall every day -- it makes me very happy!:

Here's one more before and after just because they are so fun. This was after I changed the recessed light into a pendant light:

And here it is all "finished" (still have to fix the wallpaper to the area over the doors to the right!):

Many of you have asked about the room with the dark wall color. You can read all about that here!
I learned through this particular project that I sometimes make things much bigger and harder in my head than they really are. Hanging the wallpaper wasn't bad at all. I'd do it again in a heartbeat (and will!).
I hope you've enjoyed this little transformation! As always, thanks for joining me along the way!
If you'd like to see the book nook transformation, check it out here!:
See more of our home here. To shop items in our home, click here! Never miss a post by signing up to get posts via email.
Your home is beyond lovely! Thank you for sharing! What about a frame in the middle of the 4 frames that is larger thicker shadow box type that is a hinge or maybe you don’t tough that thermostat much to hide it? You could force the mat forward & use the back of the shadow box to Float and overlap the 4 corners of the current frame. I sure hope that made sense?
ReplyDeleteThat is a great result and I totally approve of the look modified without having to remove the side trim pieces. It still appears on purpose and not lazy - actually I really like it and the additional level of detail suits your house style more than totally plain/flat side pieces IMHO.
ReplyDeleteI've got this bathroom in the middle of the house that I'm about to put V groove wainscoting in and I hope to add a bit more such architectural detail but not a ton to my home. I worry that I have to do something similar in practically every room if I do it at all, so it was interesting to read that you're not planning to trim out EVERY door in your house this way.
This really did make such a statement. I love that wallpaper and all the trim too. Great makeover
ReplyDeletePretty pretty pretty!
ReplyDeleteWould you either take an image of the "cheater" process for the doorway or draw an image I think I understand what you did but it would be helpful.
ReplyDeleteYour home improvement projects are so inspiring because while they are not technically "simple" they are reasonable for the average person :)
I know this post isn't about your Fiddle Fig tree but I see it in one of your pictures. "I spy..." I have been comtemplating real vs. faux. The faux ones I've been able to actually see (Pottery Barn & Home Goods) look fake to me. I'm fine with a real one IF they are reasonably easy to care for. And I don't want to mess up my hardwood floors with water stains from it. Any advice?
ReplyDeleteI second this request, please.
DeleteYes I have a couple posts dedicated to them! :) https://www.thriftydecorchick.com/2017/01/how-to-not-kill-your-fiddle-leaf-plant.html
Deletehttps://www.thriftydecorchick.com/2016/01/my-favorite-decorating-accessory.html
Can you tell me about your floor. I’d love to know the manufacturer and color name. Thanks. It’s all beautiful.
ReplyDeleteThey are Diamond Living, Aged Harmony Plus in Auburn :)
DeleteIt looks so amazing, Sarah, and the pattern really plays off the round wall hanging by the stairs from that angle!!
ReplyDeleteI love this idea of keeping the side casing and just change out the header. I want to do the same for my 80s contemporary stained door and window trim. But proportions are important. Can you tell me the height of your ceiling, the width of your existing trim and the dimensions of your added header? Thanks so much. -Eileen
ReplyDelete