
How to Add Cutting Board Storage to Side of Fridge
April 24, 2019
Share this
How to use the side of the refrigerator for pretty platter and cutting board storage.
I love that the empty side of the fridge now has some function and looks great!
If you've missed any, you can catch up by seeing the new kitchen island with chunky side panels here, how I built out the end of our kitchen cabinets, my trick for adding kitchen cabinet feet and my tutorials for under cabinet lighting and how to hide it here.
Whew! OK, as I said, this was the most complex of all of them, but makes a statement. Like the other projects, it's not dramatic and something you'd immediately notice because it's in a spot that not everyone sees.
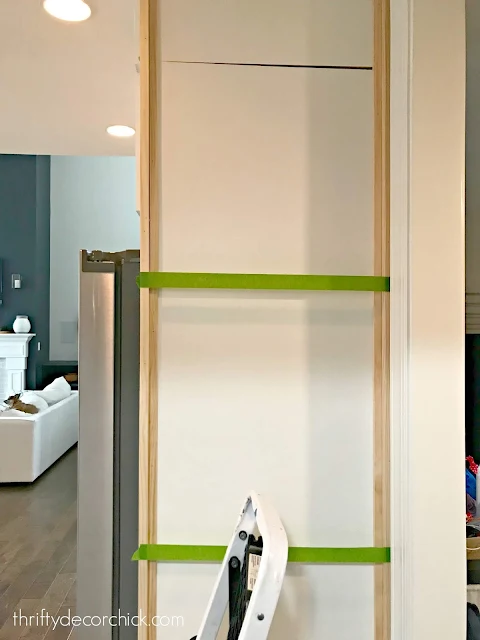
The area I've wanted to tackle is this boring side of our refrigerator:


See more of our home here. To shop items in our home, click here! Never miss a post by signing up to get posts via email.
Whew! OK, as I said, this was the most complex of all of them, but makes a statement. Like the other projects, it's not dramatic and something you'd immediately notice because it's in a spot that not everyone sees.
The area I've wanted to tackle is this boring side of our refrigerator:

It's a spot with so much potential, right?
I've planned to do this for awhile, and when I saw how my blogger friend Yuni added this fun treatment in her kitchen, I knew what little detail I wanted to add:

I wanted to build something that would hold our large cutting boards and this was perfect. The leather accent was my favorite!
To get started, I had to remove all of the trim from the side of the cabinet. This included a little decorative piece that hides where the cabinets meet. Then I got busy with the sides of my shelves:

Here's a close up -- I used a 1x2 on the sides -- nailed right through the front (and into the wall on the right).
Because I wanted some extra support for those pieces, I grabbed some smaller trim (measures about 1/2 inch by 3/4) and nestled that up to to the sides of the 1x2s:

This gives everything a little more support.
Then I needed to start figuring out where I wanted my shelves. I was initially only going to go with three or four, but this is a tall cabinet (nine feet), and I felt like it needed more:

I ended up doing six shelves. I covered the gap between the two cabinets with one at the top and then at the bottom -- those are the smallest. I increased the size slightly as I moved to the middle. The two shelves in the middle are the biggest (I have a couple large boards I wanted to make sure would fit).
To build the shelves, I used three pieces of trim -- the half by quarter inch stuff to start it, then a piece of 1x2 on the front of that (all nailed into the cabinet with short nails and into the side trim with longer nails).
I also added a strip of very thin lattice across the front -- this gives the items a place to sit and the lattice trim prevents them from going anywhere:

The next is a part you could easily skip if you are making this the same color as your cabinets. At first I was planning to paint this a different color than the cabinets. Because I didn't want to mess with having to prime/paint the cabinet side, (which would take more time to do properly) I wanted to cover it up.
I lucked out and found various pieces of luan leftover from other projects that happened to fit perfectly. The pieces aren't all symmetrical, but I knew I wouldn't see that much of them, so it didn't bother me:

I saved money by using what I had, but then I had to caulk quite a bit between these -- the edges on some were just too rough. So what I saved in money I gave up in time. :)
Oh, and because I know I'll get this question -- I added the strips to the back after the shelves for two reasons. One -- I only had eight foot pieces, and this is nine feet tall. The shelves took up some of that and gave me just enough. Secondly, I wanted the front of the shelves to be flush with the sides. If I had put this on first, they wouldn't have met up correctly.
After all that, in the end I decided to paint it all the same color as the cabinets -- it was going to be too difficult to do a contrasting color when there was no good place for it to end. I didn't want the sides to be a different color than the cabinets. SO...again, the backing is not necessary. But it does add a little detail to it.
Once everything was caulked and painted I moved on to the fun part! I'm not sure what Yuni used, but I decided to use belts as a strap to hold the boards on the wall. (These are similar (affiliate) to what I used.) I started by using one of the belt holes for the left side (I cut off the end of the belt):

Washers are a must! They will prevent the screw from coming through the belt.
I could have just attached these to the front of the unit, but I liked how hers tucked back inside. I installed the left one and then would pull the other side taut to see where I needed to cut the belt:

Once I got the sizing right (scissors cut these just fine), I drilled a hole for the screw, then repeated the washer and screw installation on this side. The right side took some maneuvering to get it tight (my drill didn't fit great back there), but it went much faster after I did the first one.
I'm SO pleased with the final result!! It's another great detail that adds some character to our kitchen!:


LOOOOOVE! This project is right up my alley -- pretty and functional! I also gained some space in our cabinets by displaying these. Always a good thing!
My favorite board is the large round one:

Its really a pizza paddle and I got it at Pottery Barn (affiliate) on sale and with a gift card. It's HUGE -- I put our meats and cheeses on it when we have company. (Looks like it's on sale now!)
By the way, you may notice the side pieces are angled at the top -- this will all be covered eventually when we have additional cabinets added to the other side of the fridge. We'll have to add to the crown molding at that point so I'll add it to this side then too:

The crown will wrap the whole thing at the top -- but until then, just having it cut off at the top looked really odd. I cut it at an angle to soften the transition a bit.
The cabinets on the other side will be a bigger budget item. I'm SUPER excited about those but it will be a bit before we can get those. So until then, we've been enjoying the smaller projects I've completed over the past month or so:

I spent about $100 on this project -- the most expensive of all of my recent additions. I'm thrilled with the function it adds to our kitchen! I've really enjoyed adding these custom touches to this space. Little by little I'm adding my stamp to this house and having a blast doing it!
I promise this is the last kitchen post for a while. SWEAR. 😂 Now that I'm done in here (for now) my focus will be on other projects.
Have you ever added function or storage to an odd spot? It's seriously one of my favorite things EVER.
By the way, if your fridge is open with no cabinets around it, you can see how I built in our refrigerator at our old house. Here's the before:

And how it looked all finished up!:

See more of our home here. To shop items in our home, click here! Never miss a post by signing up to get posts via email.
Such a beautiful idea! Love it!!
ReplyDeleteYou always have such great DIYs to maximise the use of a space! This looks great and would be perfect for any tiny kitchen. ❤️✨
ReplyDeleteCharmaine Ng | Architecture & Lifestyle Blog
http://charmainenyw.com
Looks so cute! Definitely pretty + functional!
ReplyDeleteSo beautiful and simple
ReplyDeleteSorry, cant tell much with last 2 pics. What did you use for the back of the addition..the part that is against the fridge side. Missed seeing it described that part of your description.
ReplyDeleteI was thinking you were going to add a chalkboard wall before I opened the post. This is a great addition!
ReplyDeleteThis is great! Functional and beautiful absolutely.I really love because it looks like an art display!
ReplyDeleteAmazingly Beautiful. You've done a great job. I just love it.
ReplyDeletei love diy art