
Wall of Office Built In Bookcases REVEAL!
July 18, 2019
Share this
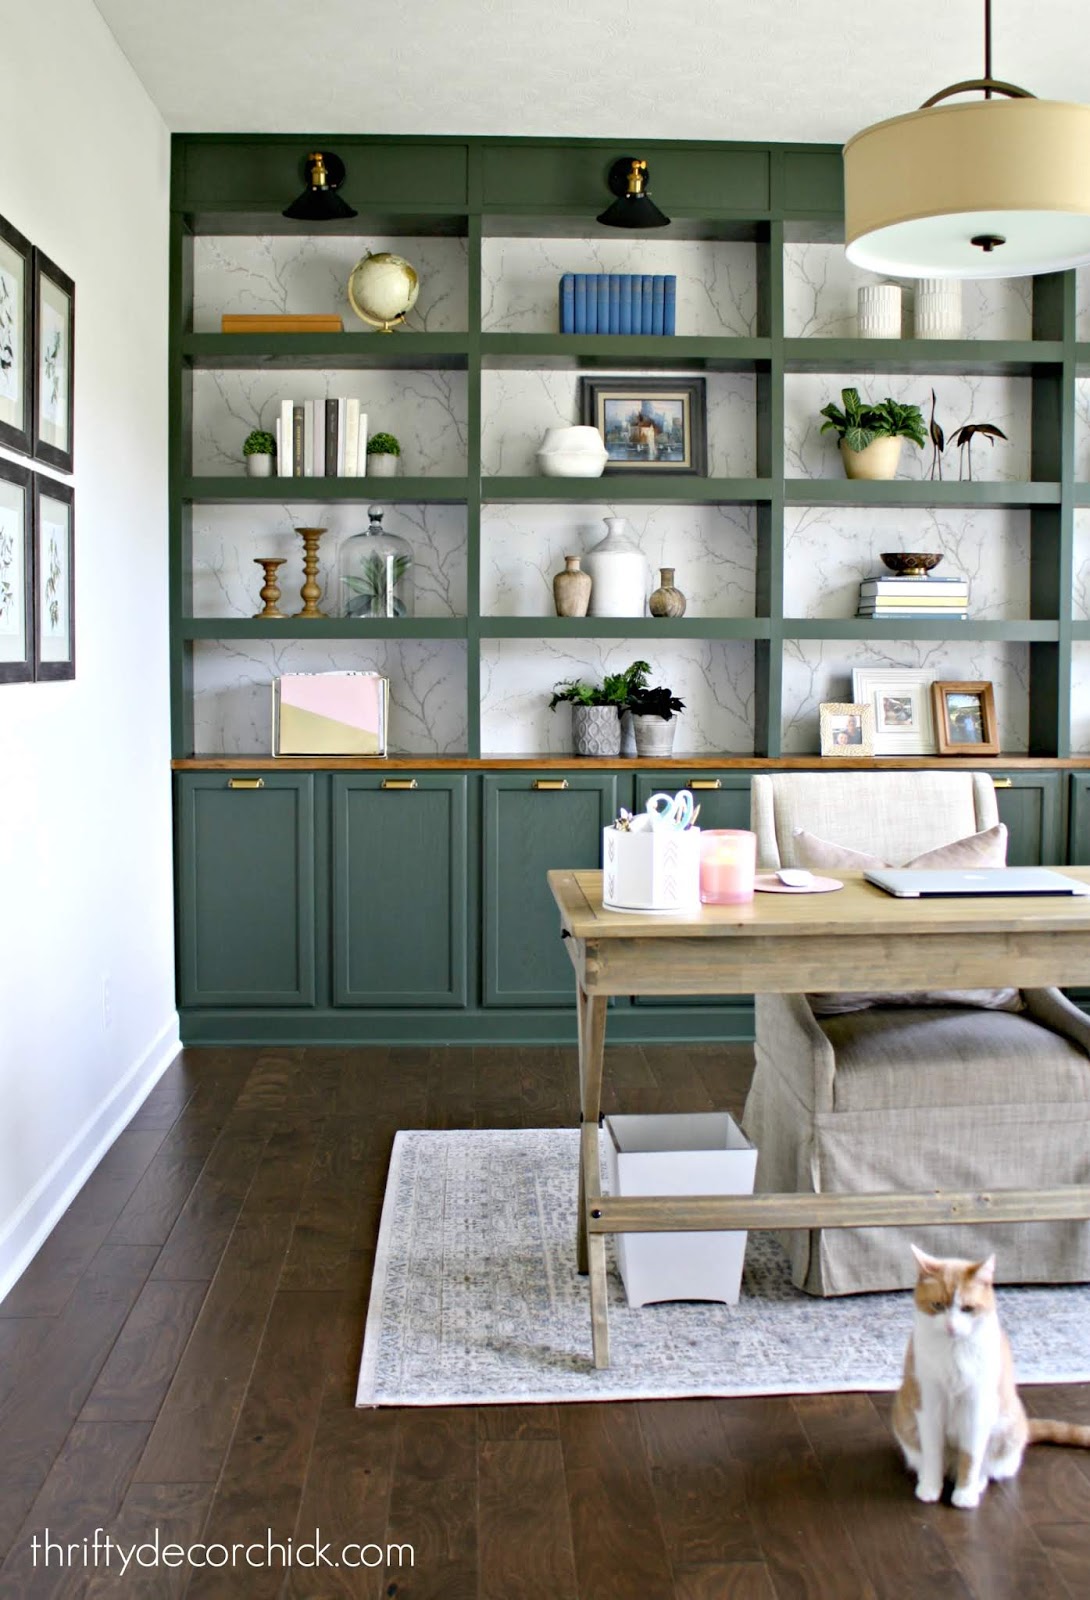
It's reveal day! Not gonna lie, I am so proud of myself for completing this project 100 percent on my own. I have been dreaming about a wall of built ins in my office since before we moved in. I pictured them there from the very beginning and they are better than I even hoped.
Let's go back and recap the steps, shall we? If you are going to attempt this on your own, these will be very helpful.
I have built a bookcase this size before, but my Dad helped quite a bit and I had help with lighting and the shelving as well. This time I was determined to do it all on my own and that I did.
This is how my office looked after I had finished unpacking all of the boxes. It was my dumping ground for a couple weeks after our move:

It's a lovely spot that gets great natural light. I love working in here!
This post may contain affiliate links for your convenience.
See my policies and disclosure page for more information.
Last year I changed out the the light and a few months ago I pulled up the carpet and we had our hardwood floors put down:

I get asked about those grids often -- they are window grids I found at Goodwill years ago. :)
The first step in the built process was adding the kitchen cabinets as the bases:

I use upper cabinets because they are just doors and they have a slimmer profile. They still hold a ton of stuff! Be sure to check out that post to see how I make them look built in.
Then I hung the peel and stick wallpaper -- it's still a favorite!:

This time I broke the painting up into sections and goodness, it made it SO much more manageable! It also gave me an idea of how it would look, so I was much more motivated to get it done.
I shared the pretty green color I chose for the cabinets here:

I'm falling hard for green lately! I just love it.
Next up, I shared how I built the sides, supports and header for the built ins:

After I got all of that painted I was able to get the lighting up. I saved a bunch by using this lighting trick without electricity instead of having them wired:

And finally, I showed you the three steps to building the bookcase shelves here:

After that there was a lot of caulking and touching up to do. I added some trim to the header to finish it off as well.
I was so excited to finally start decorating these after all that work!


I used a lot items I've had in our storage room for nearly two years now! I was so thrilled to bring these back out:

I did get a few new items from Hobby Lobby and At Home as well.
I did a massive purge of our books after the move (wish I would have done that BEFORE packing them up) so the shelves aren't full of them, which I prefer.
When I was decorating the shelves I got to where I was nearly satisfied, then I removed a few items. I find that's often the key when accessorizing!:


I shared my tips on decorating bookcases in this post years ago. It still works now!
I finished these up in less than two months -- which is WAY faster than I took last time I did this. Overall the way I did things this time was quicker and more efficient:

But I am worn out! 😂 I'm taking a break from big projects for awhile!
Enjoy more pics of this space. I'll share resources at the bottom:


I hate to be that girl that shares so many pics of the same spot, but I'm dang proud of this so I'm doing it. ;)
Now for my favorite part! The before and after picks. Here's this room shortly after we moved in:

And the same view now:

And this view before:

And the after!:
I hope you enjoyed the process and will maybe try this in your own home! I kept a running list of costs at the beginning but stopped after a few weeks. I did estimate that I was going to end up at $1000 total for everything -- that includes the lights, paint, hardware...all of it.
I'd pay WAY more than that to have a this built for me. And it brings me great joy to do this stuff on my own!
I have more plans for the other side of this room that I can't wait to show you as well! I'm hoping to get that wrapped up next week sometime and I'll be sure to share that. :)
Here's a list of the items in this room in case you are interested!
- Sconces on bookcase
- Hardware on doors
- Wallpaper source
- Wood desk
- Rug and round mirror are from At Home
- Gallery wall with free bird prints
- Rolling desk chair, HomeGoods
- Pendant light
See more of our home here. To shop items in our home, click here! Never miss a post by signing up to get posts via email.
Beautiful! Great job! You are so creative and talented. :)
ReplyDeletelooks amazing
ReplyDeleteWell done! It's just beautiful.
ReplyDeleteI am determined to do more projects on my own this next year. My youngest has this long empty wall and I think this would be perfect for her room. She has polka dots on that wall and this would still let them show through!
ReplyDeleteLooks awesome! So much talent! Is the stained wood surface on top of the cabinets one long piece? Can you share more about how you made it/sourced it?
ReplyDeleteIt's actually two pieces -- you can see more here! :) https://www.thriftydecorchick.com/2019/06/the-gorgeous-wallpaper-on-office.html
DeleteBeautiful work! Now sit back and enjoy them
ReplyDeleteThis is just AWESOME!! Love the color, the entire design and your styling. ❤️
ReplyDeleteAbsolutely beautiful!
ReplyDeletewow, sarah! they look phenomenal!
ReplyDeleteSarah, once again you nailed it!! Beautiful job, love the paint color. I know you are so proud!!
ReplyDeleteOh my word Sarah, this is absolutely amazing. It looks so pretty and you did such an amazing job on it. I am so impressed and love it all.
ReplyDeletePerfection as always!
ReplyDeleteLove it! Awesome job.
ReplyDeletelooks so amazing! congrats on a job well done.
ReplyDeleteGorgeous! Congratulations, it looks awesome!
ReplyDeleteImpressive! Great job on your hard work. So pretty!
ReplyDeleteWOW you had a vision and it turned out amazing!!!! Way to go!
ReplyDeleteBeautiful! Did you seal the paint with poly or anything?
ReplyDeleteThank you! No, no need if you use a quality paint. When it cures it holds up wonderfully!
DeleteSo inspiring!!! Oh my goodness. You are amazing. This makes me want to try this.
ReplyDeleteThis is AMAZING. . .you're making me look around my space, trying to determine where I can do this :)
ReplyDeleteWhat color are the other walls? I am having a hard time picking what color to pair with Vintage Vogue.
ReplyDeleteThey are agreeable gray by SW.
DeleteI love this and the previous bookshelf you built in your old home so so much! My boyfriend and I are moving next month and plan on doing this in our dining room with the help from my dad and I couldn't be more excited. What makes me a little nervous is the timeframe... I see the previous one took you about 9 months and this one 2 months. This is something we're hoping to get done rather quickly since our new place lacks storage and shelving. What was the most time consuming about this project if you don't mind me asking? Thanks so much for sharing your tips and projects!!!
ReplyDeleteThank you! SO many reasons...kids, work, other projects and the biggest reason is I do it all myself. If you both work on it, it will move quicker! :)
DeleteI really like your skinny tall initials but I didn't see a link. Where did you find those? Thank you!!
ReplyDeleteI absolutely love this, we are moving next month and I'm in the process of purging a lot of my books and papers, so really inspired. I need this kind of storage in my new home office at the new house, so excited to try this.
ReplyDeleteDoesn't look like that's even the same room???? I'm questioning the auetheticy of this...look how the windows are in each photo.
ReplyDeleteYou seriously have to be kidding me.
DeleteBeautiful! What stain did you use on the wood on top of the cabinets?
ReplyDeleteWhat is the height the shelves? They all look about the same. My wife has me doing this project. :/
ReplyDeleteThey are around 14 inches each -- but that will depend on how many you want and your ceiling height.
DeleteBeautiful job! Now you have inspired me to do a media wall and especially to do green!! Could you tell me the total thickness of the shelves?
ReplyDeleteThank you!! They are about two inches thick.
DeleteVery impressiv ! Thanks for sharing. How did you manage to have the length of your walls to match exactly a multiple number of kitchen cabinets ? How did you manage not to end up with the length of a half cabinet for exemple.
ReplyDeleteThank you
Oh gosh I hope you see this… did you paint your shelves after they were in place or did you dry fit, take them down, paint and reinstall? I’m nervous about painting with them up since I will have wallpaper behind too.
ReplyDeleteYou can do either! I did after because of caulking/filling holes, but it's totally up to you!
DeleteI have this same question! You are so talented!! Beautiful work!
ReplyDeleteI saved this post in my browser for months and then finally started the project. I basically copied your whole plan except for the wallpaper, and used different colors. It took me about a week to get it done, and it turned out amazing. My wife has been asking me for a "library" for a few months and this came out way better than she expected. Thanks for sharing and great write-up!
ReplyDeleteSo happy to hear it helped! Send me a photo if you want!
Delete