
How to add a light anywhere without electricity
May 13, 2021
Share this
This post is all about adding lighting...where you didn't think you could! I
used this easy hack on my wall of office built ins.
**The next step in this bookcase project (building the shelves) is here
**See this whole finished project here!
See more of our home here.
If you remember, in our old house it took me forEVER to find the lights I
wanted. I finally
went with outdoor lights
because everything else was crazy expensive:


The back of the puck light has two holes -- you'll need to run the wire
through those, then tighten as much as you can:


For me, the convenience far outweighs the cons. If I have an outlet below (to
run wiring) and a good spot for a light switch nearby, I'll still opt for
having it wired. But this is a great option for bigger projects like this that
would cost more to have an electrician add.

They worked perfectly!
Thankfully now that sconces have become more popular, they are much more
affordable. There are a ton more options now too.
This post may contain affiliate links for
your convenience.
See my policies and disclosure page for more information.
I wanted that look again, and found a brass and black sconce I love that
I've used before -- you can see it here in
our mud/laundry room:

I used this little hack on that light too! You can find
the black sconces here -- they are affordable and you get two in the order.
Usually when I build bookcases, I have electrical run to the lights to the
header. This time,
because I know of this lighting trick...I didn't pay for that part. There are pros and cons to this trick so
stay tuned for those!
The trick is using
these puck lights
inside the fixtures:

I used this little hack in our dining area as well -- it's a way to
add soft lighting without running electrical:

It would have been really difficult to wire them on these skinny shelves, so
this trick worked great! Make sure to check out the post to see how I made
those specific sconces work! (Hint: it was even easier than what I'm sharing
today.)
This time, I needed to secure them to the sconce because it was facing down.
** I've found an even easier and more secure way to do this so I'll share
that option first!
I discovered this little hack when working on our
laundry and mud room makeover. When we had the cabinets moved, I later noticed that some task lighting
would be nice on the new counter. I would have run electrical before I
started this project, but I hadn't planned on adding sconces.
Enter these pretty sconces with the puck lights!:

This time though, the sconces had a shade that narrowed a bit too much at
the top, so I knew the pucks would probably not fit.
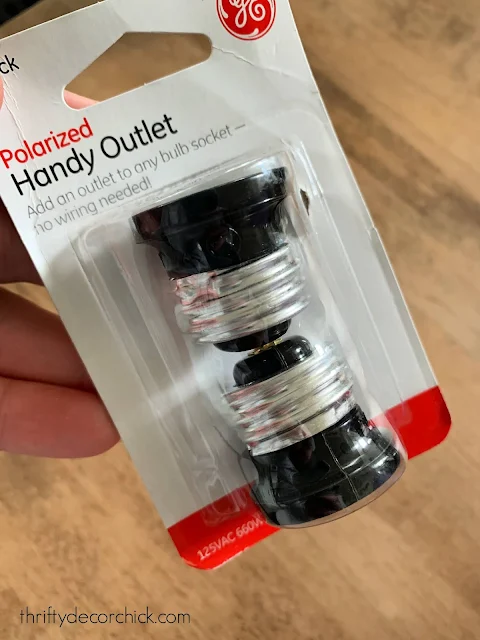
I noticed something when I was ordering the lights -- as a suggested item at
the bottom, it showed these
handy outlet adapters:

These are great if you don't have outlets outside, especially for something
like holiday lights. You can screw this into your outdoor lights and use
them as an outlet instead. Cool, right?
I decided to use them to make it easier to change out or charge the
batteries in our non-electrical light fixtures. And I knew I needed to
bridge the gap between where you screw in the bulb and where the shade gets
too narrow on our sconces.
I took some scrap dowel rod, cut it down and spray painted it to match the
light. Then glued it on to the adapter:

The spray painting is really not necessary -- I thought we'd be able to see
it in there but you can't at all. You'll need to figure out how long you
want to cut your dowel, this will depend on your light fixture.
I glued the parts together with
Gorilla Glue, and it's held up awesome! Once it's cured it's SUPER strong. I also used
it to attach the bottom of the puck to my little contraption:

As you can see, I drilled a hole through the wood to run wire through (stay
tuned for that in a minute), just for added security. It is not needed
though, so if you choose this option you can forego the wire.
This option makes it super easy to screw in and out, just like a
light bulb!:

It has worked so well -- I'm planning on making this change to the sconces
in my office. You can see how I first attached them with wire below...
If you don't want to use glue or the adapters, all you'll need is this 24 gauge wire:

The sconces have a part inside that has a small hole. I ran the wire through
that:


When it's secure, twist the puck light (with batteries) back on:

And that's it! I use the bracket that comes with the light to hang -- just
screw it into the wall and hang your light:

They look GREAT! I wanted something simple that I could aim toward the
shelves, and these work perfectly.
As you can see here, I angled them so you can't see the light unless you're
right under them. The scones have adjustable arms:

Check out this post to see the
steps of the DIY bookcases to this point!
I almost forgot to mention, that little remote in the photo above allows you
to operate these without touching them. It has a timer and dimmer option
which is great. The timer is key because when I've used puck lighting in the
past, we would turn them on and ALWAYS forget to turn them off. The battery
ran out quickly because of that. I purchased
another puck light remote
for this room.
There are pros and cons to these little puck lights:
Pros
- Using this hack is MUCH cheaper than running electrical.
- You can use them anywhere so it opens up so many possibilities.
- The puck lights give off a decent amount of light.
- You can do this with regular light fixtures (where the lights are enclosed) as well -- not just sconces!
Cons
- The light is not as bright as normal bulbs. I'd compare it to somewhere between at 25-40 watt bulb.
- The remote isn't quite as convenient as a light switch.
- The puck lights aren't as attractive as a bulb.
The items I used for this lighting hack:
Long arm black and brass sconces (in laundry)
**The next step in this bookcase project (building the shelves) is here
**See this whole finished project here!
See more of our home here.
To shop items in our home,
click here!
Never miss a post by signing up to
get posts via email.
Great idea! I have some antique sconces that I can’t commit to putting anywhere because of the wiring ~ this makes them practically portable! Thanks.
ReplyDeleteHow difficult it is to change the batteries when the puck light is wired into place? Any of the puck lights I have seen require access to the back of the light
ReplyDeleteI love how a simple light fixture changes the entire look of the room. Great post! ❤️✨
ReplyDeleteCharmaine Ng | Architecture & Lifestyle Blog
http://charmainenyw.com
I used this idea but instead of wiring I used velcro.I purchased a cheap puck light at HD to see if I liked how it looked before purchasing the lights you recommended.I also spray painted the puck light black so it blends in with my sconce.Well I love it!It is a nice accent light and when we lose power in the winter it will come in very handy.
ReplyDeleteThis is such a cheap and pretty alternative when the lights only need to be on occasionally. Timers are good things. Good job!
ReplyDeleteThis is absolutely brilliant. Your creativity amazes me 👍 Love it and going to do it in my home. Thank for the great hack. ♥
ReplyDeleteThis is so smart! Thanks for the idea!!
ReplyDeleteAfter I read your previous post about adding light anywhere, I ran out and bought several packages of the puck lights. I have an antique oil lamp chandelier in my dining room that could never be "lit" with oil (smoked like crazy and discolored ceilings). The lights sit nicely on top of the wick channels. Thanks for the idea - so happy we can use our family heirloom again!
ReplyDeleteI love this idea!!
ReplyDeleteGreat idea! You are very creative. One question though - how often do you need to replace batteries for the plucks?
ReplyDeleteHey that wire through the electrical socket could be dangerous, if it touches the negative side, power!
ReplyDelete