
Board and batten staircase accent
January 22, 2020
Share this
Hey there! I'm back with the first completed wall of trim work on our stairs! I have three walls to do and this one was the smallest. As you'll see I have quite a bit of work ahead of me, but we LOVE it so far!!
If you missed the how-to, check out this board and batten how-to post to see how inexpensively I did this project (this is only $15 worth of trim!):


And how it looks with white paint -- I love it so much:

This room is slow but sure becoming exactly what I envisioned all those years ago when we first walked through this house. It didn't have drywall, windows or floors, but I could see it in my mind! :)
See more of our home here. To shop items in our home, click here! Never miss a post by signing up to get posts via email.
If you missed the how-to, check out this board and batten how-to post to see how inexpensively I did this project (this is only $15 worth of trim!):

This post may contain affiliate links for your convenience.
See my policies and disclosure page for more information.
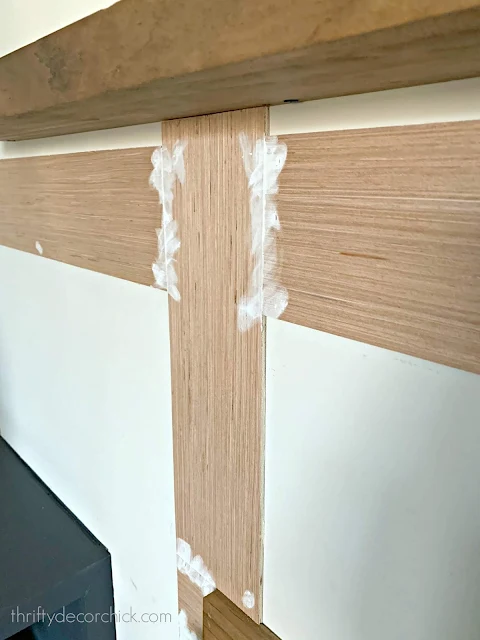
Remember how I said it's hard to envision the end result sometimes? With all those angles and without the paint on, it can feel busy.
Trust my friends! Paint saves the day, yet again!
First, I had to fill the nail holes (I use a nail gun to install all of the strips). I have just recently started using this spackling compound and I'm loving it:

It's super easy to apply with both your finger (my preference most of the time) or a putty knife.
Make sure to get all of the seams and nail holes and then let dry:

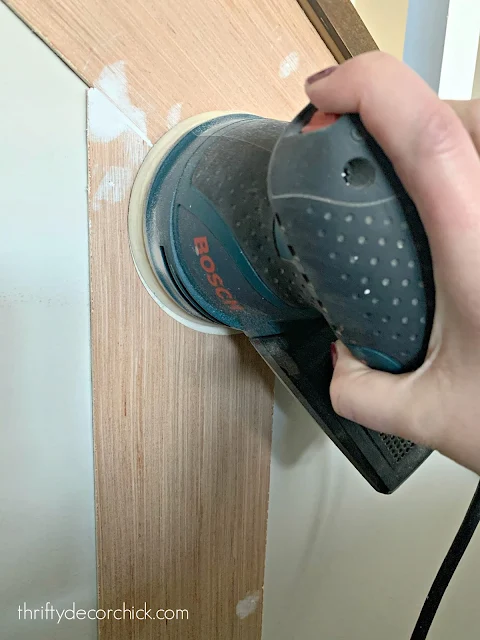
You can hand sand this down after it dries, but I prefer my hand sander because it's so quick.
I hate sanding, but it only took maybe four or five minutes to sand down everything:

Painting is always the longest step -- it took three good coats of paint and a few touch ups all over (OK, let's just say it was four coats) and it was DONE!:

I caulked up a few spots along the stairs and wall as well.
I still need to address the stained area under the stair trim -- there are some unstained spots showing since I changed out the trim. You can't even tell just looking though:

I've noticed when working on trim work projects in our home that the white paint color I've been using, Pure White, hasn't been matching exactly.
I checked our records and it says they used Pure White but there's no way. Pure White is brighter and whiter than our trim. So I took a piece of old base into get color matched and this is a much closer match! I like both white colors -- you can't go wrong with either.
Ours is a slightly creamier white:

I went to share the paint formula with you but they didn't attach the sticker to the can. I'll see if I can get it from them. (I use Sherwin Williams paint.)
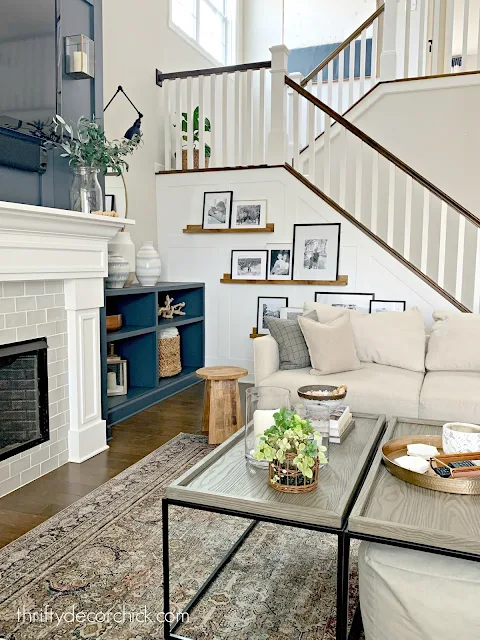
Anyway...we love it!! It's exactly what I wanted for these walls. As I mentioned last week...all three of the stairway walls will get this treatment:

And it's perfect. It's a beautiful accent that adds character to the room but it doesn't take over the space.
I was a little worried it would compete with the big fireplace wall with trim that I did last year, but it actually ties the two together beautifully! I couldn't be more pleased!
Here's a before photo from right after I finished up the built ins by the fireplace:

And here's that wall with the DIY picture ledges (so cheap to make on your own!!) and this first board and batten accent wall:

I really love the combo of the crisp white, stained wood and black frame accents! It's my jam. :)
Now I can't WAIT to get all the walls done! It's going to be so lovely when it's finished! I think I'll tackle the long wall on the landing next, since it's the easiest. (As long as my ladder will reach. 😬)
Here's another look at the wall last week:


See more of our home here. To shop items in our home, click here! Never miss a post by signing up to get posts via email.
This looks gorgeous. i love it. Really does add more character.
ReplyDeleteI have to say...I didn't see it pre-paint but now I get it. Looks great and really liking your new rug in this space!
ReplyDeleteI initially thought it would be too much, but it’s the perfect addition. Can’t wait to see the finished product!
ReplyDeleteAbsolutely love it! Can I ask a question? Did a batten treatment in our bathroom using regular 1x dimensional lumber. I used wood filler and it cracked. Should I have used spackle instead?
ReplyDeleteI have this same question! We used latex paintable caulk on our bathroom shiplap and it has separated in a few places.
DeleteEither should be fine! I find that spackle has a little more give so doesn't crack often, but over time as things settle it's unavoidable sometimes. (It happens with caulk too.)
DeleteFWIW, I wanted to get more ceiling paint at our last house and I took in a photo of the details to Benjamin Moore. They were happy because THEY HAD CHANGED THE FORMULA FOR THE PAINT COLOR! and if I had just brought in the name, the paint would no longer match. I was appalled: changing the formula and keeping the name? We're looking at a new house and believe me: we will keep records of names, dates and formulas!
ReplyDeleteLooks so good! Thanks for being a constant inspiration! ❤️✨
ReplyDeleteCharmaine Ng | Architecture & Lifestyle Blog
http://charmainenyw.com
You are a such a visionary. I love it. I was not gifted with your talents. I need to see something done to see how it would look and if I would like it.
ReplyDeleteThis I love. And you made it seem so easy.
That looks So. Good.! Love it.
ReplyDeleteWhat is your wall color in the living area?
ReplyDeleteAgreeable gray
DeleteAre your walls slightly textured? and if so, is it noticeable that the boards/trim are smooth? I really love the look but not sure if I could do that with our walls.
ReplyDeleteOur walls aren't textured, but you can install thin boards cut to size over the wall first to give yourself a smooth surface. :)
DeleteThis looks AMAZING! I agree that I did not see it at.all.in the during photos. However, it really looks beautiful. The combination of color change and texture/depth the wood add, combine to really make it look stunning. Like it was meant to be! I have a question. For your luan (which i think may be only 1/4 in thick) - have you been using brad nails or staples in your gun? I ask because I have had an issue with the thinner strips popping off because the nails go through them. Or maybe you lower your psi? Thank you and as always, thanks for posting such great and inspiring posts!
ReplyDeleteThank you! I use nails -- I've had that happen a few times but not often! Yes, try changing your psi so it's not as strong, or nailing at an angle.
DeleteThis looks great! Can you tell me where the white/blue art at the top of the stairs is from? Thank you.
ReplyDeleteThank you! I found that at HomeGoods!
DeleteI have followed you for years. I just sat down to take a break from doing faux board and batten on our stairs! And I saw this. ��Thanks for all your hard work!
ReplyDeleteLove it! Board and batten wall treatments are always a great choice! I understand that if you use wood filler rather than caulk/spackle, it doesn't crack. Any thoughts?
ReplyDeleteWood filler for wood against wood seams, not against drywall.
DeleteLooks amazing. Thank you for sharing your vision and the outcome. What color blue did you use on the shelves? Everything ties together so nicely in this room.
ReplyDelete