
How to Spray Paint Kitchen Cabinet Hardware
October 17, 2024
Share this
How to spray paint cabinet hardware and get a perfect finish!
You can give your kitchen or bathroom cabinets a new look by spray painting your knobs and pulls instead of replacing them.
I love any project involving one of my very
favorite DIY "tools" ever -- spray paint!
I've blabbed on and on about my
love of spray paint for years now. It's one of the easiest and least
expensive ways to completely transform an item or room.
This transformation was in the kitchen and I'm really happy with how it turned out.
I've added an update on this hardware and how it held up at the end of this post!
When I was picking out the finishes for this house, I went much "softer" and lighter than I had in the past.
It felt right at the time, as we were starting fresh. But I quickly
discovered that I am a contrast lover through and through.
Almost
immediately I was craving it. I started
painting walls super dark,
hung dark wallpaper
and changed out some lighting for bigger and bolder options.
This project involved our kitchen handles:

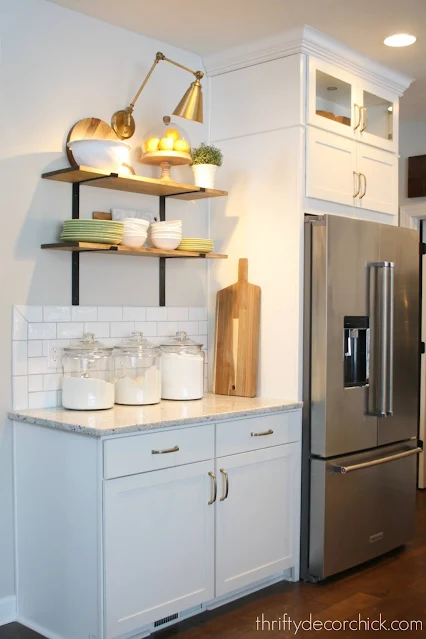
I picked a lovely brass handle that looks GREAT. I loved the handles and
the color was gorgeous!
But they didn't feel substantial enough -- it was
something I noticed every time I walked into the kitchen.
I
bought a set of black handles just to see if I liked them:

We loved them! But it would have been kind of spendy to replace all of the hardware.
And ours are really nice, I just wanted to change the color.
So...spray paint to the rescue!
I've spray painted bathroom and kitchen handles in the past and it's
a really easy DIY project. Spray paint is a GREAT way to ease into
do-it-yourself projects.
For this one I used the
Krylon Fusion All-in-one spray paint to paint our hardware:

I wanted a slightly more modern feel so I went with the satin black. It leans towards a matte finish but is not dull at all.
The easiest way to spray paint cabinet hardware.
Spraying hardware can be tricky because you need to get all the angles.
Sometimes it's difficult to access it all.
My friend Lindsay
shared this brilliant tip for spraying pulls and knobs:

You'll need to insert the wood dowels into the holes where the screws attach the hardware.
This allows you to
spray from any direction! It's especially helpful to spray the underside of the hardware.
The spray nozzle on this can made it so
easy as well -- I held it upside down, sideways, whatever! It made really
quick work of this project.
Also, unless you are spraying on grass (I recommend a sturdier location), you'll want to lay down a drop cloth or cardboard first.
Now, the easy tutorial for spray painting cabinet knobs and pulls...
Step one: Prep your hardware well.
I worked in shifts -- I would remove four handles at a time. I left the screws
in the cabinets so there was no worry about misplacing them.
I used a damp, clean cloth to wipe down the hardware well with warm water. There's no need to
use a degreaser or dish soap unless you have grime build up or sticky residue.
Dry them well
and then let sit for a bit to ensure they are completely dry before starting your first coat. (Wet spots will cause the spray paint to not adhere well.)
Step two: Start spraying! (But not too much.)
First up, make sure you are in a well-ventilated area before starting this project. I also find it helpful to wear inexpensive gloves to avoid getting splatter on your fingers.
Shake your spray can well, according to the directions on the can. (Continue to shake the can in between
coats).
My biggest tip when it comes to spray painting hardware (or anything) is to use a very light hand.
Don't hold down the nozzle and try to get the item covered in one coat. Instead, use numerous thin coats.
If you want a
"factory" smooth finish, using light coats of spray paint is best.
You'll also avoid wasting your spray paint with this method. You can see that even after the second coat my hardware wasn't completely covered:

Patience is key, as with most DIY projects!
I did three to four coats each to get full coverage, which may sound like a lot, but you only
have to wait a few minutes in between coats. That's another reason for
spraying lightly...it will dry much quicker!
If you are spraying outside, the temperature or conditions may affect drying time.
If you spray too heavily or too thick you'll get drips, or it will get gummy
and take forever to dry. If you add more coats on top of that it's a recipe
for a mess.
I also recommend starting to spray just before the item and then continuing
off to the side. I learned this super helpful trick when I used a sprayer to paint our old kitchen cabinets.
This helps control your spray and keeps the coats super even.
This Krylon spray paint went on like butter! Zero drips, zero splatter...perfection!
You
can see here how my set up worked:

The gardening tool was just used to weigh down the foam a bit. :)
This contraption made painting these SO much easier! What a great idea!
Step three: Let them cure!
After the last coat I made sure to give them a good 20 minutes to dry before
handling them at all. Then I moved to another spot to dry for longer.
I used
a cardboard box in the sun on nice days with no humidity:

Check out that beautiful finish! 😍
I did this over a few days so some days were warmer/more humid. On those I
brought them inside and placed them over an air vent to dry.
After they sat for a couple hours I was able to reinstall them, but at first
I didn't tighten them against the cabinet doors:

We didn't use the handles and 24 hours later I fully tightened them.
For the next few weeks we handled them a light touch, but they were completely
useable! You just want to avoid knocking anything into them while they cure,
or completely dry.
How to fix a messy spray paint finish.
Sometimes even with the best prep and set up, there are issues with the final finish. If you notice these right away, stop the process and address them before adding more coats to your cabinet handles.
There are a few issues that may arise when spray painting:
- Your hardware gets damaged during the drying process and ends up with scratches or smudges.
- It dries down with a wrinkly or crackle finish. (This is normally due to moisture, grease or debris on the handles.
- Drips from over spraying.
If you have drips, I recommend wiping those away while they are still wet. This makes it easier to correct later.
For all of these issues, you'll want to let the paint dry and then use a fine-grit sandpaper to knock down those imperfections. If you have to go down to the original finish on the hardware, that's OK!
When you get it down to a smooth surface, clean again and then resume your light coats of paint.
When you take your time spray painting you'll get a factory finish on your
"new" hardware!:

You can use a primer before painting as well, but this Krylon all-in-one paint has that already. No sanding or priming is
required, which is a huge time saver!
In my experience, cleaning the item
well and then letting it fully cure is most important.
The black hardware makes such a difference:
 |
| See how I made those thick floating shelves. |

We LOVE it! Start to finish this project took a few days, but by far the majority
of that time was letting the hardware dry. I did it in shifts because I
only had four spots in my spray paint "station."
Both versions of the hardware are equally pretty -- but I was craving more
distinction between the cabinets and handles.
This was such an easy and cheap transformation. Spray paint can
make such a difference!:

I'm a HUGE fan of
using black accents in a room. It's one of my favorite ways to decorate a space.
I really wanted to tie in our lights and island stools:

I'm still a huge brass fan and always will be. We still have
plenty of brass accents in here that I love. (In fact, I've left the island
hardware brass for a two toned look. I may spray those eventually but love
it for now.)
The darker cabinet hardware makes a bigger statement.
Tips for successful spray painting:
- Clean and dry item well (any moisture or debris will cause uneven texture).
- Use light, quick strokes instead of heavy, long ones. The finish will look so much better!
- Let the item dry well before handling and then cure for plenty of time before using or setting items on top.
I did this transformation with less than one can of spray paint! That's 40 handles and I still have a ton of paint left
in the can.
Changing your hardware color is one of the easiest kitchen DIY projects!

*UPDATE!*
I've received a few requests for an update on these, so I went through all of the hardware to see how things were holding up. I was pleasantly surprised!
There were only a couple that had noticeable wear:


Those were fine on one side but had obvious wear on the other side, because of how we reach for the handles most of the time:

That was taken after I touched them up. ;)
There were a few that had less obvious wear as well:

Honestly, I would have just let those go if I hadn't taken the others down to touch up.
There were three door handles and three drawer pulls that I removed to touch up. Just like the doors, the drawer pulls only had wear on one side -- the top, where we grab. )
You could just flip them over to spread out the wear and tear!:

I took the six off, cleaned them well and then gave them a couple more light coats of the satin spray paint.
They look great! I was impressed that only six of the handles needed to be touched up. Of course, these are on the cabinets that we reach for the most often.
Even if I have to touch them up every six months or so, it's worth it! A can of spray paint costs less than $10.

If you're interested in anything pictured you can find most of the items (or
similar) here!:

Pin this project for later!:


Never miss a post by signing up to get posts via email.
My hubby and I love Krylon spray paint. We prefer it to Rustoleum brand, or the cheaper store brands. It dries much faster. A good product at a fair price.
ReplyDeleteWow, what a difference painting those handles made! Just beautiful!
ReplyDeleteI actually spray painted my hammered copper handles and hinges when I refinished my cabinets over 10 years ago and they still look great. There's a little wear on the 2 cabinets that get opened the most. Another tip for any exterior facing screws, stick them in the foam and spray the heads, too. Works great. I did put a primer coat on mine, also.
ReplyDeleteI just spray painted our dated kitchen light fixtures. What a pain to tape off the whole ceiling with huge garbage bags. They are not perfect bc I was scared of the fumes so I kept running away but they are better! I’ve also heard of screwing in handles like yours into cardboard with their screws behind them so you spray paint them easy that way too!
ReplyDeleteI love using spray paint! I remember updating our horrible outdoor lights years ago when you had s.p. yours. Ours turned out amazing! Spray paint has been my go-to for hardware, lights, ceiling fans, hinges & picture frames. My faves are ORB and hammered black.
ReplyDeleteHi there! I will absolutely try this on my handles! I was wondering if, 6 months later, they wore off or chipped off
ReplyDeleteMy drawer pulls are two years old and they are wearing out! I looked for new pulls but for 36 pulls, it was a fortune. I am going to to this and use the Krylon spray. Thank you.
ReplyDeleteHi....
ReplyDeleteI've spray painted a few things in my day but I was wondering about what to do with chipped cabinet handles where you can see the metal. Do I need to dand them down first?
Yes I would give them a light sanding and then clean them well before spraying.
DeleteI had a custom made mini blind over a large window. It was blue. I took it outside on a non-windy day, suspended it between 2 ladders and painted it white. Several months later I looked at it at night and the light showed the blue coming through. Back outside for another spray session. The pulls will no longer work so I never pull it up, but I saved a ton of money. The hardest part was wiping down each and every slat before spraying.
ReplyDelete