
How to Easily Patch Anchor Holes in Drywall
July 28, 2009
Share this
Tips on how to fill large anchor holes in drywall.
So if the builder in your house was towel rod happy like ours was, you've probably got lots of these:

This post may contain affiliate links for your convenience.
I may earn a small commission when you make a purchase through links.
See my policies and disclosure page for more information.
I mean, they were giddy with these things. We had a loooong one in our powder room -- for bath towels. And there's no bath in there. Or shower.
First off, if there are anchors in the wall (builders are anchor-happy too), it's pretty easy to get them out. Take a pair of needle-nosed pliers and get in there and grab the anchor:
 Pull it and it should come out fairly easily. If it won't, try pounding it back into the wall and through. Either way you'll be left with a massive hole. It will be way bigger than the anchor seemed to be, but just relax peeps! I got your back!
 Next is my little trick I learned awhile back. If you go to fill the hole as is, it will take a ton of spackle to fill it in. Instead, before you fill, take some thick paper -- I've used grocery bags or these mailers that come out of magazines:
 Tear off little pieces and stuff them into the holes:
 This gives the spackle something to lay on and grab ahold of.
(By the way, the fun little ring around the holes happens when you have zero patience after painting a wall and are dying to get the rods back up. Yeah. Don't do that.)
Then take your favorite spackle (I've also used this stuff for these textured stencils):
 And frost the holes with it. It's fun. I use a putty knife:
 Keep frosting till you've covered the holes, using the scraper to take off the excess and then reapplying a few times.
I like to leave a little smudge of extra on top so the holes are covered really well:
 After it's dry sand it down a bit and reapply if needed. Wipe down after sanding well, wiping off all excess spackle you can.
 Be very selective where you put anchors in your walls. Generally you will ALWAYS see where they were, no matter how well you patch them up. Anchors tend to pull the drywall up around them a bit, so the drywall is never quite flat.
But I promise unless you are really looking, you will never notice them again:
 See?? Told ya! If you are patching small nail holes, just use your finger and put a little smudge in the hole. Just a little dab. Just a smooch. Like you're kissin' your sister. (Name that movie!)
It may just be because I'm the freak I am, but even the smallest changes make a huge difference to me. Before, the towel rod was the first thing you saw in our bathroom:
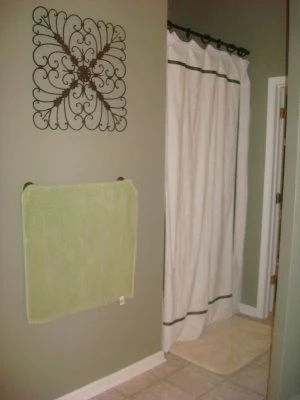
Now, it's my pretty little bench and my enormous shower curtain:
 I filled about 14 holes yesterday, and it only took an hour to do it all.
Easy peasy Squeezy! Any other good patching tips? Share them in the comments!
Here's an image to pin for later if you'd like!:

See more of our home here. To shop items in our home, click here! Never miss a post by signing up to get posts via email.
Dearest Godsend,
ReplyDeleteTHANK YOU!!!!! I am hole-ier that all get out and I soooooo needed that tip!
Awesome!
Thx!!
m ^..^
I hate not having spell check--I meant to say that I have not tried DIY magazine before. I need to head to Border's to find it. But right now, I need to head to bed. :)
ReplyDeleteGreat post to go to sleep on. Laughing my head off right now. I knew all the tips since I use to work with my dad ( a general contractor), but I think your how to instructions were much cooler than I ever got :o)
ReplyDeleteThat's great! Never thought of those annoying pieces of papers... now this is funny, my mom use to spakle the "holie" walls with white soap bars. She couldn't help! Poor mother!
ReplyDeleteI fill my nail holes with Colgate toothpaste and it works like a charm!
ReplyDeleteTraci
Got any tips for filling holes in popcorn ceilings?? Some crazy person got hook happy in our ceilings. I am not sure what is worse, all of those crazy hooks in random places or little black holes every where!
ReplyDeleteI wish more people knew your tips! We've moved into homes where the previous owners have done the WORST hole-filling jobs ever. A light bulb went on when I saw how you moved your towel bar somewhere else. Duh. Why haven't I thought to move ours, since I don't like where it is???
ReplyDeleteI love it when you call me Squeezy! LOL Spackle is the easiest stuff in the world to use. I buy the kind that goes on PINK (b/c it's my fav color) and turns white when it's dry. So you don't screw up and sand/paint over it too soon. Ask me how I know this....Ugh.
ReplyDeleteGreat tips! Looks fantastic! But where do you hang the towels now? Or are they not needed in there?
ReplyDeleteThis was timely for me! I've been glaring at those very holes in my bathroom for about 3 months, unsure of how to proceed.... holes, beware!
ReplyDeleteI love the idea of stuffing the hole before patching it. Thank you!
ReplyDeleteThe Kissin' Yer Sister quote sounds familiar but I can't place it. It sure sounds like something a Vince Vaughn Character would say...
I think the movie is ps I love you. I loved it
DeleteDOH!! I was just looking at some retro towel-hooks-on-a-plaque at TJ Maxx today, and couldn't figure out what I'd do with them... Now I know! I'm ripping that "vintage" (i.e. crappy and old) towel bar off the wall in the guest bath!! THANKS!
ReplyDeleteToo strange. I used spackle for the first time last night in years. I dropped a cup in the kitchen and it hit the wall and made a massive ding I had to patch. ~Funny that you posted this tonight...:) ~Great info!
ReplyDeleteI love my lightweight spackle! I carry it around like some women carry a lipstick. Do I need to mention I have many boys?
ReplyDeleteAnd hey--Madagascar II is one of our favorite movies. Got to love those penguins! "Two passengers unaccounted for, sir" "Now that's a number I can live with!"
Love your blog.
you are so funny, and really good at patching holes in dry wall! I will have to try my hand at this (I have been waiting very patiently for hubby to patch a few spots upstairs with my girls having all traded rooms) thanks for your step by step guide with pictures!!!
ReplyDeleteOh man, I wish I would have known about the paper before I filled my towel rack holes the other day!
ReplyDeleteHere is my tip: If for some reason you cannot find your spackling tool because say, the 5 year old has carted it off to the sandbox, a credit card will work in a pinch. :)
great tips thanks. i hate those holes. im sure as heck gonna remember this one.
ReplyDeleteblessings,
aimee
Your blog makes me happy.
ReplyDeleteYou make me want to sand something.
I can't wait to get back to the states where they have yard sales!!
Name that movie = Madagascar II. Or as my nephew calls it "Mood it mood it 2" [think two year old trying to sing "I like to move it move it"].
ReplyDeleteMood it Mood it 2 is wayyy better than Mood it Mood it 1.
basset hound.
I love, love, love this tip for patching a large hole using a piece of drywall. Check it out: (I hope the link works. It's from DIY's Bathroom Renovations with Amy Matthews.)
ReplyDeletehttp://www.diynetwork.com/videos/ceiling-holes/18888.html
Love your blog, Sarah!
Thanks for posting! I wished I'd seen this several months ago when we were redoing my daughter's bedroom....had some wall anchors and HOLES. I hadn't thought of stuffing them with stiff paper. I just spackled the heck out of them! Naturally you can tell but it's still better than a gaping hole. LOL!
ReplyDeleteI'm so glad you posted this! Our towel rack in the master bath is falling down and I keep telling my husband. Now, I can do it and stop waiting for him!
ReplyDeleteThanks!! :)
You do have to wonder what they are thinking when they put a towel rack in a half bath. Love your "after" picture and your shower curtain (what a great idea to use terry cloth).
ReplyDeleteThat's a great tip to stuff the hole! Those anchors always leave such a huge deep hole!
ReplyDeleteManuela
OK, now I know what to do with those annoying cards in my magazines! :)
ReplyDeleteSqueezy says Thank you Thank you! I have three giant holes in my laundry room where the builder put up a wire shelf, and I took it down. Now that I know it will be easy, I am going to do it!
ReplyDeletelove the bench!
ReplyDeleteGwen, they make a tube of stuff just for re-texturing/repairing popcorn ceilings. If the hole is small just fill it with some toothpaste (or spackle if it's larger), let dry and you dab on the texture from the tube. Very easy to do! We got some at Home Depot, but Lowe's should carry it too. Look in the paint section or ask about it.
ReplyDeleteLove the idea of stuffing the hole first. This is something I always forget! When we move from our rental we'll have a LOT of holes to fill so hopefully I can remember this great tip for making it go faster.
Ok - love the paper idea. I hadn't ever thought of that and I was actually just about to patch a few anchor sized holes in my ceiling (long story). Thanks for the tip!
ReplyDeleteGot any tips for how this might work with plaster walls? We have a ton of holes left from the previous folks that I want to fill and I'm just about ready to say the heck with it and live with it. Problem is, I hate the holes! So, give me some tips on plaster. Please!
ReplyDeleteAhhhh genius! Filling the hole with paper first! Yes! I have a few anchor holes I need to fill. Thanks for posting this!
ReplyDeleteThanks for the tutorial on yanking out the anchors. I had no idea how to get the eyesore out of my wall so I could paint.
ReplyDeleteThose annoying magazine inserts HAVE to go before I can read a magazine. My family thinks I am nuts! Now I have a purpose for them, to fill the empty anchor holes.:)
GREAT idea to stuff something in the hole! GENIUS! :) Our builder (also rod happy) caulked ours to the wall... which had caused a whole set of problems along with wall anchors from other stuff. ANNOYING! Your bathrooms looks great! :)
ReplyDeleteif you don't have spackle, use white toothpaste on the little nail holes
ReplyDeleteAnother tip: My friend, a paint contractor, got me to start using joint compound instead of Spackle. You can always see a spot that has been spackled but joint compound disappears leaving nary a trace.
ReplyDeleteI feel like I need to bow down to your awesome diy self. I have about about 19 of those stupid anchor holes in my living room. No joke. I merely painted over them bc I had no idea how to get rid of them. Now I do! I'm soooo doing this. And rather than your post putting me to sleep, it shot me up out of my seat shouting "Eureka! I can do this!" Thanks Thrifty Decor Chick!!!
ReplyDeleteAHA! Now I have a plan (and the cofidence) to tackle the huge towl rod in our 1/2 bath. We never even use the sink in there. Basically, it's purpose is just to give me a space to paint with the dark charcoal color I loved that John was afraid of. ;)
ReplyDeleteI remember my dad used to use newspaper.
ReplyDeleteWhen we change out thermostats at work,we tape a paper lunch bag under the work area (use the blue low tack tape.) This helps to catch the the messes.
ReplyDeleteClean up is so much easier after the sanding is done.
betcha you didn't think you'd get this many comments on such a 'boring' post, did ya?! Thanks for the tip. I have been avoiding two of those nasty things for like a month now but I think I'm gonna tackle that eyesore tomorrow thanks to you!!
ReplyDeleteThank you for the tip - and your bathroom looks beautiful!
ReplyDeleteIn our downstairs half bath, no tub or shower we have a rod big enough for two towels. Not only is the towel bar there, but they put the bar on a pice of wood that they glued/anchored to the wall. The worst part is that its not even center the wall. Oh, did I mention that all the bathrooms have the added wood. I wish they had just used anchors. I want to pry them off somehow, but am scared to mess up the walls.
ReplyDeleteYou are too funnt. I like using my spakle for other projects as well.
ReplyDeleteI am starting a NEW Mr. Linky party. It will begin on Aug 10th so everyone will have a week and a half to think about their first post. I have a poll up for votes on which button should be the new button. The "party" is called The Knock Off Knock Out-where THRIFTY meets creative sensation. Go over and learn more about the new weekly event and I would appreciate if you would cast your vote and HELP pick the new button design and its the last week for the July GIVE-A-Way, if you would like to be a part of that event..
Cheri
Great post!!! I starred it in my reader so I can refer back to it. I have several holes that I need to patch since I hung two curtain rods too low. Thanks for the tip!!!
ReplyDeleteI'll be using this in the paneling we have in our house...I hope it works on that as well! :)
ReplyDeleteGreat tutorial. I HATE patching walls. You made it looks so simple:)
ReplyDeleteThat was entertaing AND informative. Thank you and I much prefer your towel bar gone.
ReplyDeleteThat is sooo crazy that you posted this. Just a few weeks back I learned that trick from my father in law. He was patching the holes at the old house from where had our heavy Pottery Barn Iron thingys hanging and he asked for a paper towel. I had no idea what for. He just stuffed the holes and you would never know we even had anything hanging there.
ReplyDeleteInstead of digging the anchor out just knock the outside edge off. (That way the hole is WAY smaller) Lay your putty knife flat on the wall below the anchor and quickly slide it up the wall. The anchor edge will slice off and you can push it into the wall, or leave it. Either way you are good to continue patching with your spackle. One more tip, spackle accepts paint differently than existing paint, so be sure to prime the newly spackeled area bfore painting. If you skip this step the paint will never look right no matter how much you paint over it until you apply the primer!!!
ReplyDeleteI got sick and tired of dealing with the anchors and trying to get them out. Then, one day it occurred to me: YOU DON'T NEED TO REMOVE THEM! Total epiphany! I use a razor blade and just shear the darn things right off. Yeah! They're plastic, so they cut super-easy, and you're not left with chunks of wall missing. Then, spackle as usual. I've been much calmer since figuring that one out. :)
ReplyDeleteGreat instructions. To get rid of the raised area...hit it with a hammer and make an small indent that is easily filled with the compound.
ReplyDeleteTo solve the problem of the raised edges around the hole just hit the hole with a hammer (not too hard, you don't want to make the hole bigger lol) this should dent the wall inward slightly. Then fill with sparkle as normal. You will be left with a perfectly smooth finish.
ReplyDeleteI just chisel off the head of the anchor (wall plug) and then just push it in a little way or where there is no head just
ReplyDeletepush in below the surface of the wall and then fill. Only if the plug will not push in then you might want to remove it.
After patching, take plastic wrap (seran wrap) and place into the spackle container. I conform the wrap to the spackle left. It keeps it from drying out when storing.
ReplyDeleteAlso: Matching the wall color is easy by pulling off a switch plate and chiseling a square from behind the plate to use to match the color at the hardware store.
instead of knocking the bold anchor completely through wall, just tap it gently until it just goes under the paper on the sheetrock. you will now have a backer for your spackle. no need to fill hole with anything now.
ReplyDelete“Holey” jamoley! In my usual ADHD style, I scanned quickly, looking for the easy answer. However, I suddenly detected a fellow smartass with a sense of humor, leading me to slow down and have a laugh along the way. Thanks for that!
ReplyDeleteThe towels are rolled in the basket on her bench..... it's in the picture
ReplyDelete