DIY Wood Shelving (Laundry Storage)
April 13, 2015
Share this
I was able to finish up a project this weekend I’ve been wanting to build these floating shelves for quite some time. The materials have been in the garage for weeks so I went for it.
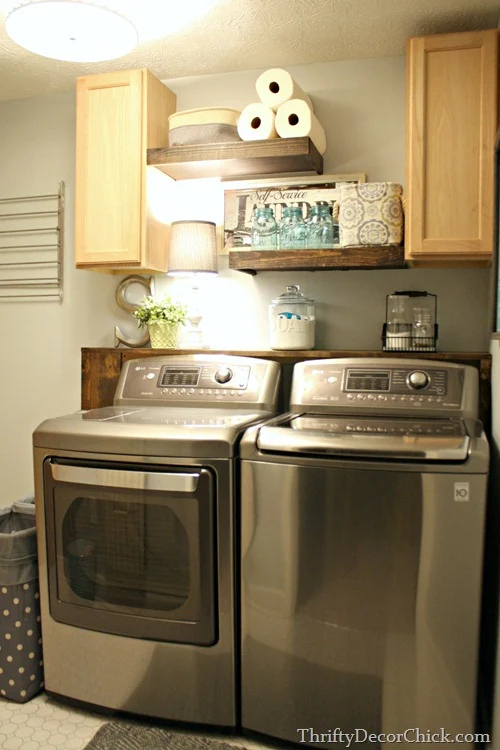
I’ve shared this tutorial before but it’s such a good one it’s worth sharing again. Building your own wood shelves is really such an easy DIY project – and they are great for storage for sure. I wanted to add some to our laundry room above the washer and dryer: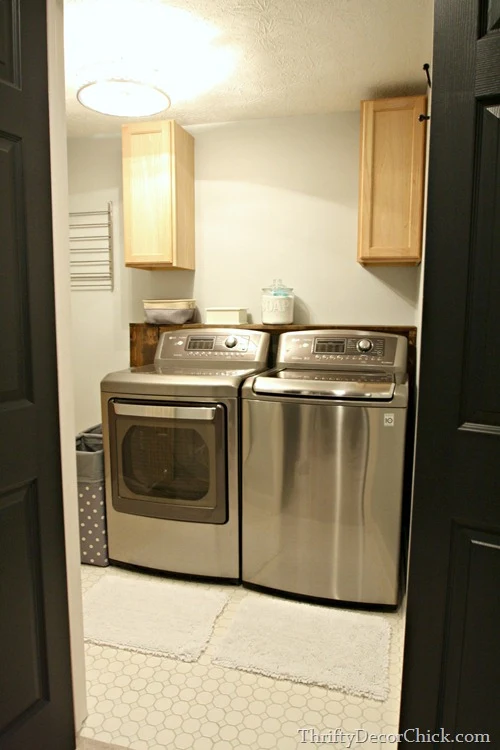
It took me awhile to decide exactly what I wanted up there – as with everything in our house I have to live with it for awhile before I make a move. At first I was going to add a pole to hang clothes out of the dryer, but then realized that wouldn’t work because it would be too awkward to reach over the machines.
Then I decided on shelving but my idea for two full shelves changed because of the lamp I added behind the washer and dryer a few months back. (You can see how I made that simple shelf here!) I love having some low light in there and didn’t want to have to say goodbye to my cute lamp, so I made some adjustments to the design.
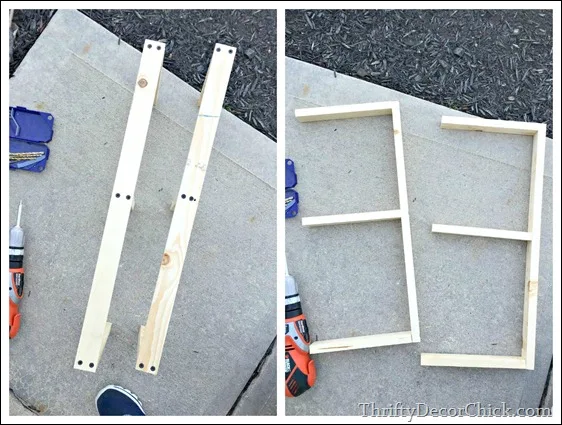
Here’s the very basic tutorial! I used basic (cheap!) pine for the bases – this was all 1x2’s:
This post may contain affiliate links for your convenience.
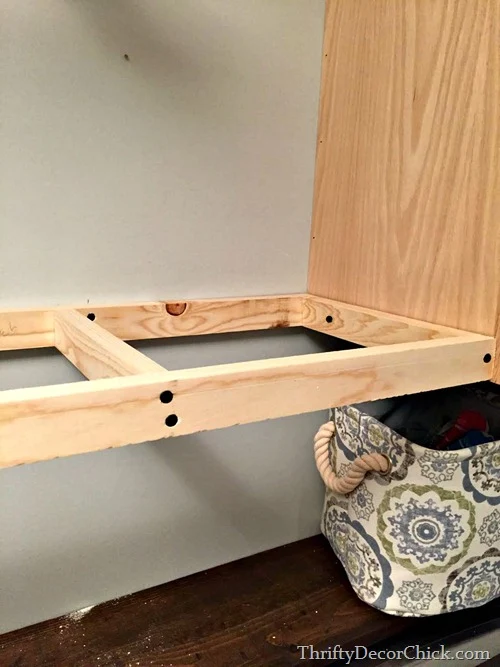
My cabinets are 12 inches deep so you have to do some figuring – the 1x2’s aren’t really one by two inches at all – the width is 3/4 of an inch. So knowing I would have one on the front and the back I made my cuts accordingly for the supports. I drill a pilot hole and then use two inch screws to attach the supports.
Do not attach the front piece just yet – leave it off so you can easily put the brace on the wall. You’ll want to mark your studs and screw into them:
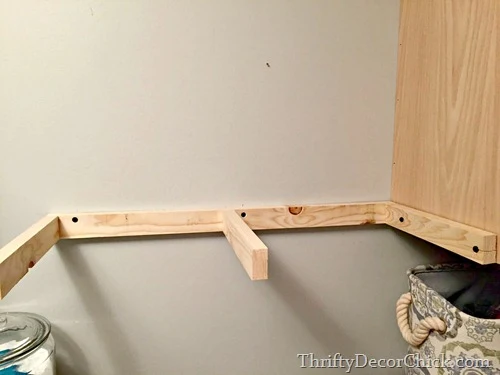
I only hit one stud but that was fine because I was attaching them to the cabinets as well. For the end I used an anchor – drilling a hole where it would go and then moving the brace a bit to put the anchor in:

Seriously my friends – this is such a simple project! If you are familiar with tools at least a little bit I know you can do this.
Here’s the start to the shelves:
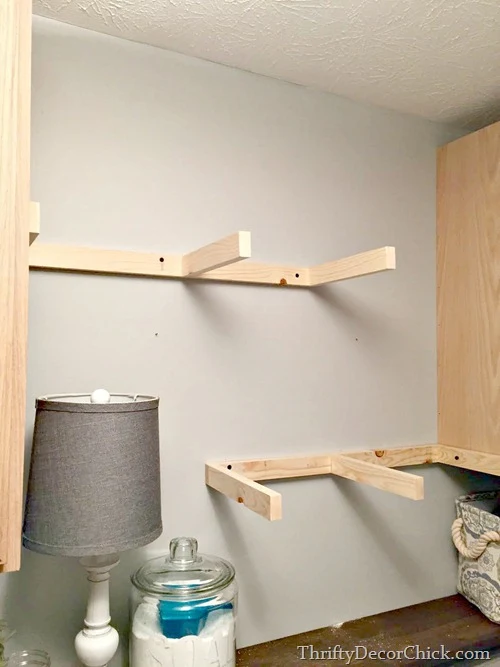
You can see I decided to stagger them so I had room for my lamp. ;)
The next step is to attach the front piece:
I had thin underlayment cut down to 11 1/4 inches wide at the hardware store and I cut the length at home. I made it that size (instead of the 12 inches to match the cabinet) because of the trim I add to the front in the end…that will make more sense in a minute. :)
Just lay the underlayment down and attach with a nail gun (glue would probably work as well if you weight it down while it dries:
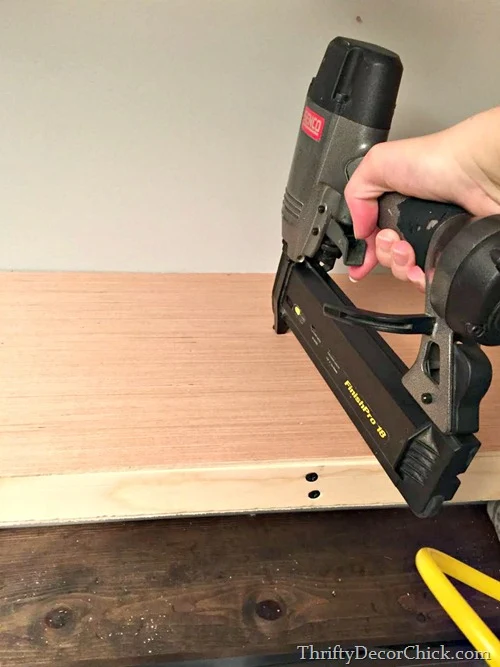
You’ll want to one to the bottom as well so you can hide the not-so-pretty parts.
The final step is why I didn’t have the underlayment cut to exactly 12 inches – I finish it off with a 1x3 on the sides and the front.
When it was all done I taped it off to stain. (I didn’t know if I was going to stain it or paint up till the end.) Stain is SO fast and easy. I’ve been using the Rustoleum Kona color for everything in the basement so I stuck with that:
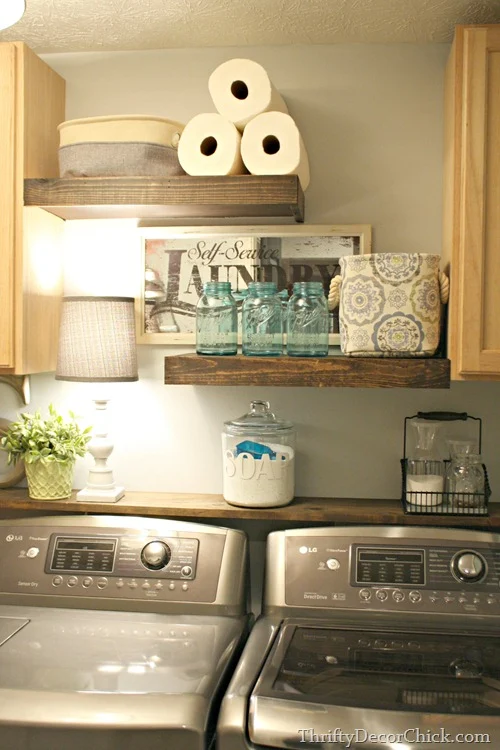
This project is another in a series of many in this room – I love how it’s coming together! I’ve been trying to decide on a cabinet color and now that I’ve figured it out that will happen next. Then some crown will go up at the top of the cabinets and around the room as well:
I don’t make this room a priority as far as finishing up little projects just because we’re the only ones who see it.
Uh…and thousands of you. Ha! But you know what I mean.
But I do want it to be a pretty place to be – and functional! These shelves are so nice for extra storage! The basket at the top holds random laundry stuff (that I don’t need as much) and the one on the bottom shelf holds odd socks:
I couldn't decide on an accent color in here and then the aqua just kind of happened when I found this cutie laundry symbol art: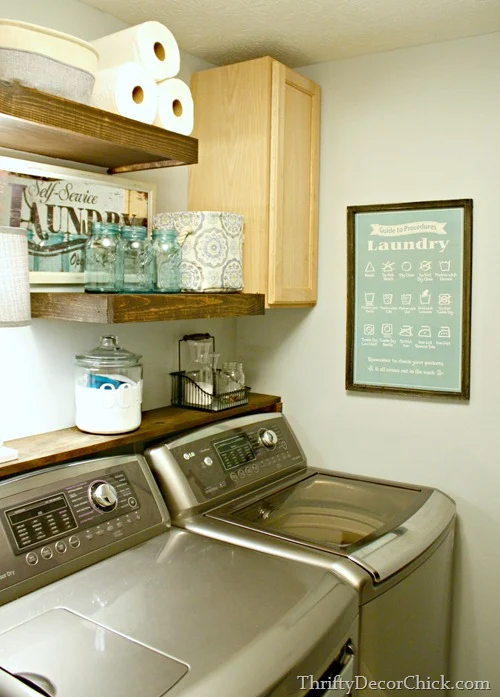
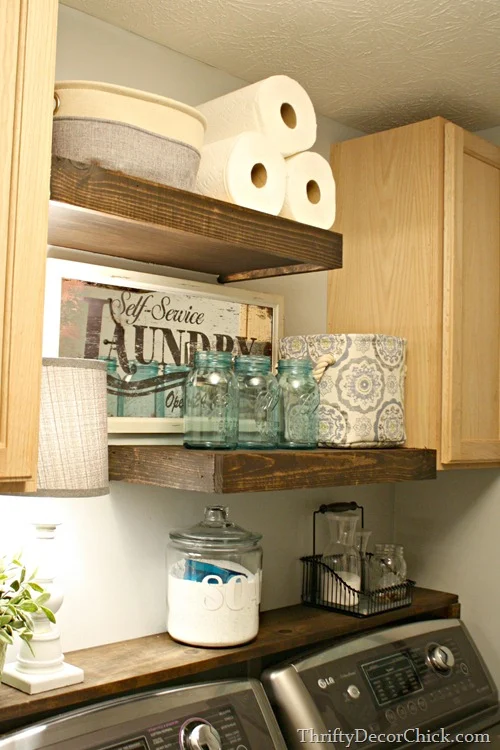
The only thing I did wrong during this install was place the bottom shelf a little too low. I lined up the bracket with the bottom of the cabinet, forgetting that the front piece of trim was thicker. So it hangs a little below the cabinet:

But I’ll just add some trim to the bottom of the cabinets to even it all out. It’s on the to do list. :)
Another project is knocked off the list! I love it! It looks cute and offers so much more storage!:
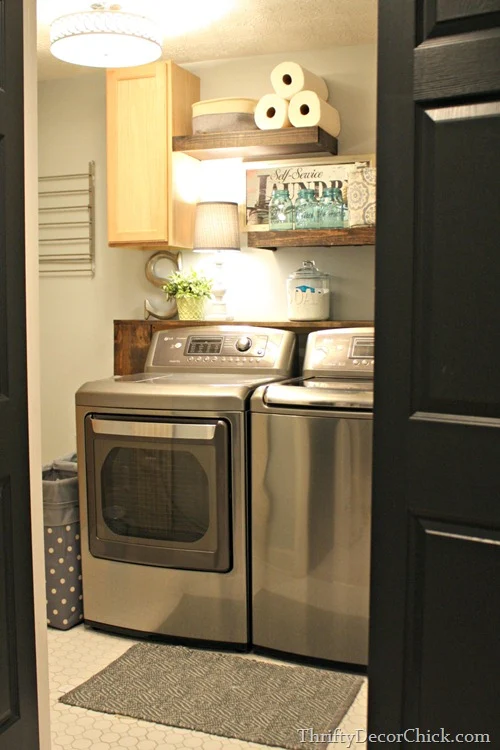
I added even more storage in this room a year or so ago and I can’t wait to show you that too – it’s been sitting in between all that time so I hope to finish that up soon.
Have you attempted these DIY shelves? I added them in our basement family room and the bathroom down there too. I’m crazy about the stained wood with the gray walls – love it.
Something to think about if you make your own -- when these shelves don’t attach to something on both ends they aren’t quite as sturdy. I mean, I could put pretty much anything on them (and they hold cats jumping on them), but I wouldn’t try pull ups or anything. Good thing I don’t ever attempt pull ups. :)
See more of our home here. To shop items in our home, click here! Never miss a post by signing up to get posts via email.
I’ve shared this tutorial before but it’s such a good one it’s worth sharing again. Building your own wood shelves is really such an easy DIY project – and they are great for storage for sure. I wanted to add some to our laundry room above the washer and dryer:

It took me awhile to decide exactly what I wanted up there – as with everything in our house I have to live with it for awhile before I make a move. At first I was going to add a pole to hang clothes out of the dryer, but then realized that wouldn’t work because it would be too awkward to reach over the machines.
Then I decided on shelving but my idea for two full shelves changed because of the lamp I added behind the washer and dryer a few months back. (You can see how I made that simple shelf here!) I love having some low light in there and didn’t want to have to say goodbye to my cute lamp, so I made some adjustments to the design.
Here’s the very basic tutorial! I used basic (cheap!) pine for the bases – this was all 1x2’s:

This post may contain affiliate links for your convenience.
See my policies and disclosure page for more information.
My cabinets are 12 inches deep so you have to do some figuring – the 1x2’s aren’t really one by two inches at all – the width is 3/4 of an inch. So knowing I would have one on the front and the back I made my cuts accordingly for the supports. I drill a pilot hole and then use two inch screws to attach the supports.
Do not attach the front piece just yet – leave it off so you can easily put the brace on the wall. You’ll want to mark your studs and screw into them:

I only hit one stud but that was fine because I was attaching them to the cabinets as well. For the end I used an anchor – drilling a hole where it would go and then moving the brace a bit to put the anchor in:

Seriously my friends – this is such a simple project! If you are familiar with tools at least a little bit I know you can do this.
Here’s the start to the shelves:

You can see I decided to stagger them so I had room for my lamp. ;)
The next step is to attach the front piece:

I had thin underlayment cut down to 11 1/4 inches wide at the hardware store and I cut the length at home. I made it that size (instead of the 12 inches to match the cabinet) because of the trim I add to the front in the end…that will make more sense in a minute. :)
Just lay the underlayment down and attach with a nail gun (glue would probably work as well if you weight it down while it dries:

You’ll want to one to the bottom as well so you can hide the not-so-pretty parts.
The final step is why I didn’t have the underlayment cut to exactly 12 inches – I finish it off with a 1x3 on the sides and the front.
When it was all done I taped it off to stain. (I didn’t know if I was going to stain it or paint up till the end.) Stain is SO fast and easy. I’ve been using the Rustoleum Kona color for everything in the basement so I stuck with that:

This project is another in a series of many in this room – I love how it’s coming together! I’ve been trying to decide on a cabinet color and now that I’ve figured it out that will happen next. Then some crown will go up at the top of the cabinets and around the room as well:

I don’t make this room a priority as far as finishing up little projects just because we’re the only ones who see it.
Uh…and thousands of you. Ha! But you know what I mean.
But I do want it to be a pretty place to be – and functional! These shelves are so nice for extra storage! The basket at the top holds random laundry stuff (that I don’t need as much) and the one on the bottom shelf holds odd socks:

I couldn't decide on an accent color in here and then the aqua just kind of happened when I found this cutie laundry symbol art:

The only thing I did wrong during this install was place the bottom shelf a little too low. I lined up the bracket with the bottom of the cabinet, forgetting that the front piece of trim was thicker. So it hangs a little below the cabinet:

But I’ll just add some trim to the bottom of the cabinets to even it all out. It’s on the to do list. :)
Another project is knocked off the list! I love it! It looks cute and offers so much more storage!:

I added even more storage in this room a year or so ago and I can’t wait to show you that too – it’s been sitting in between all that time so I hope to finish that up soon.
Have you attempted these DIY shelves? I added them in our basement family room and the bathroom down there too. I’m crazy about the stained wood with the gray walls – love it.
Something to think about if you make your own -- when these shelves don’t attach to something on both ends they aren’t quite as sturdy. I mean, I could put pretty much anything on them (and they hold cats jumping on them), but I wouldn’t try pull ups or anything. Good thing I don’t ever attempt pull ups. :)
See more of our home here. To shop items in our home, click here! Never miss a post by signing up to get posts via email.

love this, but it would not work for me I am to short to reach items lol
ReplyDeletePretty space!!
ReplyDeleteLooks great! I've used floating shelves in my house for displaying pictures and light weight items. I cheated though!! I ended up buying 2x10 wood, found the studs on my wall and used my Kreg Jig to make pocket holes on my 2x10 for where the screws needed to go into the studs. Then I used 4" screws and attached the 2x10 to the wall. Looks just like a floating shelf and it is on there really good. The 4" screws I used were a heavy duty metal so they wouldn't break or bend.
ReplyDeleteContinuation from my post...I forgot to mention that if you have a smaller span between two walls such as above your toilet you can use the 2x10 as well. Make your Kreg Jig pocket holes on the back of the wood into your studs and on each side of the 2x10 so you are actually anchoring the 2x10 into 3 walls for added supports. I love the look of it!
ReplyDeleteLooks good!!
ReplyDeleteWhat a perfectly cool and custom way to add storage! I love it!
ReplyDeleteThe shelves look great! Love the glass jar for the soap! Sorry about your ankle, hope it heals quick!
ReplyDeleteSo cool! I love how staggering the shelves opens up room to still store tall objects, if they don't quite fit between the two shelves, or (like your adorable lamp) on the shelf beneath.
ReplyDeleteI am in awe with you. I can't help but be a little jelly to see how good you are with these power tools....I can hardly measure correctly myself! Love your blog. I read every single post. Thanks for all the inspiration and hard work.
ReplyDeleteBryn
cute shelves!! I can see the cabinets a pretty soft blue color to match the jars and the artwork on the one wall. Just a thought! :o)
ReplyDeleteI love those so much, I have some in my laundry room too!! http://thatredheadedsister.com/chunky-floating-shelves/
ReplyDeleteLove the idea of the shelve in the back....would keep me from pushing stuff up and over behind the washer. Great job.
ReplyDeleteLove the shelves and the idea of a lamp in your laundry room, it really makes the space feel all warm and cozy even while doing laundry! :P Great job!
ReplyDeleteI just saw that same laundry sign at hobby lobby last week. I'm totally going to buy it after we move half way across the country next month! (but I'm holding off until then; We don't need another thing to cram into the truck!)
ReplyDeleteYes it was Hobby Lobby, I totally spaced it! So cute.
DeleteI love the shelves and the ledge! I've been putting stained shelves everywhere I can get away with. Now the laundry room is on my to-do list...
ReplyDeleteI love this! I am so inspired to work on my laundry space now!
ReplyDelete"Like"!!!!!! :)
ReplyDeleteWhere did you get the frame to hang up items for drying? I need to find a solution for my laundry room that doesn't take up too much space!
ReplyDeleteThanks! Britney
BCollings06 AT gmail.com
IKEA! It folds flat -- love it!
DeleteLove your laundry room!! What a great idea to use a cute baskets to hold odd socks!
ReplyDeleteLooks great! I love the stained wood it suits your wall colors beautifully, can't wait to see what color you paint the cabinets and the finished product!
ReplyDeleteWoohoo I love checking things off the list, feels so good right?
Lauren | LB Designs
xx
That's brilliant! I live in a first floor 1920s duplex and I adore it. The problem/bonus is everything is original so there is no storage! You have to be creative.
ReplyDelete-Ash
www.stylizedwannabe.blogspot.com
Very nice. We need this. Sorry about your ankle - take care.
ReplyDeleteAw man I usually love everything you do - especially your kitchen updates - you do beautuful work I'm such a fan :) - but to be honest I am really not loving this for some odd reason. Why add trim vs. Move the shelf to the right place? Also which tone will the trim be? Thst kind of do-over would be interesting to read too. Overall it just seems staged for how you want to see it from your kitchen vs. set up to be actually functional. Paper towels, empty jars, and hobby lobby signs seems like a 180 from the impeccable and purpose-driven approach you took with your gorgeous TV center.
ReplyDeleteI think I'm just in an overly critical mood. I love the idea and the lamp, I love thst you did staggered shelves too. The thickness of the shelves and stain color are perfect. I love the mixed wood tones too.
Thanks again for all you do - I'm a huge fan - :)
Thank you? Ha! Do you mean adding the trim under the cabinet? It's something I was going to do anyway (and plan to do in the kitchen) to finish off the undersides so it's not a big deal. Adding some a little peice of trim compared to taking apart and moving the shelf is way easier. (The trim will match the cabinets.) The shelves are completely functional for us -- we can both reach to the top shelf and everything on them is something we use. We use jars for change from pockets. I don't see why it's a bad thing to decorate with some cute stuff? I love the art and think it's adorable. :)
DeleteLOVE THIS!!!!!!!!! Where did you find your Laundry Self Service sign?
ReplyDelete