
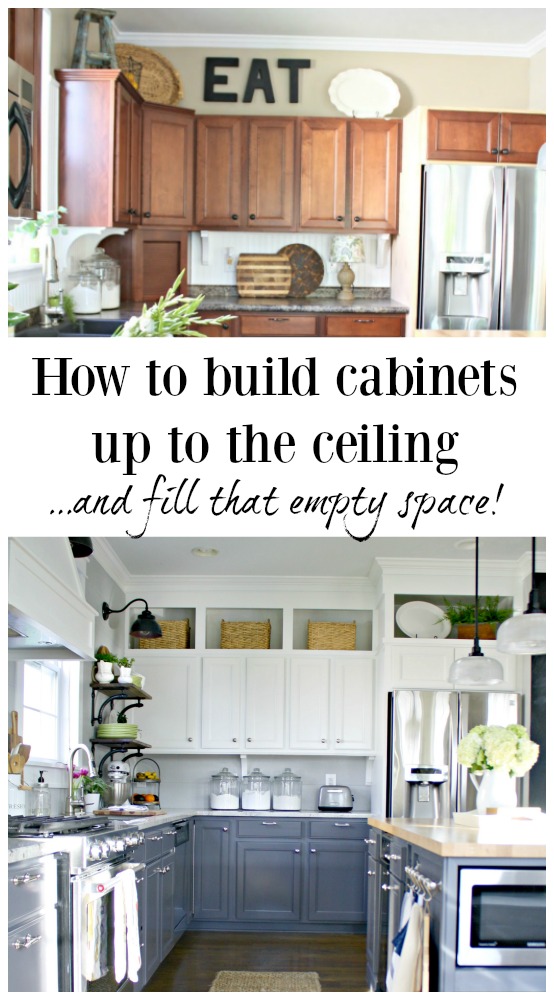
How to Extend Kitchen Cabinets Up to the Ceiling
May 26, 2020
Share this
Extending your kitchen cabinets up to the ceiling isn't as hard as you think!
How to fill in that empty space and extend your existing cabinets. This is a great way to update builder's grade cabinets in your kitchen or laundry room.Taller upper cabinets give you a custom look, and with this tutorial you can add them for a lot less! You can add doors for extra storage space, or leave them open like I did to display decorative items.
This project was a major step in my kitchen reno -- thankfully it went really quickly and was a simple build!
When we picked out cabinets out during our building process, we went with the shorter versions rather than taller. I knew that tallest shelf would be too high to reach and I was trying not to spend any more money. :)
We did have crown molding added, and if you have basic builder's grade cabinets I think it makes a HUGE difference.
You can see here where I had taken down the crown to add cabinets above the fridge -- it was still up on the left:

Just adding crown molding is a super effective way to make your cabinets look more high end!
I still would have done this project even with taller cabinets. I love the look of built ins and building them to ceiling height feels more custom to me.
1. Build your boxes
I didn't use any fancy tools to build these boxes. They were so basic -- I didn't even use a pocket hole jig. We won't see the sides of the boxes, and they are mostly decorative, so it's not needed.
If you will see the sides of a piece (and don't want to add trim), I would recommend using a Kreg Jig.
But to build these "upper cabinets" (as well as the box I built to extend the kitchen island), I just used plywood boards and screws:

This post may contain affiliate links for your convenience.
See my policies and disclosure page for more information.
This is my favorite corded drill -- I love it for bigger projects that need more power and last longer than my battery operated drill will allow.
I didn't even use glue (I've learned adjustments may need to be made later). Those who build cabinetry for a living are probably cringing. :) But these won't be touched much at all and the boxes are strong!
My point is, you don't need a ton of tools or a workshop (your kitchen floor is fine) to do things like this.
All you need is some wood, a drill and a dream. ;)
The hardest part of every project like this is figuring out the sizing of the boards to make the boxes. I spend most of my time perfecting that.
I stand with a tape measure and notebook and draw pictures of what I want to do and end up scratching most of it out before I get to the final. It's how I work it all out in my head.
I have all my pieces cut down at the hardware store -- I didn't do them all at once this time because I was checking sizing as I went.
I built one box at a time and placed them up on top of the existing cabinets to make sure I had the width and height correct:

2. Installing the new upper cabinets
Your cabinets are built to hold quite a bit of weight so don't worry about that. Make sure to attach them into the wall studs behind (and to each other) -- that will take most of the weight off.
I waited till I had the three installed before I started the cabinet above the fridge.
It doesn't go all the way back but I wanted it to go back enough so that I could attach it to the one next to it.
It's also screwed into the stud on the right wall and into the cabinet enclosing the refrigerator below:

Trust!
3. Give the new upper cabinet a custom look
We had about two feet of space above our cabinets and I made these 16 inches tall. I was adding a header above and wanted to leave enough space for that and decorative trim.
I didn't want the cabinets to be too tall -- I thought that would look at little off since our old cabinets are a basic size.
Next I had to prep for the header piece. I screwed some scrap wood into the beams in the ceiling for the header to attach to at the top.
I didn't get a good picture of this but you can see a piece of that sticking out behind the header to the right in this pic:

The header is decorative, but also starts the face frame trim I was adding around and in between each new cabinet.
Also, I didn't remove the crown molding around the room to put these up -- I knew I could cope new pieces in so that saved me a ton of time.
I just notched out a corner in the header so it would fit over the existing crown.
Next were the finishing touches -- this is my favorite part because things start to come together! I added some 1x2 trim along the bottom of the boxes:

And then I added the vertical trim to mimic the look below:

I was getting really excited at this point!
I made the header thick because I have crown and trim that I needed to continue around the top of the cabinets. That takes up about five inches from the ceiling down.
Also, I will be adding lighting inside the cabinets and that will run along the back of the header. This gives me plenty of room to add that and keep it hidden.
Here's the shot I shared on Instagram because I was so excited:

I was working on a deadline here -- I am a procrastinator through and through. I've had weeks to get this done but I work best when I HAVE to get it done.
The counters are coming this week and I wanted to get everything up high done that I could.
I finished up the fridge cabinet and started adding more trim to hide the rough stuff:

Here's a shot of how that's coming together:

You can see here we had to have the recessed light moved out a few inches -- it was right in the way of where the crown was going.
Renovations are a constant dance of two steps forward and one step back. :)
It's hard to see there but if you look close you can see how I added the small trim along the top that goes around the rest of our great room. It's an easy way to make your crown molding look extra chunky.
Here's another shot before the crown was started:

A couple of you have asked about the cabinet on the left side -- I won't be moving it because the way the doors open would be awkward.
And here's how it's looking with the crown (that I had help with, I'm not great at coping trim yet):

I absolutely LOVE it. I'm so thrilled!!
After the build is finished, you'll need to do the following:
- Fill the screw or nail holes and any imperfections with wood filler.
- Add new doors (glass fronts are a nice touch!) with hinges if you want closed cabinets.
- Prime your cabinets for paint.
- Paint the cabinets with a sprayer or by hand.
When everything is painted it will look exactly like it did in my head all these years!
I used some extra wood leftover from the fridge enclosure so that helped a ton with costs. I ended up spending maybe another $100 and that includes trim.
I would have paid hundreds in labor if we had hired it out!
You can replicate this project if you have soffits above your cabinets -- you'll just need to remove those first.
If you have less space than we did, you could just add the header and close the whole thing up. With a lot of space like we have, it would be too big of a header.
Here's the after view for you!:
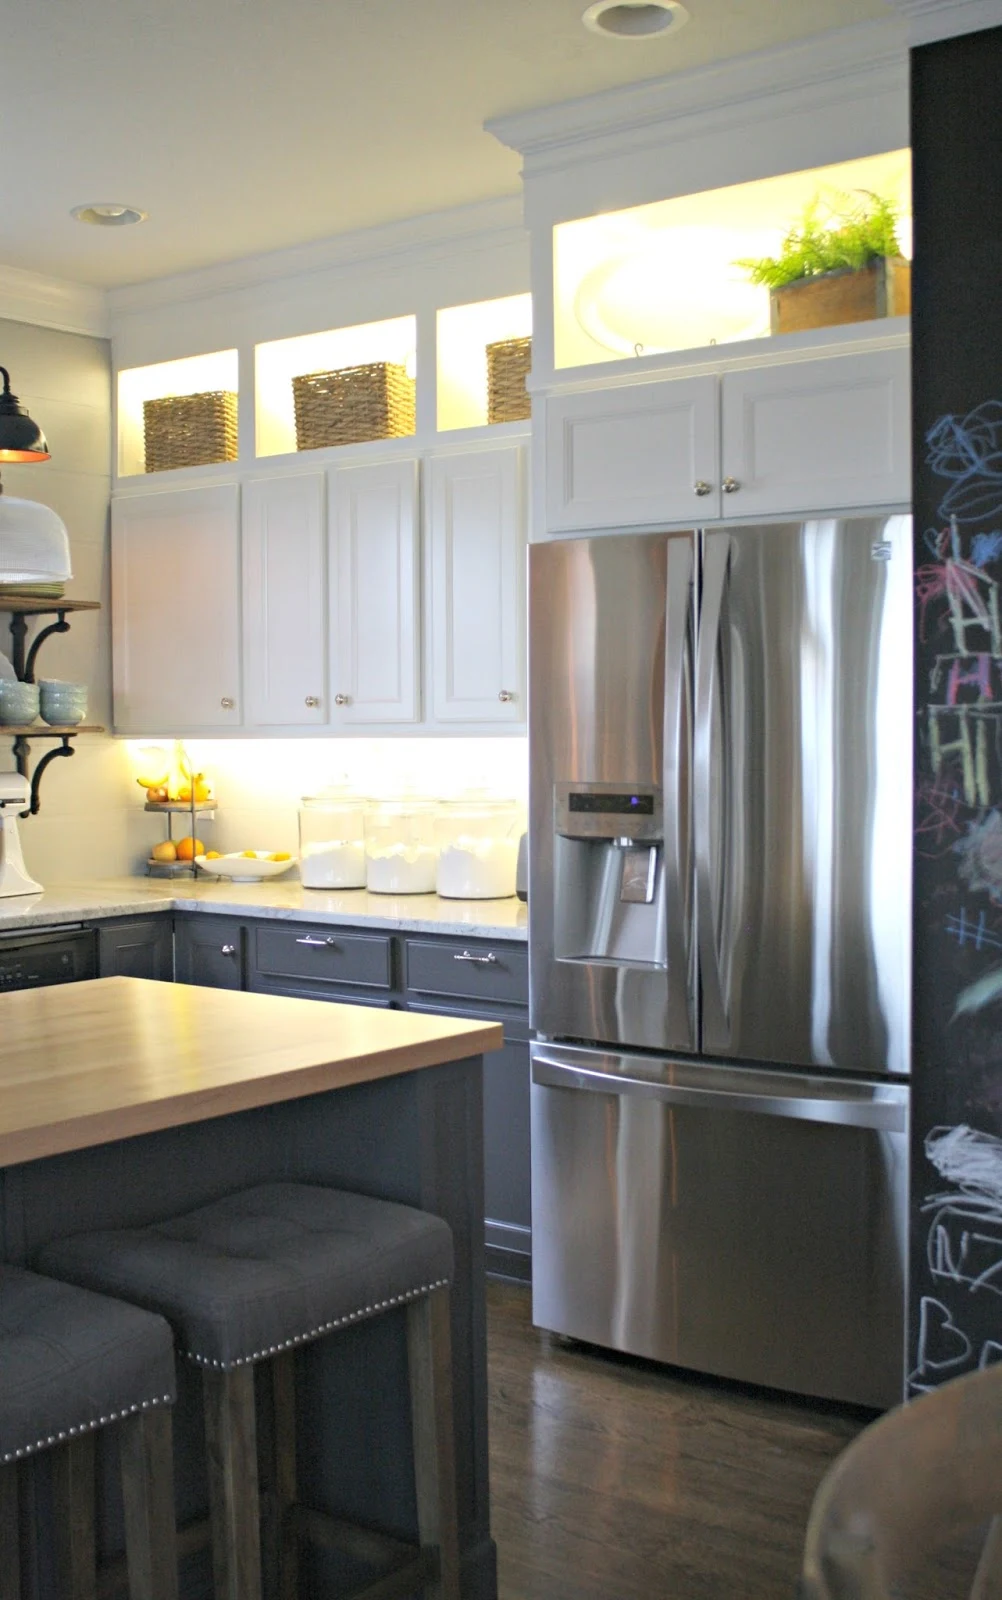 |
| DIY upper and lower cabinet lighting |
If you have any questions or if I missed anything please let me know!
Have you attempted this project in your home? I know many of you have been thinking about it!
**You have to see the full finished kitchen makeover here!
**Pin this project for later with this image:

**You have to see the full finished kitchen makeover here!
**Pin this project for later with this image:
Never miss a post by signing up to get posts via email.
Looks awesome, I'm jealous of your woodworking skills!
ReplyDeleteIt looks so awesome!!! I really like how you added the small trim on the header too. We just got done doing this to ours but it was not as easy for us, lol. And it took us 3 hours to figure out the crown since our ceiling is apparently not level and you could totally tell when we attached it to the cabinets. It totally makes such a big difference though and I am happy we did ours too. Cant wait to see what color you are going to paint them!
ReplyDeleteYes the crown was the hardest part! I'm glad I had help with that -- my work is never perfect so I needed help making everything meet up. Caulk is your best friend!
DeleteI have exactly the kind of space above my cabinets as you do yours. When my ex and I built I thought the open space for display was the cat's meow - since I'd always had bulkheads over kitchen cabinets before.
ReplyDeleteIt only took a year or two before I started kicking myself for that decision and I've been itching to run the cabinets up to the ceiling ever since.
If you don't have a ton of space I love that look! But we had too much to do that.
DeleteAmazing. Totally transforms the space!
DeleteDid you ever do it? I personally dislike the space for so many reasons but the main one is the dust/grease/steam combination that turns to a sticky sludge that takes up residence there on the tops of cabinets and the general unfinished look like boxes on walls rather than a high end finish.
DeletePlease oh please add glass doors to the top cabinets!!!It will look much more finished professionally. I love, love what you are doing but I do no like the open boxes on top of the doors. It looks like they were put on after the fact. I have built 13+ homes, owned 17 and remodeled many, many. Cabinetry I know and love, so just think about it and if you do add some glass cabinet doors, add lights to the interior cabinets. Thanks for listening. Great work, love your heart, ideas and it is the best blog!!
ReplyDeleteThank you!! I don't think I'll add doors but I want to live with them for awhile. If we did it would be later down the road. I love them as they are now! :) And yes, I'm adding lighting up there -- we already got an outlet installed and connected to a switch.
DeleteLooks awesome! I've been wanting to do something like this also. What was the space measurement between the lower cabinets and the ceiling? What kind of wood did you use?
ReplyDeleteThank you! We have about two feet between the top and the ceiling. I used plywood with an oak veneer for some of it, for the rest I used a cheaper butcher block kind of wood.
DeleteGirl, you have some mad carpentry skills! I'm impressed! Nothing makes my eyes glaze over than trying to figure out crown molding angles and cuts. I have to laugh at your procrastination tendencies, as I'm the exact same way. I work best under deadlines imposed by OTHERS, not my own. ;-)
ReplyDeleteWhat about putting a center, vertical strip down the middle of the large cabinet door (the cabinet you moved from the other wall) so it looks like two doors rather than one? Then it would match the other cabinets it is next to and look like it has two doors also rather than just one.
ReplyDeleteWe'd have to get two new doors made. It does not bother us enough to pay for that. :)
DeleteThis looks amazing, but the thing I find most inspiring is how you have done all of this over so many years. I sometimes get caught up in wanting my house to look great right now, but your blog has helped me see the work and effort it takes to create beauty over time. I love that you are unafraid and also that you make adjustments if something doesn't turn out right or costs too much or you just change your mind. Thanks so much for doing this for so long and keeping it real as well as beautiful!
ReplyDeleteAre you painting everything... or will you have painted cabinets on top of wood? How will they integrate?
ReplyDeleteThat looks fabulous! Can't wait to see it finished!!!
ReplyDeleteThat's going to be AMAZING when painted, bravo girl!
ReplyDeletexo
Kate
Looking forward to seeing the finished product :)
ReplyDeletexo
I would love a tutorial on the caulking process. That is what holds me back from tackling something like this. I would want it to look great once painted and I'm always trying to figure out how to get a good looking caulk line. It sounds simple, and maybe I'm making a mountain out of a molehill, but it intimidates me. Your projects always look so great when finished and painted.
ReplyDeleteOh Sarah, that turned out beautifully! This is going to be amazing!
ReplyDeleteLooks great. I did something similar at our house we just sold. I got my idea from Remodelando la Casa blog. We already had white cabinets so it was much easier to paint the finished uppers. Now in our new house we have cabinets similar to yours with a shiny finish. I want to enclose the top section but am scared of painting my cabinets. I can't wait until you are all done! I'm looking forward to your painting tips so I can proceed with how to paint mine. Love your blog and appreciate all of your how to projects!
ReplyDeleteWe did the same thing a few years ago. Left them open, no doors or glass, and still love the look. Gives the look of open shelving and adds tons of space for those items you want to display because they're "pretty" or just for those items you don't use daily. It helps having a husband tall enough to reach everything. We actually didn't even build boxes--GREAT idea, BTW--we built one big box and then added wood dividers, spaced to mimic our cabinet-spacing. LOVE the look and can't imagine not having it look like this. We ended up painting everything a rich khaki. What color are you going with? Most people go with white, I just had to do something opposite of what everyone else does--hahaha!! Can't wait to see the finished product!
ReplyDeleteVery impressive. I do not have as much head room above cabinets but since I am in desperate need of storage space it may be worth considering. You made it look so simple.
ReplyDeleteYou are amazing! This is going to be so pretty! Feeling jealous over here.
ReplyDeleteEvery blog post I've seen when you've spiffied up your home leaves me feeling very inadequate, lol. Who says women can't do what men do and better sometimes? You have proven it can be done. Love anything/everything you have done, you're one awesome lady. Happy weekend
ReplyDeleteYou have made a really great job of this kitchen improvement. I like he very practical way to approach and described the project. Personally, I never rely on rule or tape for final measurements, I always measure directly onto the piece I'm just about to fit, rooms are never square, and wood isn't a uniform material. Kudos.
ReplyDeleteMe, I would have used glue.
I don't think I could ever have a blog... so many opinions on what you should do, what you need to do, how horrible it will look if you don't do something, ect! And you're so sweet about it in your responses ♡
ReplyDeletePersonally, I love what you have done. I've wanted to add smaller upper cabinets to the top of ours for a while, but we have two corner cabinets I haven't been able to find a 12" cabinet to match them so I gave up on that dream slightly.
However, seeing how you framed in the area above yours gives me hope. I love that they're open, also. And that corner cabinet by the wall everyone comments on... I think it looks fine! It's over your counters, which are similar in width to the size of the door, so it looks good to me.
Anyways, have you ever thought of doing a post about how to use the tools you use for projects like this? Like the saws, nail guns, ect? Sometimes I swear my husband's eyes are going to get stuck in the back of his head one day when he rolls them around after I ask him to cut things for me with his saw (s). I'm a pretty visual person and all those tool manuals with their little black and white "pictures" lose me a few words in so it's not something I've pursued. You seem very knowledgeable and a how-to post on the basics of the tools you use from your point of view could be really beneficial to a lot of your readers!
I have been dreaming of doing precisely this for a couple of years now as well, so I'm glad you're blazing the trail for me!! ;) One question: Do you think it would look weird to do this with staggered upper cabinets? The cab above our fridge and above the stove go up about 6 inches higher than the others. That's the only thing that's holding me back from jumping in.
ReplyDeleteThese look great! I'm hoping to do something similar in my kitchen next month :)
ReplyDeleteIt looks amazing! It's exactly what I would have done, too. I can't wait to see it finished.
ReplyDeleteLooking good! How exciting! About how long did this whole project take you? And what's the plan for the backsplash?
ReplyDeleteAwesome possum!! Question. Did you predrill your screw holes? Or maybe you didn't have any problems with the wood splitting.... And did you use a nail gun for the small trim? I'm in the middle of redoing a fireplace mantle and was wondering. I can't wait to see the finished space with counters and paint. Woohoo!!
ReplyDeleteLove it!! Wow does it ever look great and once you put that trim on..youza ;) I cant wait to hear what color you decided and see that countertop!
ReplyDeleteLauren Baxter | Lovely Decor
xx
Love the black wall sconces next to your window. Do you mind sharing the source? Love everything. Thanks!
ReplyDeleteAaaahhhh! I can not wait to see these done! What a great vision!
ReplyDeleteNot sure if you'll see this, but I found this blog post and it gave me the confidence to try this with my own cabinets. I'm halfway through so far, all the boxes have been built and the rest of the materials have been purchased and are currently sitting in the kitchen. I will most likely finish this weekend provided the husband and baby don't need me haha! Thank you for sharing this! :)
ReplyDeleteThe same for me!
DeleteHoly cow you are amazing. It looks fabulous!!!
ReplyDeletequestion. I noticed a tool hooked up to a hose. did you use a pneumatic stapler?
ReplyDeleteNo, just a nailer for trim.
DeleteCurious how high your ceilings are, and what size the original cabinets are?
ReplyDeleteThanks!
Hello! The ceilings were nine feet and the cabinets were standard -- we didn't get the extra tall ones. (I'm not sure of the exact height of them.)
DeleteYour article became my blueprints for my own build. I’m proud to say I am half way through and it looks fabulous. The framing has been added and I am about to put up the moulding. Everyone thinks I’m a big deal Ha
ReplyDeleteFabulous work . Beautiful kitchen. I am wondering the brand and colour of the white paint you used on your cabinets. I have similar kitchen cabinets have been thinking of painting them white. Thank you in advance.
ReplyDeleteExcellent. The direction I’m aiming
ReplyDeleteCan you give an approximate cost? I have about 3 similar areas
10 years later, still looks classy and timeless. Love what you did here! -Kelly in FL
ReplyDelete