
$100 kitchen island transformation
March 26, 2019
Share this
Hello hello!! The island makeover is done! I'm so excited to share it with you. :)
I think I confused some of you on my last post when I shared the build of the new sides on the kitchen island. To clarify, this is where we started:

We love the size and the wood countertops, but otherwise it was fairly simple design.
Last year I added a little detail on the sides of the island with some trim and even that little bit helped. But as I mentioned last week, I really wanted the look of the island that I built in our last house:

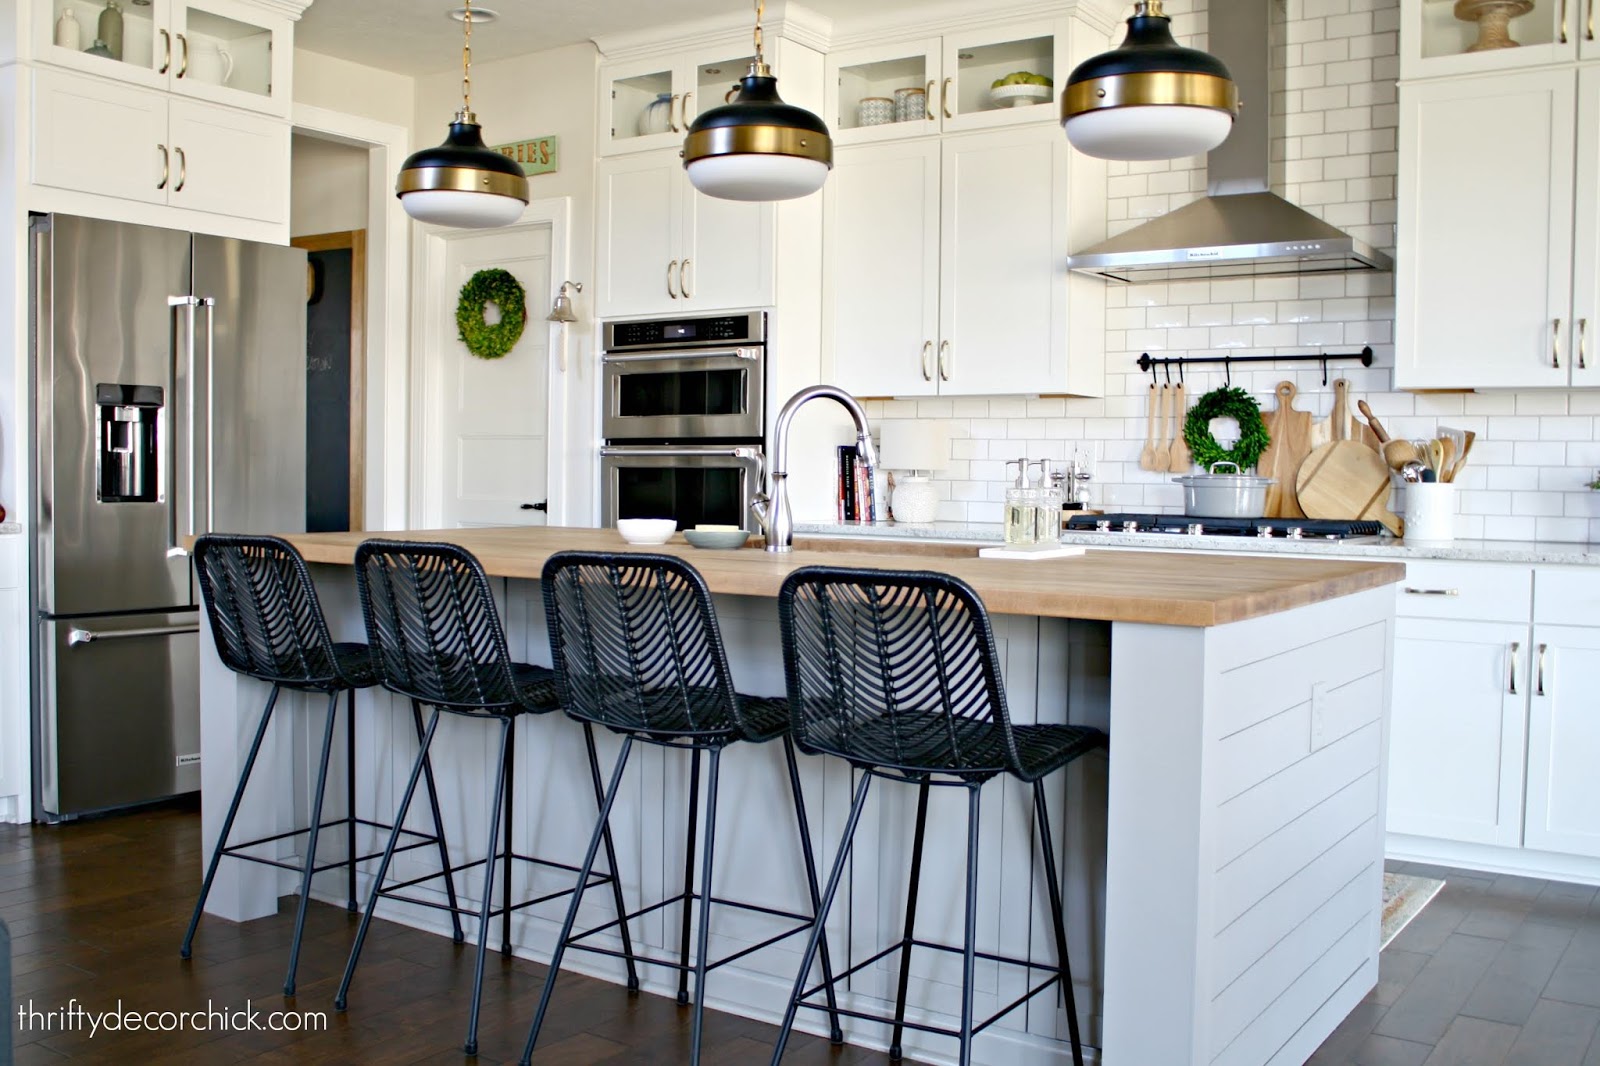
I gave that island a custom look by extending it quite a bit and adding a bunch of storage (and a spot for the microwave). My favorite part was how I brought out the sides of the island and gave it more substance. I LOVE when an island is sort of enclosed like that -- I feel it adds more presence in the room.
As I mentioned last week, I didn't think that would be possible with our current island because we have cabinets that run along the front. But I came up with a way to make it work!
Last I left you, I had built the plywood sides of the island that spanned the whole width -- from the front edge of the countertop to the back:

I framed it out with some trim, then thankfully I had plenty of leftover planks from another project to finish up both sides of the island!
I painted everything to match the island (I color matched a cabinet door last year) and the finished result gives the whole island SO much more presence:

I LOVE IT!! Just what I wanted!
I didn't want to block the end cabinet doors on the front and this solution worked perfectly! I created "legs" that wrap back around, so the cabinet has plenty of room to open:

You can see a photo of the door opening in my last post about the build.
Can we talk about those stools? 😍 Goodness I love them!! I've had a love hate relationship with our upholstered stools since we got them. They were so comfy, but the cats used them as jungle gyms and were constantly climbing them. Their claws tore them up. Plus, we have one cat who will knock over any glass on the counter within seconds -- it's his sixth sense, like an alarm goes off in the house alerting him. Ugh! Anyway, I was tired of cleaning spills off the fabric.
So I found these at At Home (more on that later!) and I absolutely LOVE THEM. They fit our kitchen so much better. And they are still incredibly comfy. Bonus -- the cats haven't been on them once. I think they're afraid of them. ;)
Here's a front view of the island before:


I mentioned last week that I love the extra support this provides too. It always worried me a little bit when someone would lean on the counters. I don't think about that at all now.
Here's a look from this side of the island before:

And here's how it looks now:

I think it's a big difference, but at the same time, not in your face different, right?
I used the planked look on the ends because it's a favorite of mine and I hadn't added it in the house yet! Because of Joanna Gaines this is well known as shiplap, but many of us were planking walls well before Fixer Upper. ;)
I think shiplap works well with so many decor styles -- farmhouse of course, but it goes modern when paired with the right accents as well:

I looove how those stools tie into the black on the lights. 👍
I spent $85 total on this build. It went waaaaay quicker and easier than I thought it would, and was much cheaper than I thought it would be too. (Hence why I went ahead with the new stools now instead of later.)
By the way, I purposely didn't add hardware to those cabinets underneath so they wouldn't look like cabinets quite as much. Without hardware they look more like panels across the front:

Here's one more before for you from the other side:

And with the chunky sides and new stools:


You know what I always say -- if it looks like it should have always been like that, it was a good transformation! This felt right immediately -- I'm so glad I decided to tackle this one!:
I am SO happy with how it came together, especially with little effort and under $100!

I'm working on some smaller projects in the kitchen to add even more character -- I hope to share those soon! You can see more about those new stools (and a ton of other affordable options) in this post!
Have you tried adding some detail to your kitchen island? I think it's such a great spot to customize in the kitchen. It's a focal point and it's fairly easy to create some interest! I shared a bunch of ways to add character to a kitchen island last week if you missed that post. :)
Let me know if you have any questions! If you're interested in anything in the kitchen you can find many of the items below (affiliate links included -- see my disclosure info here):

See more of our home here. To shop items in our home, click here! Never miss a post by signing up to get posts via email.
It looks so high-end! Love it!
ReplyDeleteLove the kitchen flooring, please share the brand, type and color of it. 😊
ReplyDeleteThanks! It's from Diamond Living, but it has been discontinued. :(
DeleteIt looks fabulous and makes the island look bigger and more substantial too
ReplyDeleteYou always seem to know how to make something that looks good look great and like it was always there
ReplyDeleteHuge compliment, thank you!
DeleteLooks great!
ReplyDeleteI've been kicking around revamping our kitchen island since you did your first one (LOL). Now you have cemented the need for shiplap on my island. I've been around with beadboard, wallpaper beadboard, X's, but now I have made up my mind! I love what you have done and really love that the shiplap goes right down to the floor with no baseboard. Thanks for being so helpful and inspirational.
ReplyDeleteAbsolutely in love! You have the best design sense!
ReplyDeleteCharmaine Ng | Architecture & Lifestyle Blog
http://charmainenyw.com
so much more substantial and high end! The stools are perfect and really accentuate your gorgeous lights! You could tuck in and led strip light under the counter for mood lighting at night which would glow through the stools too. Wire it to the lug point and add a switch tucked in under the counter. Fabulous transformation!
ReplyDeleteFunny you mention that -- I thought about doing that, but I think it would just highlight the crumbs that seem to gather there. Ha We'll see, I love the idea!
DeleteAnxiously awaiting the stool source info!! They are a knock-out! Plus, I bought the same gray ones about 5 years ago and they are starting to get wobbly. :-(
ReplyDeleteThey are from At Home :)
DeleteIt looks really great! I Love the planked sides! :)
ReplyDeleteThank you for sharing your beautiful kitchen! We are planning a major kitchen redesign and I'm wondering, how do you like having the sink in the island? Any positives/negatives you'd be willing to share?
ReplyDeleteI was a little worried about that at first, but turns out I LOVE it. I love that I can be washing dishes or prepping food and still watch TV or talk to family/friends. Our island is large enough so we have plenty of room for food when we entertain. That's one thing -- make sure the island is big enough -- I think it would bother me if it was small.
DeleteLove it! Such a greater presence in the room! I think I love the swap out to the black stools as much as I love the rebuild. All about contrast and balance for me!! Great work!
ReplyDeleteIt looks amazing! I was wondering if you would show pictures looking from the front of the island (kitchen side). Thank you for all your great tutorials.
ReplyDeleteThank you! Yes I will! That side doesn't look any different really, but I will for sure. :)
DeleteDid you lose any room for your chairs? The island actually looks bigger, but you will have lost several inches.
ReplyDeleteHi! I am in love with your island! Would you mind sharing what type of wood that is? Is it white oak? Thanks!
ReplyDeleteThank you! I believe it is walnut!
DeleteWhere did you get the lights over the island?
ReplyDeleteA local lighting company through our builder, but I believe Wayfair carries them.
DeleteI am gearing up to re-do our kitchen island and trying to decide if I keep the current butcher block countertop from IKEA or get a new bigger one to do your look. My current cabinets go right to the edge of it. Can you tell me how big yours is and where you got it? Stock or custom cut? Thank you!!!
ReplyDeleteOurs is 4x8 and we got it from a local lumber company through our builder. Do a search for lumber or butcher block in your area and I'll be you can find bigger options. :)
DeleteI am thinking about changing my island countertops to butcher block have you found them difficult to care for? And do they stain easily?
ReplyDeleteNot at all! They have held up great. It's important to treat them correctly. Go here to see how I stained and treat our butcher block.
DeleteI love love love it! Quick question though, what does the construct of the extended section under the counter look like. I didn't see any photos of that. Thank you!
ReplyDelete