
The office DIY built ins have started!
May 29, 2019
Share this
Hey hey! This week I've started really tackling the BIG built in project in my office. Yes...I'm still working on the mud room too. It's how I roll.
(Edited to add: Visit the link at the bottom of this post to see the bookcase reveal!)
I really want to get this DIY project done this summer, so I wanted to get started sooner than later. I usually work slowly, but since I've done this once before in our old dining room turned library I'm hoping it will go a bit quicker this time:
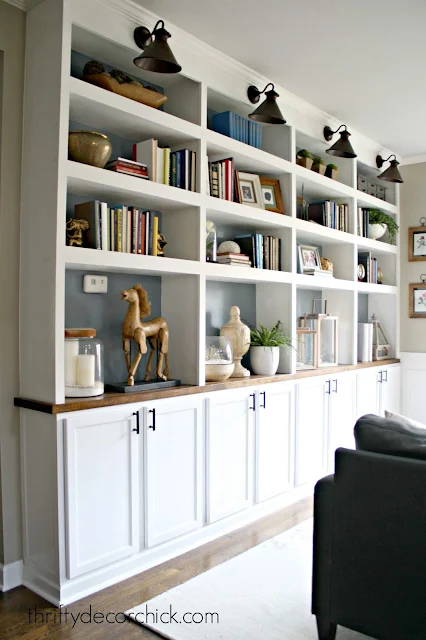
I'm also not worrying about a couple steps I took last time, so that will save some time and money for sure!


So far it's been easy...the real labor comes with the getting the bookcases up. My list is VERY long, but it feels so good to have this part done! I'd LOVE to have this done by mid-summer, but you know how that goes. ;) Stay tuned for another update!
**See the next step in this build (the wallpaper!) here
**See the final bookcase reveal here!
See more of our home here. To shop items in our home, click here! Never miss a post by signing up to get posts via email.
(Edited to add: Visit the link at the bottom of this post to see the bookcase reveal!)
I really want to get this DIY project done this summer, so I wanted to get started sooner than later. I usually work slowly, but since I've done this once before in our old dining room turned library I'm hoping it will go a bit quicker this time:

I'm also not worrying about a couple steps I took last time, so that will save some time and money for sure!
This post may contain affiliate links. See my policies and disclosure page for more information.
I shared my plan for my office here -- and I've figured out a few more details since:

The first step was getting the floors down in here. I was glad to see the carpet go! I needed the carpet gone before I installed anything.
I removed the baseboards on the sides and along the back of the wall -- the back piece I'll use again later on:

I used my Dremel cutting tool to cut through the base and then this method to remove the baseboards.
Here's the key for building a bookcase like this with closed storage underneath -- I use UPPER kitchen cabinets. They are only 12 inches deep so they are much easier to work into a space. You can use the lowers, but they come with drawers on top, which looks more "kitcheny" to me.
I always want a simpler look, so the uppers are where it's at. The thing is, they look a bit awkward just sitting on the ground (there's no toe kick on them like base cabinets). To create that custom look, you'll just need to add some height to them like so:

I used four 1x5s -- one for each cabinet. I wrap the inside of the bottom with them -- two long ones first, then brace it all with the shorter pieces. I secure them with my nail gun, but you could use screws as well.
This brings the cabinets up to a more natural height, and allows you to install the baseboards back across the front. To do that, you'll need to add some scrap pieces along the front of the new toe kick to bring the base out a bit. (That part is still to come.):

Check the height of your current (or future) baseboards before deciding on the height of your toe kick. Because our base is more than four inches, I had to go with a five inch wood piece (which is actually only 4.5 inches) because anything shorter wouldn't have allowed me to use the same size baseboards.
My next two steps are to cut out a hole in the back of a cabinet for the only outlet on the wall, and then I can secure them to the wall. Installing cabinets isn't my favorite thing because you have to watch to make sure they stay flush from all angles. But it usually goes pretty quick!
After that I can get the baseboards back on. I may get the painting started after that so I don't have to do quite so much at the end! Call me crazy but I think it's already looking good!:

I'm stoked to get these in the wall because I have a ton of craft supplies in our basement storage room and I can't wait to get them out of there. Since I don't paint inside the cabinets I can go ahead and put all of that away.
After that I will start the wallpaper -- I'm planning something on the back wall. Right now I'm leaning toward this peel and stick cherry blossom print (affiliate):

But it depends on how it works with the color I have planned for the built ins. ;) I THINK I'm going in a completely different direction than I originally planned. Any guesses?
Total cost so far for the built ins:
$300 for the four cabinets (mine were on sale, you can find them at most big box hardware stores)
$20 for the wood for the bases
So far it's been easy...the real labor comes with the getting the bookcases up. My list is VERY long, but it feels so good to have this part done! I'd LOVE to have this done by mid-summer, but you know how that goes. ;) Stay tuned for another update!
**See the next step in this build (the wallpaper!) here
**See the final bookcase reveal here!
See more of our home here. To shop items in our home, click here! Never miss a post by signing up to get posts via email.
It's going to look great! You are so talented!😁
ReplyDeleteThe room is looking great already! Where did you find the 3 diamond pane panels that you have on the wall behind your desk?
ReplyDeleteI found them at Goodwill! They are window grids. :)
DeleteLooking good so far! Can't wait to see the progress!
ReplyDeleteCharmaine Ng | Architecture & Lifestyle Blog
http://charmainenyw.com
I think you are headed for black bookcases.
ReplyDeleteHi! What is the source or did you make the 3 wooden wall pieces in the office? They are cool!
ReplyDeleteThanks!! They are window grids I found at Goodwill years back. :)
DeleteMy guess for the bookcases is navy blue. Looks great so far!
ReplyDeleteLooks great so far.... will you be adding a step by step process of the full install. ..we're wanting to built a bookcase along a whole wall. Never done anything like that before. We currently have tile on the floor but are looking to redo the whole ground floor flooring. Would you recommend we do that before building the bookcase?
ReplyDeleteLooking forward to see how yours progresses.
What/how would you do this if you had carpets?
ReplyDeleteI am starting my book case, hopefully this week! How do you attach your 1x5 frame to the bottom of the cabinets, and any tips to attach the cabinets to the wall?
ReplyDeleteI'm starting my bookcase, hopefully this week!! How do you attach the 1x5's to the cabinets, (nail in at angle or through the inside of the cabinet?? Any tips how to attach the cabinets to the wall.
ReplyDeleteI prefer to nail them from the side along the base of the cabinet. There's a little lip around the bottom that is just enough to get them secure. You could nail through the bottom of the cabinet as well to make sure they don't budge!
DeleteI am so inspired by these! They are gorgeous!! The wall where I would love to build these has a baseboard heater. Do you have any suggestions for working around these?
ReplyDeleteHi, I live this diy! I’m attempting a similar design. I’m stuck however, two of the cabinets aren’t flush- 1 cabinet seems to be crooked so it’s flush at the top but bows at the bottom. How do you solve this if you’re not planning on filler pieces in between each cabinet? Thanks in advance!!0
ReplyDelete