
DIY Built in Basement Bookcase Wall Reveal
February 09, 2021
Share this

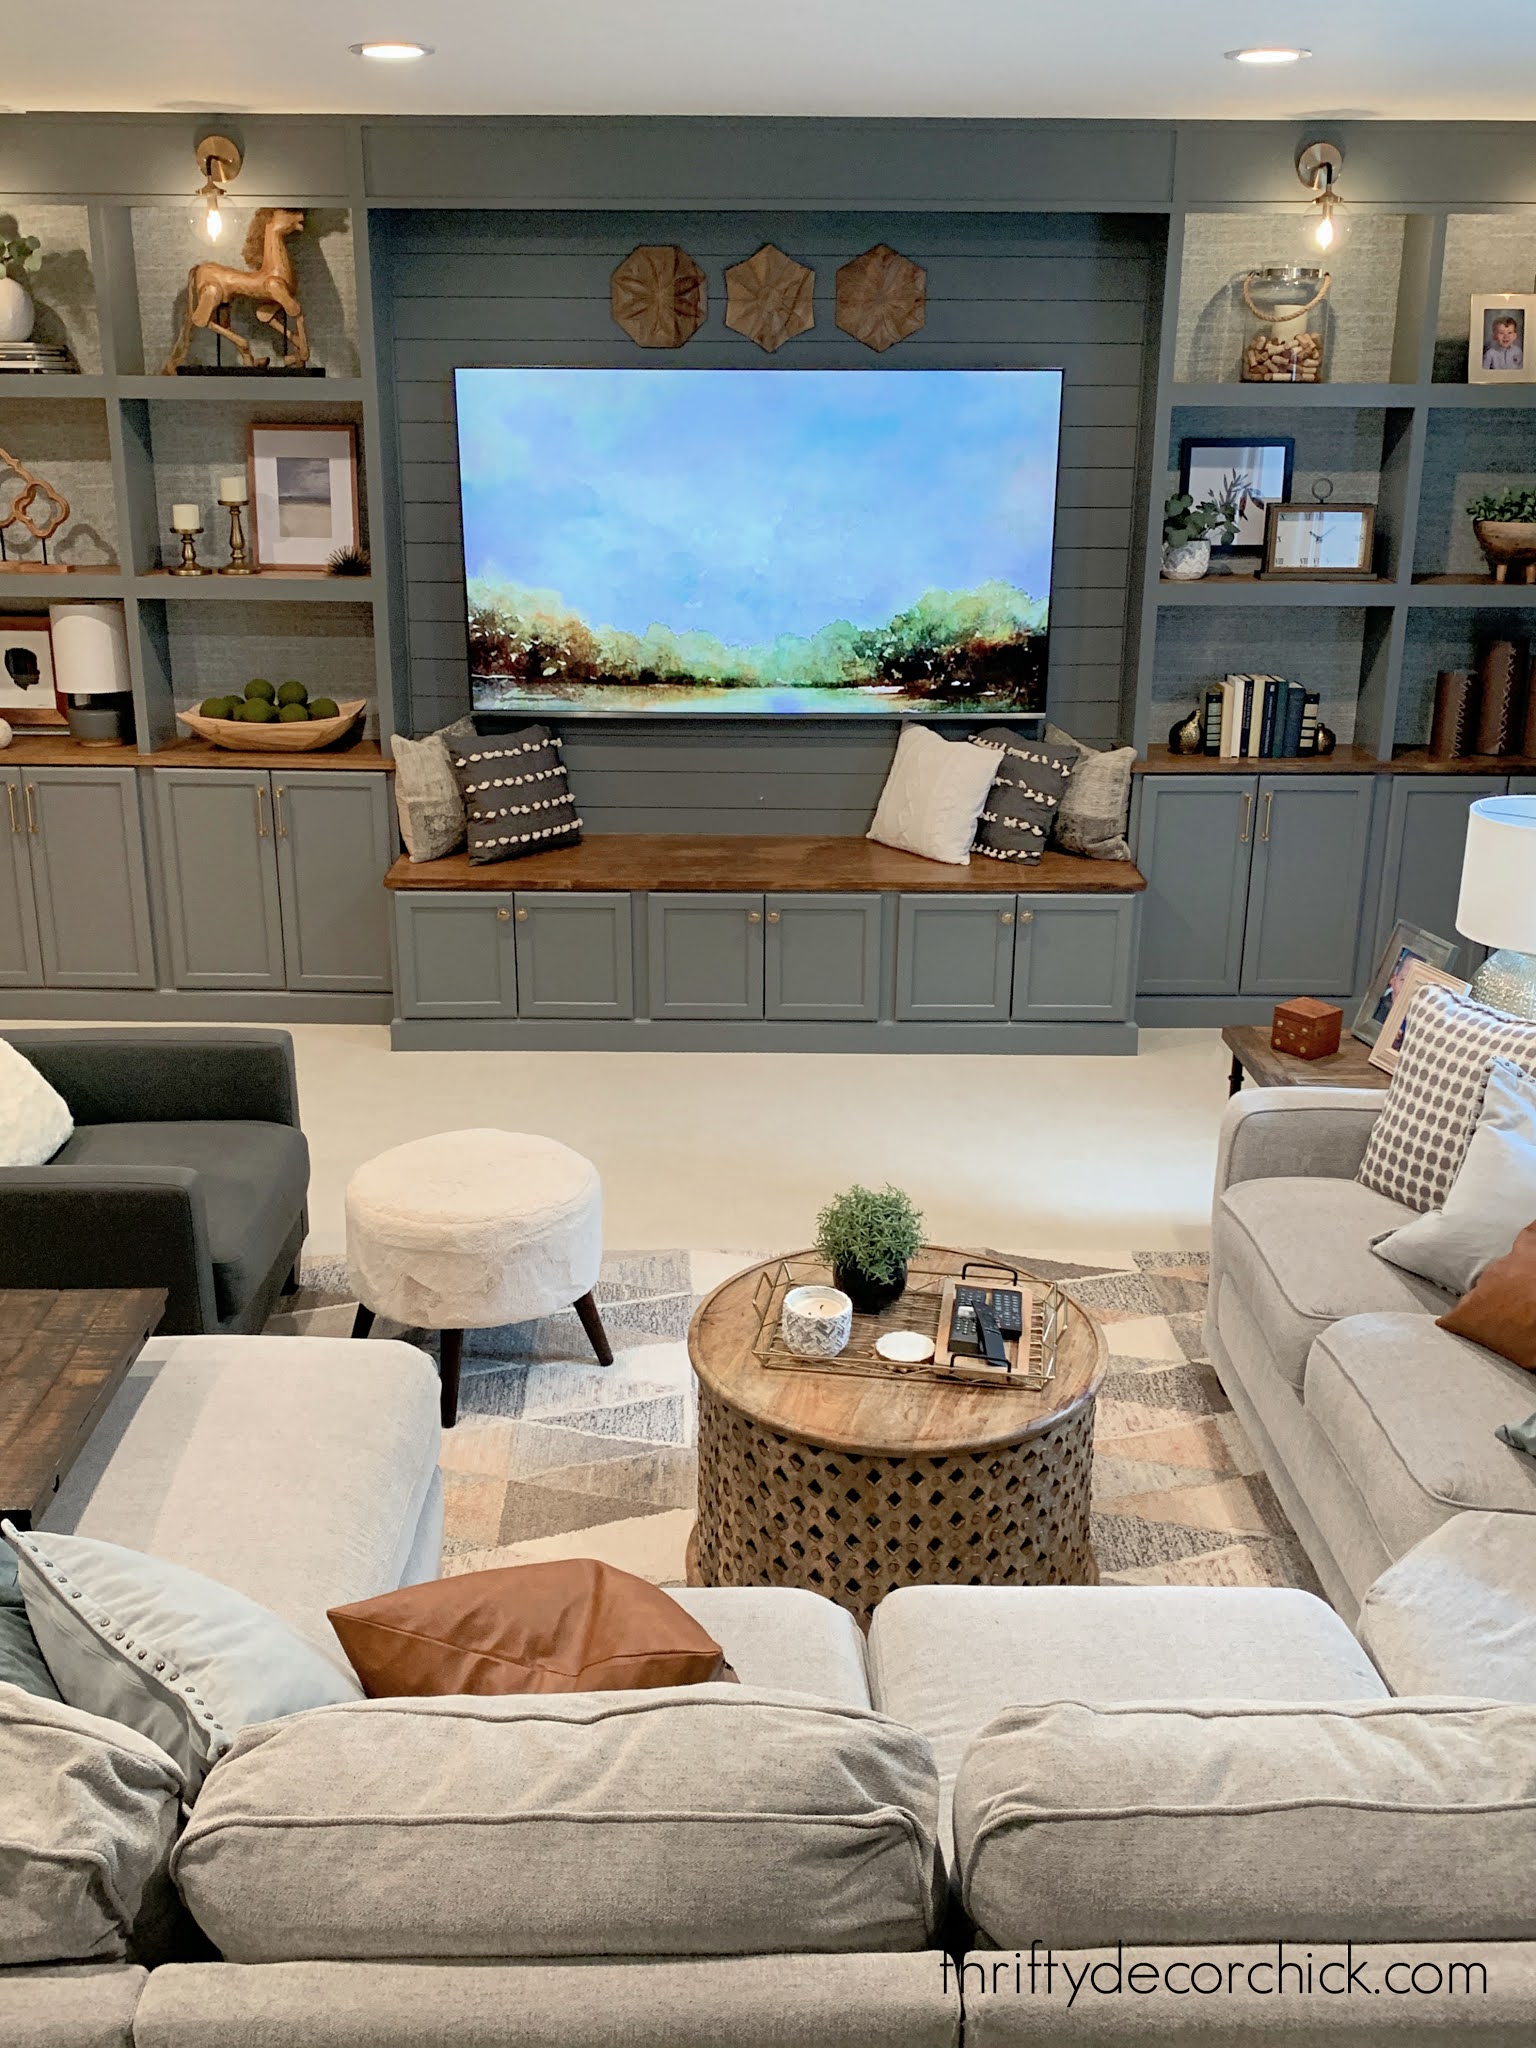
Hello there and welcome to the reveal of biggest bookcase build
I've ever attempted!
I shared a few weeks ago that I was going to start
building a MASSIVE entertainment unit in our basement.
I'll get you caught up on the process first and then will share the after
pics.
This is the wall I tackled...I've had an idea in my head since we moved in
for this spot:

The wall is a whopping 19 feet -- I was filling 18 of that.
I always use kitchen cabinets for my built ins. It's way easier, cheaper and
faster than building from scratch.
I started by
building up my cabinets
so they would look more built in:

After I got them in place I installed them into the wall and into each
other:


This post may contain affiliate links for
your convenience.
See my policies and disclosure page for more information.
I'm kicking myself because I didn't get a pic of how I did the center bench
part. I attached them to each other, and then added a support (into studs)
behind them.
Then I place supports that went from that to the backs of the
cabinets, where I screwed them in.
This just gives the bench some added support on the back part. It also keeps
it open back there so we can access sound system components underneath.
I
only screwed the top in, so if needed, we can take it off to access things
even easier.
The center and left side bench cabinets are cut out in the back, so we can
reach through.
When we get our sound system in place, I'll have to cut the
center of the doors out and replace that with something that will allow for
the remotes to work.
It also lets the electronics breath -- you can see how
I did something similar and
hid our TV electronics here.
I shared how I add
the look of wood counters for way less
a couple weeks ago. Butcher block isn't crazy expensive, but I knew we'd
need a lot for this project.
This is SO much more affordable and looks
great!:

Oh! And I hung wallpaper behind the bookcase -- it's a
gray tweed look in a peel and stick:

I find it much easier to hang this before I put my supports up. If I
ever want to change it out, I can cut it away from the shelves.
I have found it's more manageable to paint as I go -- I used to wait until
the whole thing was done and then start.
Doing it in phases is SO much
better! I painted the bases first, and then installed the pretty new
hardware:

You can see my trick to
easily install cabinet knobs and pulls here.
The rest of the project was done pretty much identically to how I built my
office bookcases. You can see how I
installed the supports for the bookcases here
and the
three steps for building built in shelves.
I knocked this whole project out in two weeks. I was on a mission! I spent
hours a day working on it and had an absolute blast.
It's like a puzzle
for me -- I really enjoy it. The only hiccups I had were at the very end
when I was building the shelves:

As you can see, I built the VERY LAST shelf and then stepped back and
realized it was in the wrong spot. Argh! Story of my life.
I have loved the look of stained shelves against painted bookcases and
wanted to incorporate that into this build. But pine is a finicky beast.
Sometimes it stains up beautifully, sometimes it looks awful (even with
conditioner). I'll go into more detail about that in an upcoming post.
This time, even with conditioner and using select pine, it didn't look the best:

So I had to switch gears. I contemplated taking off the fronts and
replacing them with a different wood, but I really didn't want to spend
more money (or start all over again!).
Instead I decided to paint the fronts and leave the actual shelves (on
top and bottom) the stained wood:


I absolutely LOVE how it looks!! It turned into a happy accident. Now the
front ties in nicely with everything else, but you still see that wood
tone on the shelves.
After that, I installed
the sconces, added some trim to the headers and touched up holes and paint:

Then it was time to decorate! I swear this part took me longer than it did
to build the bookcases! 😂
I had items in our storage room I've kept for
years just for this wall. I shared my
tips on decorating bookcases here
-- I always incorporate those when I'm accessorizing a spot in our
home.


A before shot from the front:

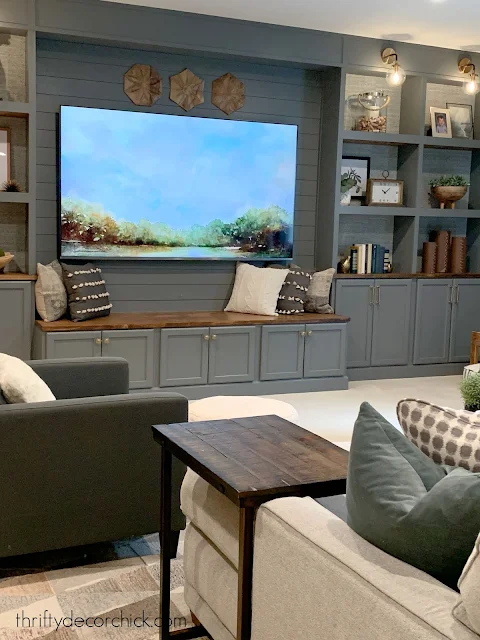
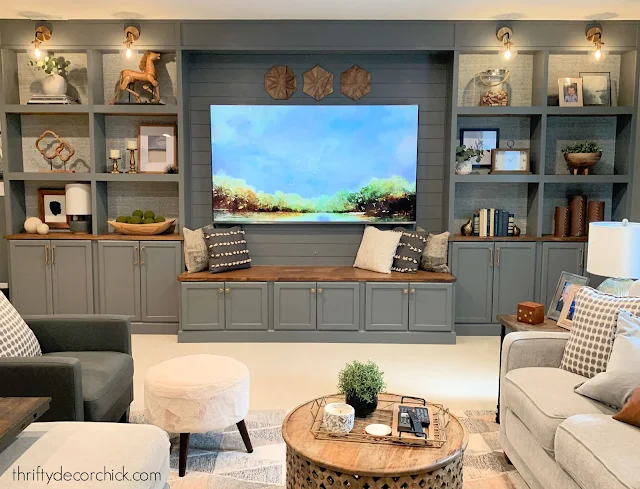
And now!:
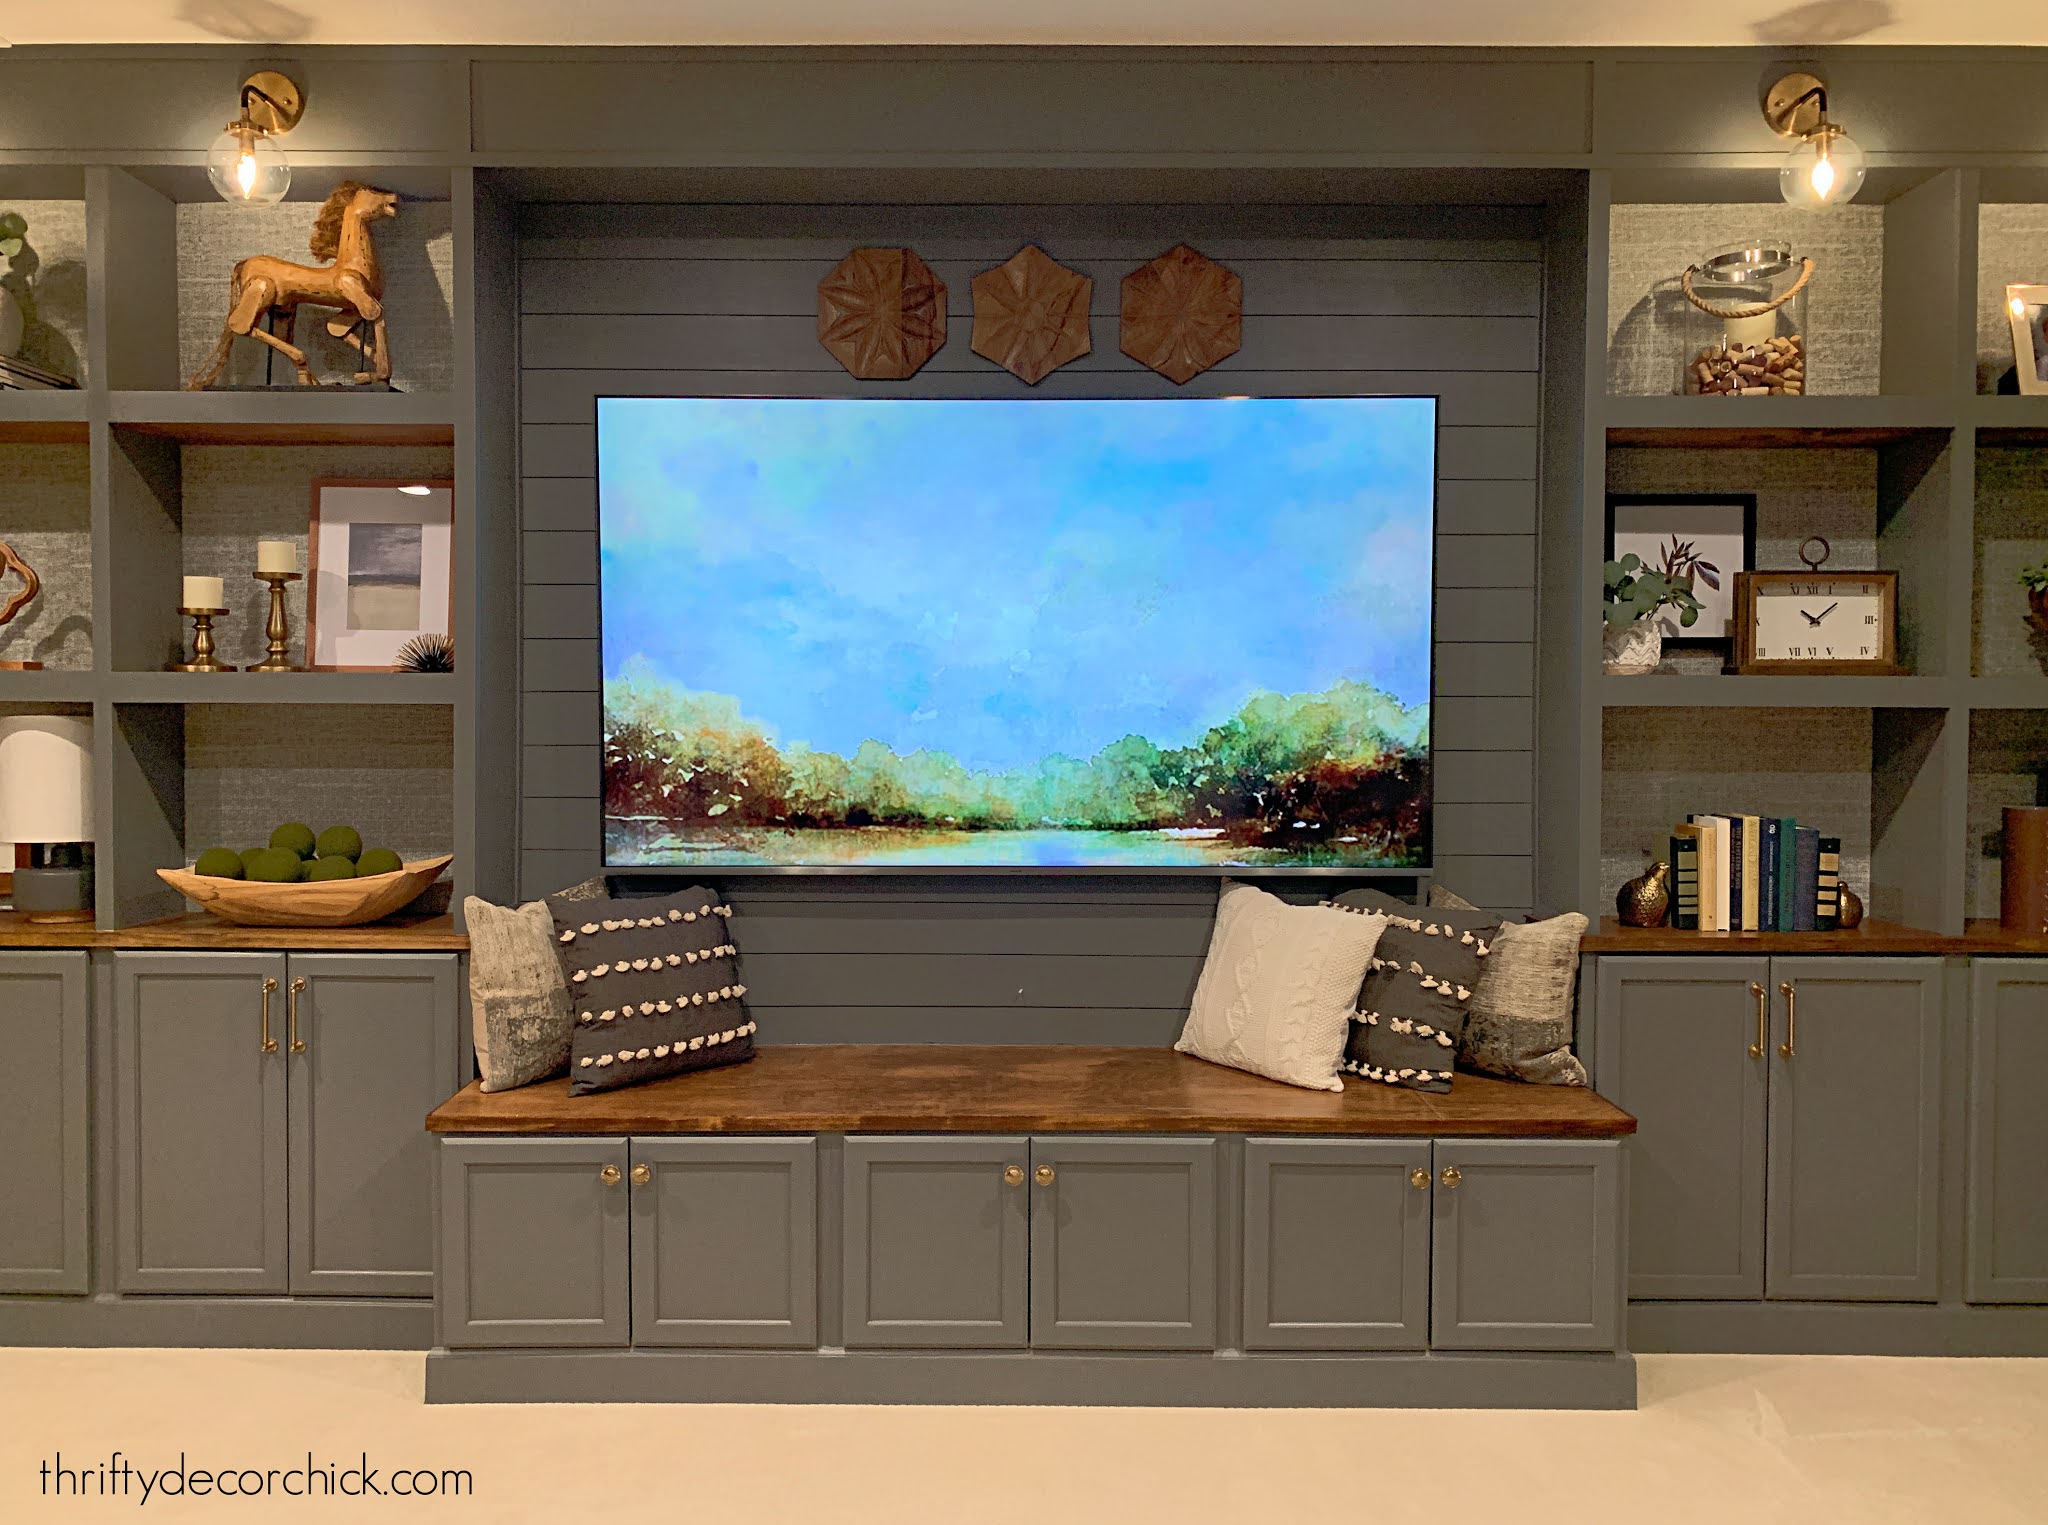
I had so much fun working on this project -- it came together so
beautifully:


I think this may be my favorite project I've ever done. My
kitchen
and
bathroom
renovations at our last house are way up there too...I'm so proud of
those!
But this one...I don't know what it is. It's just so me and fits in
perfectly in our home.
I'm super proud of this...I love all of the details and how the
decor came together:

We'll
need to wait to see how big the center speaker is before I do that:


We had bookcase speakers wired as well...I've hidden those holes behind
the art. :) Those will come when the budget allows.
I screwed the header in the middle section in (instead of nailing it) so
I can easily take it down when we have the ceiling speakers installed.
(Those are already wired.) I think we'll focus on the front speakers now
and tackle that part later.
When I look at a project and think, "It should have always looked this"
-- that's a sign it turned out really well! This fits perfectly in this
room!:
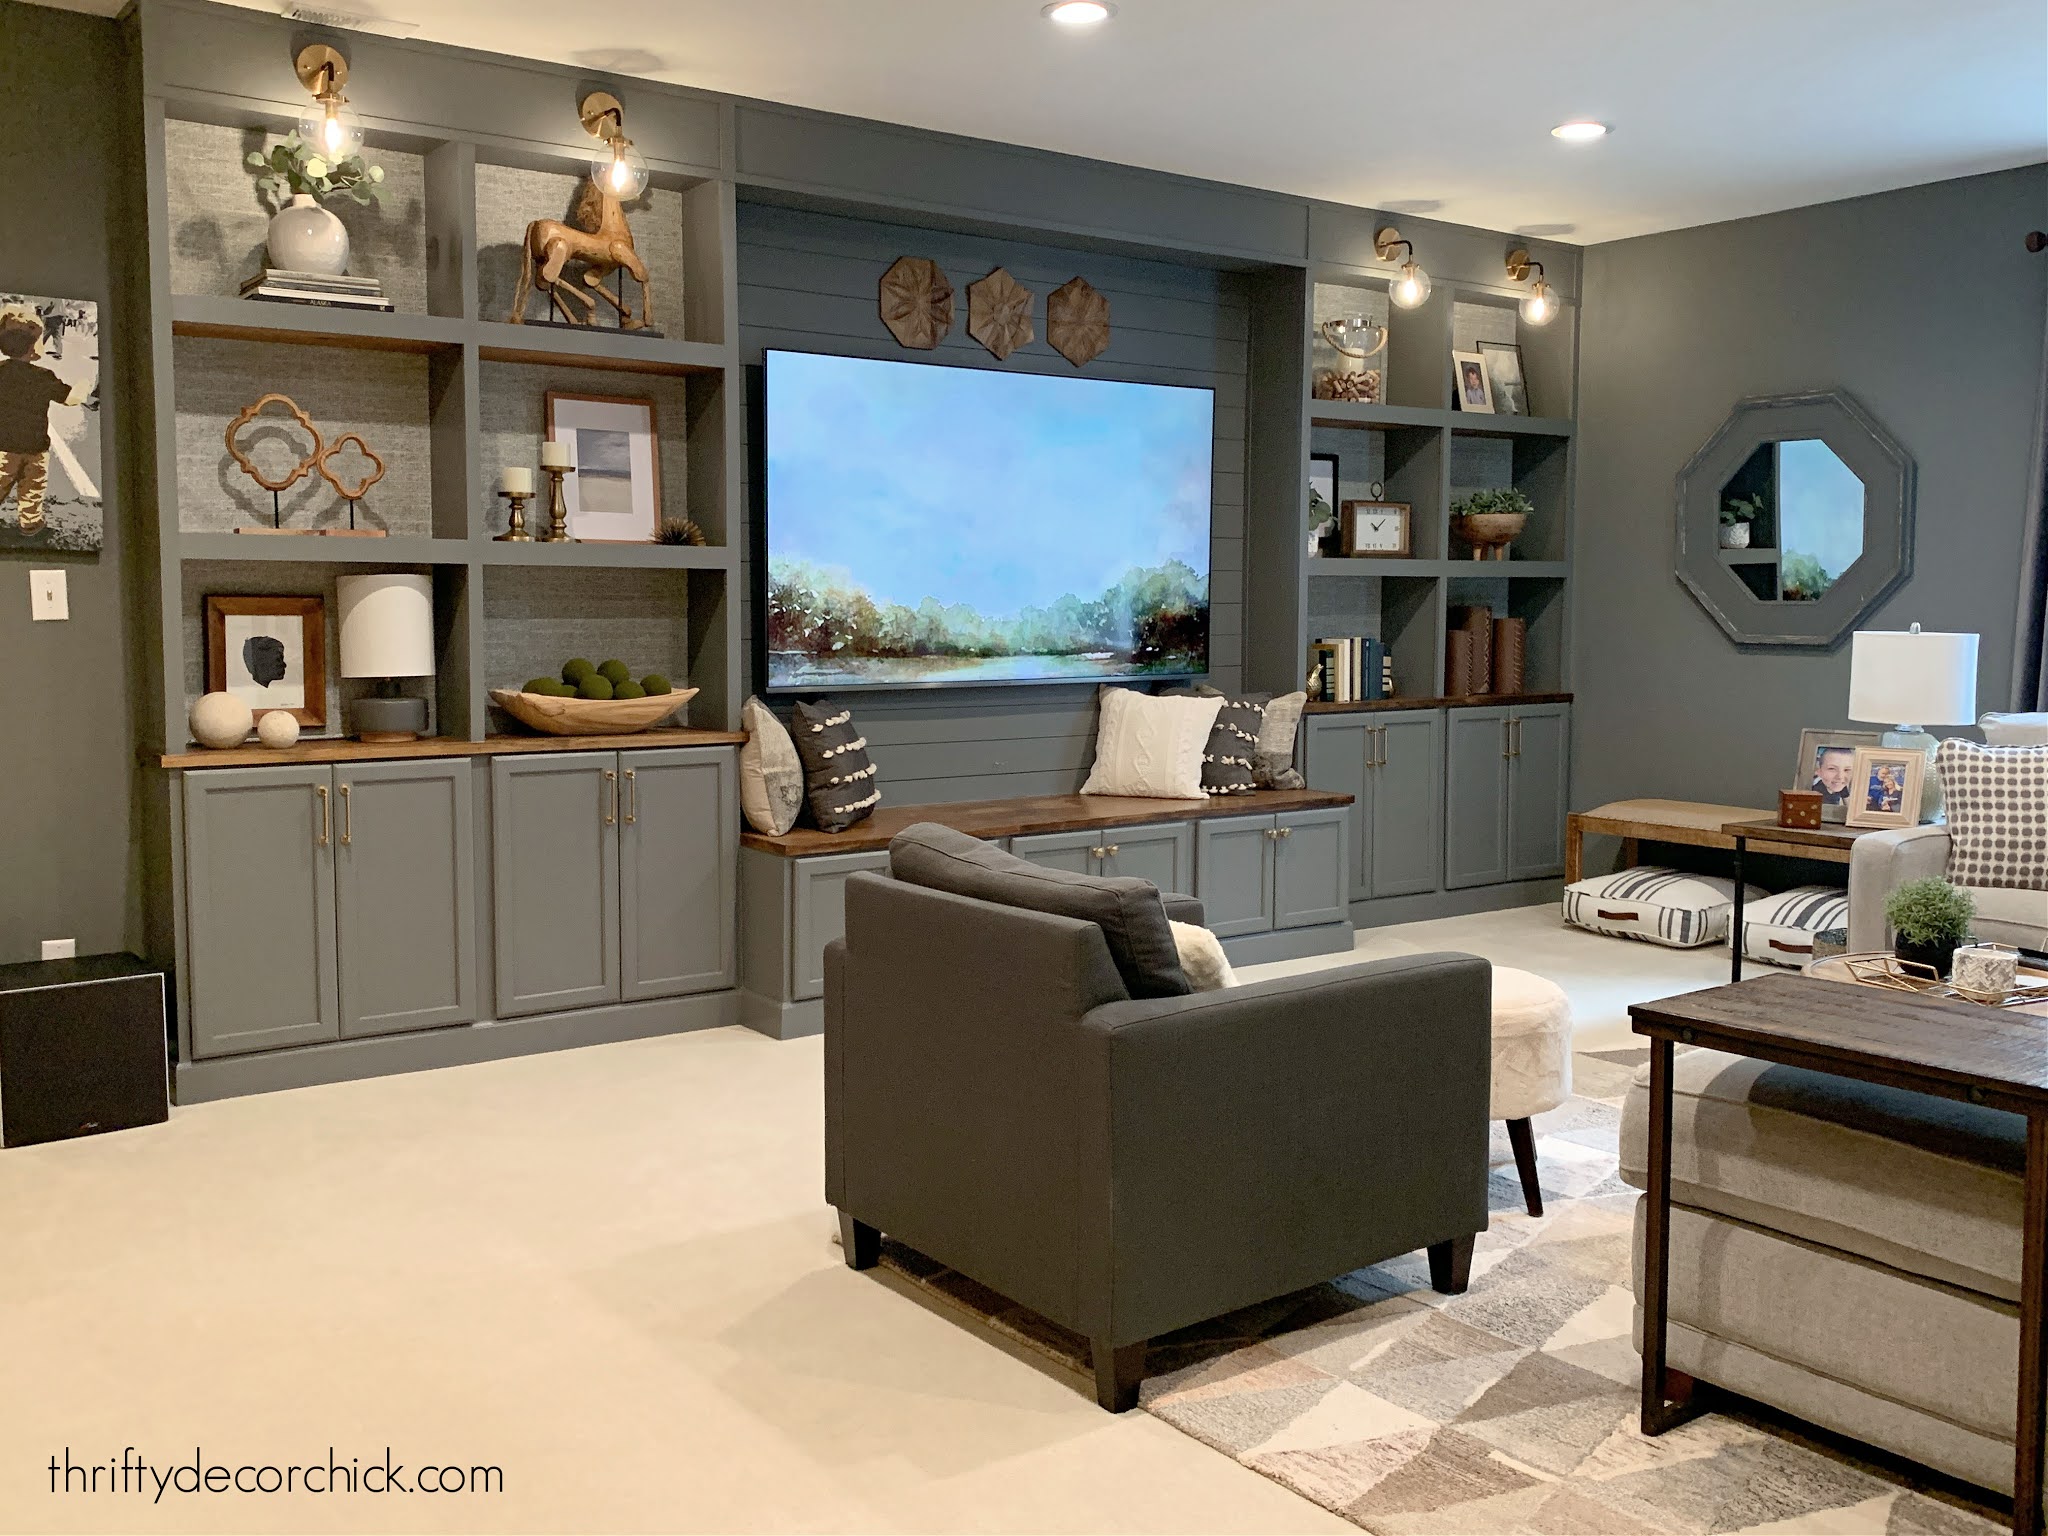
This spot is SO cozy and warm! We always spend a ton of time in the
basement in the winter, but we've been down there more than ever lately.
It's the best spot in the house right now!:
If you remember my drawing for this wall, you may remember we had planned
to add a long, electric fireplace under the TV:

Turns out there wasn't enough room. Now I'm kinda glad we didn't try to
fit in there! We're looking at a new spot for that instead.
The reality matches my sketch pretty well, right?:

The TV is just slightly off center and it should slide over, but it's
not budging. We want to wait till we have another person to help us --
hopefully we can scoot it over a bit more.
The final cost for ALL materials -- wallpaper to stain to wood
-- was around $1300. I would have paid at least three times that
to have someone build this for us!
The walls in this space are getting a little detail soon as
well!:

We've had that mirror since the old house and just happens to match -- but I'd
prefer it didn't. I'm thinking about painting it...just have to decide
what color!
You may notice that the lighting in here is MUCH better now. I'll share more
about that soon.
I hope this project inspires you! If you have questions I didn't address here,
please let me know.
SOURCES FOR THIS PROJECT
Wall and cabinet color -- Westchester Gray by Sherwin-Williams (flat and semi
gloss)
Stain color is Provincial by Minwax
Brass globe sconces
(I got them at Home Depot but they priced even lower at that link!)
Pillows -- Hobby Lobby
More about our sectional here
Watercolor art
on left shelves
I had most of the bookcase decor already. (They are a mix of thrifted and mostly HomeGoods items.)
See more of
our home here.
To shop items in our home,
click here!
Never miss a post by signing up to
get posts via email.
Share this
February 09, 2021
basement
before and after
Bookcases/built ins
decorating
DIY
staining
wallpaper
Wow, this is fabulous. What an amazing transformation. You have this wall build in game down, this is your best of all of them.
ReplyDeleteThank you so much Marty! I hope you're doing well!
DeleteWOW! You go girl! So pretty!!!
ReplyDeleteThis looks fantastic. I have the tools to pull this off, but not the patience...way to go :) Wondering if you would mind sharing dimensions, inside of shelves, cabinet height and your ceiling height in particular? Or if your sketch is to scale and you could tell me the scale, I can figure it out.
ReplyDeleteI just gave my cabinet guy a sketch for a large bookcase with library lights in the header and am now waffling on whether my shelves are too short. It's one thing to look at pictures and another to understand how it'll look in my living room. (sorry about the double comment, I wasn't logged in before)
My sketch is to scale! I think I used two squares per foot, if that makes sense? Our ceiling is nine feet. I ended up using 15 inch tall cabinets in the middle when we realized the fireplace wouldn't fit. (Remember these are all upper cabinets.) Yes the shelf height can be hard to determine. I didn't want a ton of shelves on this one, but keep in mind they will be a little more difficult to decorate. You'll need bigger items to fill in the height. Hope that all helps!
DeleteSOOO helpful, thank you!!
DeleteIt really makes the room!
ReplyDeleteQuestion: did you build directly on carpet and pad? (Looks like it from pics) Any concerns about it compressing over time especially once the shelves are loaded? Or that the unit itself might shift slightly and lose some structural integrity? We are thinking about doing a similar project and our shelves would definitely be loaded to the max with books and thus a lot of weight! What if you were to replace flooring in future?
Yep, right on top! It's not difficult to cut the carpet after the fact if we change flooring. We'll just need to add quarter round if we put in hard floors. If you would cut away the carpet you'd have to have a professional (or at least someone who knows what they're doing) add tack strips and stretch the carpet to the built ins -- otherwise it will get loose.
DeleteWhen these are complete they aren't going anywhere -- every step of the build adds integrity to the whole unit. If you are going to add a lot of weight to your shelves you'll want to insure your supports are into studs as much as possible. If not, use heavy duty anchors.
Looks AMAZING! I love everything about this! Wish I had a space in my house to do it. LOVE!
ReplyDeleteYou are so talented! It's gorgeous! Well done.
ReplyDeleteThis is amazing! Are you an electrician? How did you install the sconces and I'm assuming hardwired them in?
ReplyDeleteYes we had them hardwired by a professional. :) I can change out lights and outlets but don’t know enough to do that yet.
DeleteLooks really awesome! And I agree it looks like it was always there. Excellent job! I also really love the look of the stained wood. Gives it a very cozy feel.
ReplyDeleteSo beautiful! What about tweed wallpapering the mirror?
ReplyDeleteOh that’s a fun idea!
DeleteStunning - exactly what I want in my living room. I'd be very grateful if you could stop by and build me the same thing!!!
ReplyDeleteJob very well done!!!����Can't wait to do my built in.Your Home very well decorated so relaxing. Thanks for sharing.Beautiful
ReplyDeleteBeautiful! Your work always looks professional. I can see your skills improving with every project! Great Job!!
ReplyDeleteThis built in bookcase looks awesome! Great job, you are so talented Sarah!
ReplyDeleteThis is amazing! You inspire me to tackle home improvement projects that I would've never tried myself :) Can you tell me what tools you used for this and how you hardwired the sconces? Thanks!
ReplyDeleteYou are so unbelievably talented, it is perfect for that room. Just love it, WOW!!!! I need a clone of you to work at my house. <3
ReplyDeleteLove it! They look amazing! Love the color and the hardware - classic, timeless and beautiful!!!! So talented - thanks for sharing!!!
ReplyDelete----Holly
Hi! I love how this turned out! What did you use for the shelf fronts? Thanks!
ReplyDeleteThanks! It’s select pine. 😊
DeleteYour best ever!
ReplyDeleteBeautiful work! Can you share how to find the image that is on the TV screen?
ReplyDeleteThank you!! It’s just an image I found online that I screen shared. Easy easy to add art! 😊 I’ll try to find where I found it.
DeleteDid you cover that HVAC vent in the ceiling?
ReplyDeleteNo it’s still there.
DeleteStunning!! Truly stunning! You are quite talented! Do you mind sharing what you used for the planking behind the TV? It all looks beautiful!
ReplyDeleteThank you so much! You can see how I do it for super cheap here: https://www.thriftydecorchick.com/2016/08/how-to-add-shiplap-look-to-your-home.html
DeleteWow, thanks for the reply! I wondered if that was the same method you used here!
DeleteOh my goodness- that is incredible!!!!! You did SUCH an amazing job. WOW WOW WOW!!!! I absolutely love every decision you made on it.
ReplyDeleteAs for the mirror? Paint the trim gold to tie in to those awesome sconces? And maybe the inside part use some more tweed peel and stick for interest, as opposed to painting?
Whatever you do will be amazing. You are so talented.
My goodness this is beautiful and perfect for your room. You inspired me to make a similar "built-in" for my bedroom's north wall. I already measured and sketched it on graph paper. Now budgeting for the lower cabinets. Meantime, I am painting my living room and doing needed repairs in this room. At 67 I thought I could no longer do big projects, but decided to break them down into small increments. Slower, but I am in the 3rd quarter of this room. Next the bedroom wall unit, third a new kitchen. Fourth, tear out old kitchen. My son (in another state) is astonished!
ReplyDeleteI LOVED reading this! Good for you!!
DeleteIt looks absolutely terrific!!!
ReplyDeleteI'm working on built-ins for my office/guest room and I'm trying to figure which paint to use. I was contemplating BM Advanced but haven't fully decided yet. Which kind do you use for yours?
Advance is great! I used that on our last kitchen cabinets and I loved it. https://www.thriftydecorchick.com/2015/11/the-epic-how-to-paintyour-kitchen.html
DeleteI haven't used it since -- I love Sherwin-Williams paint and I find it holds up really well. I used the semi-gloss SuperPaint for this project. As long as you prep well I think you'd be fine with either.
Stunning! You are amazing! Congratulations, Sarah!
ReplyDeleteWow, you did a fantastic job on this! I think this is your best project yet. Totally transforms the room. You should be very proud of yourself!
ReplyDeleteThis is lovely. Congratulations! I like your more-distanced shelving better than my daughter's similar but closer-spaced shelves. She did a super job styling her shelves, but the larger items on your shelves banish any hint of clutter. One question: is the bench usable in front of the flat TV? I'd be afraid someone might lean back into it. I prefer the 'bench' used as a shelf without a cushion.
ReplyDeleteYes, it's two feet deep, plenty of room to sit!
DeleteABSOLUTELY BEAUTIFUL!!
ReplyDeleteAmazing transformation! It looks fabulous and I'm sure it is really convenient for storage as well. I love the choices you made in wallpaper and adding the stained wood.
ReplyDeleteThis is BEAUTIFUL and functional!! Love it! Maybe paint the mirror a mossy green color that's the same or similar to the bookcases in your office, and paint the raised border gold.
ReplyDeleteThis turned out incredible! I'm in love with it, as I'm sure you are as well. Thanks for sharing--I love your style and design :-)
ReplyDeleteThat system is the crowning touch to a great family relaxation area. I envy your ability to complete such amazing projects. It looks gorgeous, Sarah.
ReplyDeleteYou are so talented. Your first built in at your prior home in the dining room, was true inspiration for me. I built one in my dining room off of your instruction. So beautiful!
ReplyDeleteThanks for being you.
Is that shiplap in the middle?
ReplyDeleteThis looks absolutely gorgeous! I love the look so much!
ReplyDeleteThe built ins are fantastic! As an aside, can you tell me where you got the sectional?
ReplyDeleteSarah, you did an amazing job! It's absolutely beautiful!
ReplyDeleteI just stumbled on your basement bookcase build. How impressive! Did you do it yourself? You give me incentive! My husband was talented and going to build for our house. He passed away in 2017 and, due to a brain injury I had in 2018, I have doubted the abilities I had. I built my own cedar bookcase headboard and dresser in high school. I think I've forgotten how to run some of the tools! But, those are long-term memories and, with a refresher from a friend, I just may tackle it! Thanks for the inspiration! I'll be watching for more projects by you!!
ReplyDeleteYou nailed this! Perfection. I’ve followed your blog since you had the angled walls the fireplace in your old home. Wasn’t that mirror there at one point? Love this so much. Your style is spot on.
ReplyDeleteHi -
ReplyDeleteFor the Sherwin Williams paint, what type was it? Latex? Any base coat? Has to be sturdy for cabinets. Would love those paint details - I'm ready to go to the store so I can do that to some oak cabinets I have in our bathroom. Looks amazing!!!
Wow. How impressive.You must be so proud of yourself. Did you remove the baseboard behind the bookcase ? I was impressed with what you did in the old house with kitchen cabinets, but don't think I could build a base.
ReplyDeleteMyrna
I absolutely LOVE this project. I think what really stands out to me is the attention to detail. from the wallpaper to the pulls to the lighting. I could go on but... you get the idea. It is freaking awesome!!!! Thanks for sharing how you brought your vision to life:)
ReplyDeleteThis turned out so beautifully! I've been sitting here for five minutes just drooling over the reveal pics - you really nailed the staging as well as the build design. It's giving me much food for thought with my living room project.
ReplyDeleteI love this and you sectional is amazing. Can I ask which one it is?
ReplyDeleteThs is beautiful, thanks for sharing. I had a question. Have you ever stacked the upper kitchen cabinets on top of each other? I've looked at this design and most of the ones you linked and they all seem to be cabinets for the base with shelves above it. I'm looking at trying to build some built-ins with more enclosed cabinets and would love to stack them but not sure it will work.
ReplyDeletelooks amazing. This is something that we want to do in our basement. Did you attach the shiplap to the wall or the sides of the unit?
ReplyDeleteSorry I just saw this comment! I nailed it into the wall behind. :)
DeleteWow! What a beautiful job you did on the basement build in. I have questions though as I am a very detail oriented person haha.
ReplyDelete1. Did the wall paper go directly to the wall on the shelves? If not what wood did you back it work?
2. How did you mount it to the wall?
3. How did you get the beginning of the shelving walls running vertical to stand on the 'cabinets' below? Drill inside?
4. Is that shiplap behind the TV and how it is attached?
5. How did you fill the gap between the bench and the wall?
I may have missed the answer to these questions in the article and if I did I apologize. Thank you in advance :)
Thank you! The wallpaper is peel and stick, easy to install! In the post I link to how I installed the supports -- I share pictures there showing how I did it. Yes it is a shiplap look and they are nailed into the wall. :)
DeleteHi There! My husband and I are so inspired by this. We plan to create the same thing! Do you mind sharing about how much paint you had to use? As well as at what point did you have the electrician hardwire the sconces in? do you have to do that before beginning anything, or can they do the installation after the fact?
ReplyDeleteI used about a gallon and a half, I'd get two just to be safe! You'll want to have them do that before you start so they can run the wiring where they need to. :)
DeleteAbsolutely beautiful!!! We are so inspired we are planning on doing this is our family room as well. I would LOVE to know the color of the paint you used.
ReplyDeleteSorry I missed this! The color is Westchester Gray.
DeleteThis turned out amazing, and will be me inspiration for my project. Thank you for going step by step into how you did this.
ReplyDeleteOne question though. How did you make that (what looks to be) rounded shiplap backing behind the center bench?
Thank you ahead of time for your response!
Thank you! It's just straight shiplap on the wall behind the TV and bench :)
DeleteHello, my wife came across your basement built-in project and it inspired me to attempt it myself. I was wondering if you had a complete cut list for the materials you used and had a question about how you’ve built the section underneath the TV to stick out further than the side cabinets. I saw that it wasn’t included in the post. I also wanted to know how you closed in the top part of the built on to hide the supports.
ReplyDeleteI don't have a cut list but should do that! Beyond the cabinet bases, it's really all 1x12s -- but the length and size will depend on your base cabinet depth and the height of your ceiling of course.
DeleteThe bench cabinets are pulled away from the wall, and I used 1x2s level with the top of those cabinets and secured into studs in the wall. So the wood bench top from front to back is level and supported.
The top part is closed in with scrap wood around the interior of each section at the top where I wanted to secure the 1x12. I installed those scraps into studs along the back wall and into the side supports, then nailed the top board to hide those.
I hope that makes sense!
This is great. What size is the TV?
ReplyDeleteSoo nice! I’m inspired by this. How high is the ceiling?
ReplyDeleteThank you! The ceilings are 9 feet.
DeleteWhere did you find your rug?
ReplyDeleteI found it at HomeGoods, but it was nearly ten years ago now.
DeleteGreat Work! How did you route the cords for electronics?
ReplyDeleteThanks! We have outlets under and behind the TV. The bench is open in the back so the electronics are plugged in there.
DeleteThis is exactly what I'm wanting to do in our living room. Can you explain how you hid the wiring of the TV? I'm assuming its behind the back panel, but them I'm confused on how you mounted such a large TV if that panel isn't screwed into the studs.
ReplyDeleteWe had our builder put the outlets and cable on the wall behind the TV. An electrician can do this for you pretty easily! The panels on the back behind the TV are just nailed into the drywall.
DeleteLove this and are attempting something similar in our living room. I was wondering how you attached the countertop to the top of the cabinets? Glue or nail? Doesn’t seem to me there’s enough surface area to glue it but am trying to limit holes if possible. For reference, we used four 36” upper cabinets and it’s supposed to be all one long nearly 13’ countertop. Any help is appreciated! Haven’t done a DIY this big before.
ReplyDeleteI usually nail in from the top and then you can also use screws from underneath inside the cabinet as well. Just make sure your screws are the correct length so they don't come through the top of the counter.
DeleteI love the look! Turned out beautiful. Are base cabinets actually upper cabinets? The depth seems smaller than standard lowers? We're getting ready to do a library/den and I'm trying to convince hubby he doesn't have to make it all from scratch.
ReplyDeleteThank you! Yes those are upper wall cabinets. You can find out more about that process here -- https://www.thriftydecorchick.com/2016/06/how-to-create-custom-built-ins-with.html.
DeleteThis is waaaay easier than building your own. :)
This is very similar to the size of my living room! How tall are your ceilings?
ReplyDeleteThey are nine feet!
Delete