
Five Helpful Garage Storage and Organization Solutions
June 04, 2026
Share this
TONS of useful garage storage ideas and organization tips.
After decluttering, cleaning and
organizing our garage, I'm sharing ALL of the garage organization projects and storage solutions that have worked best for our family.
Before this project, our garage was never this organized...not even close. I tackled this
space because I was SO tired of stepping over messes or pushing them out of
the way while I was in here cutting wood or working on projects. Or not being
able to find the tool I needed.
Years ago it hit me that the garage is as much my work space as my
office with a desk and computer. I decided then and there to figure out better storage and a set up
that functioned better.
I definitely splurged on a few things! But I saved in
a lot of other ways too. I'm SO glad that I spent on the items I did -- they
were so worth it!
Let's take a tour of some of my favorite organized spots, shall we?
This post was updated in June, 2026.
1. Seasonal decor storage.
I've shared our
wood shelves with the organized holiday decor before:
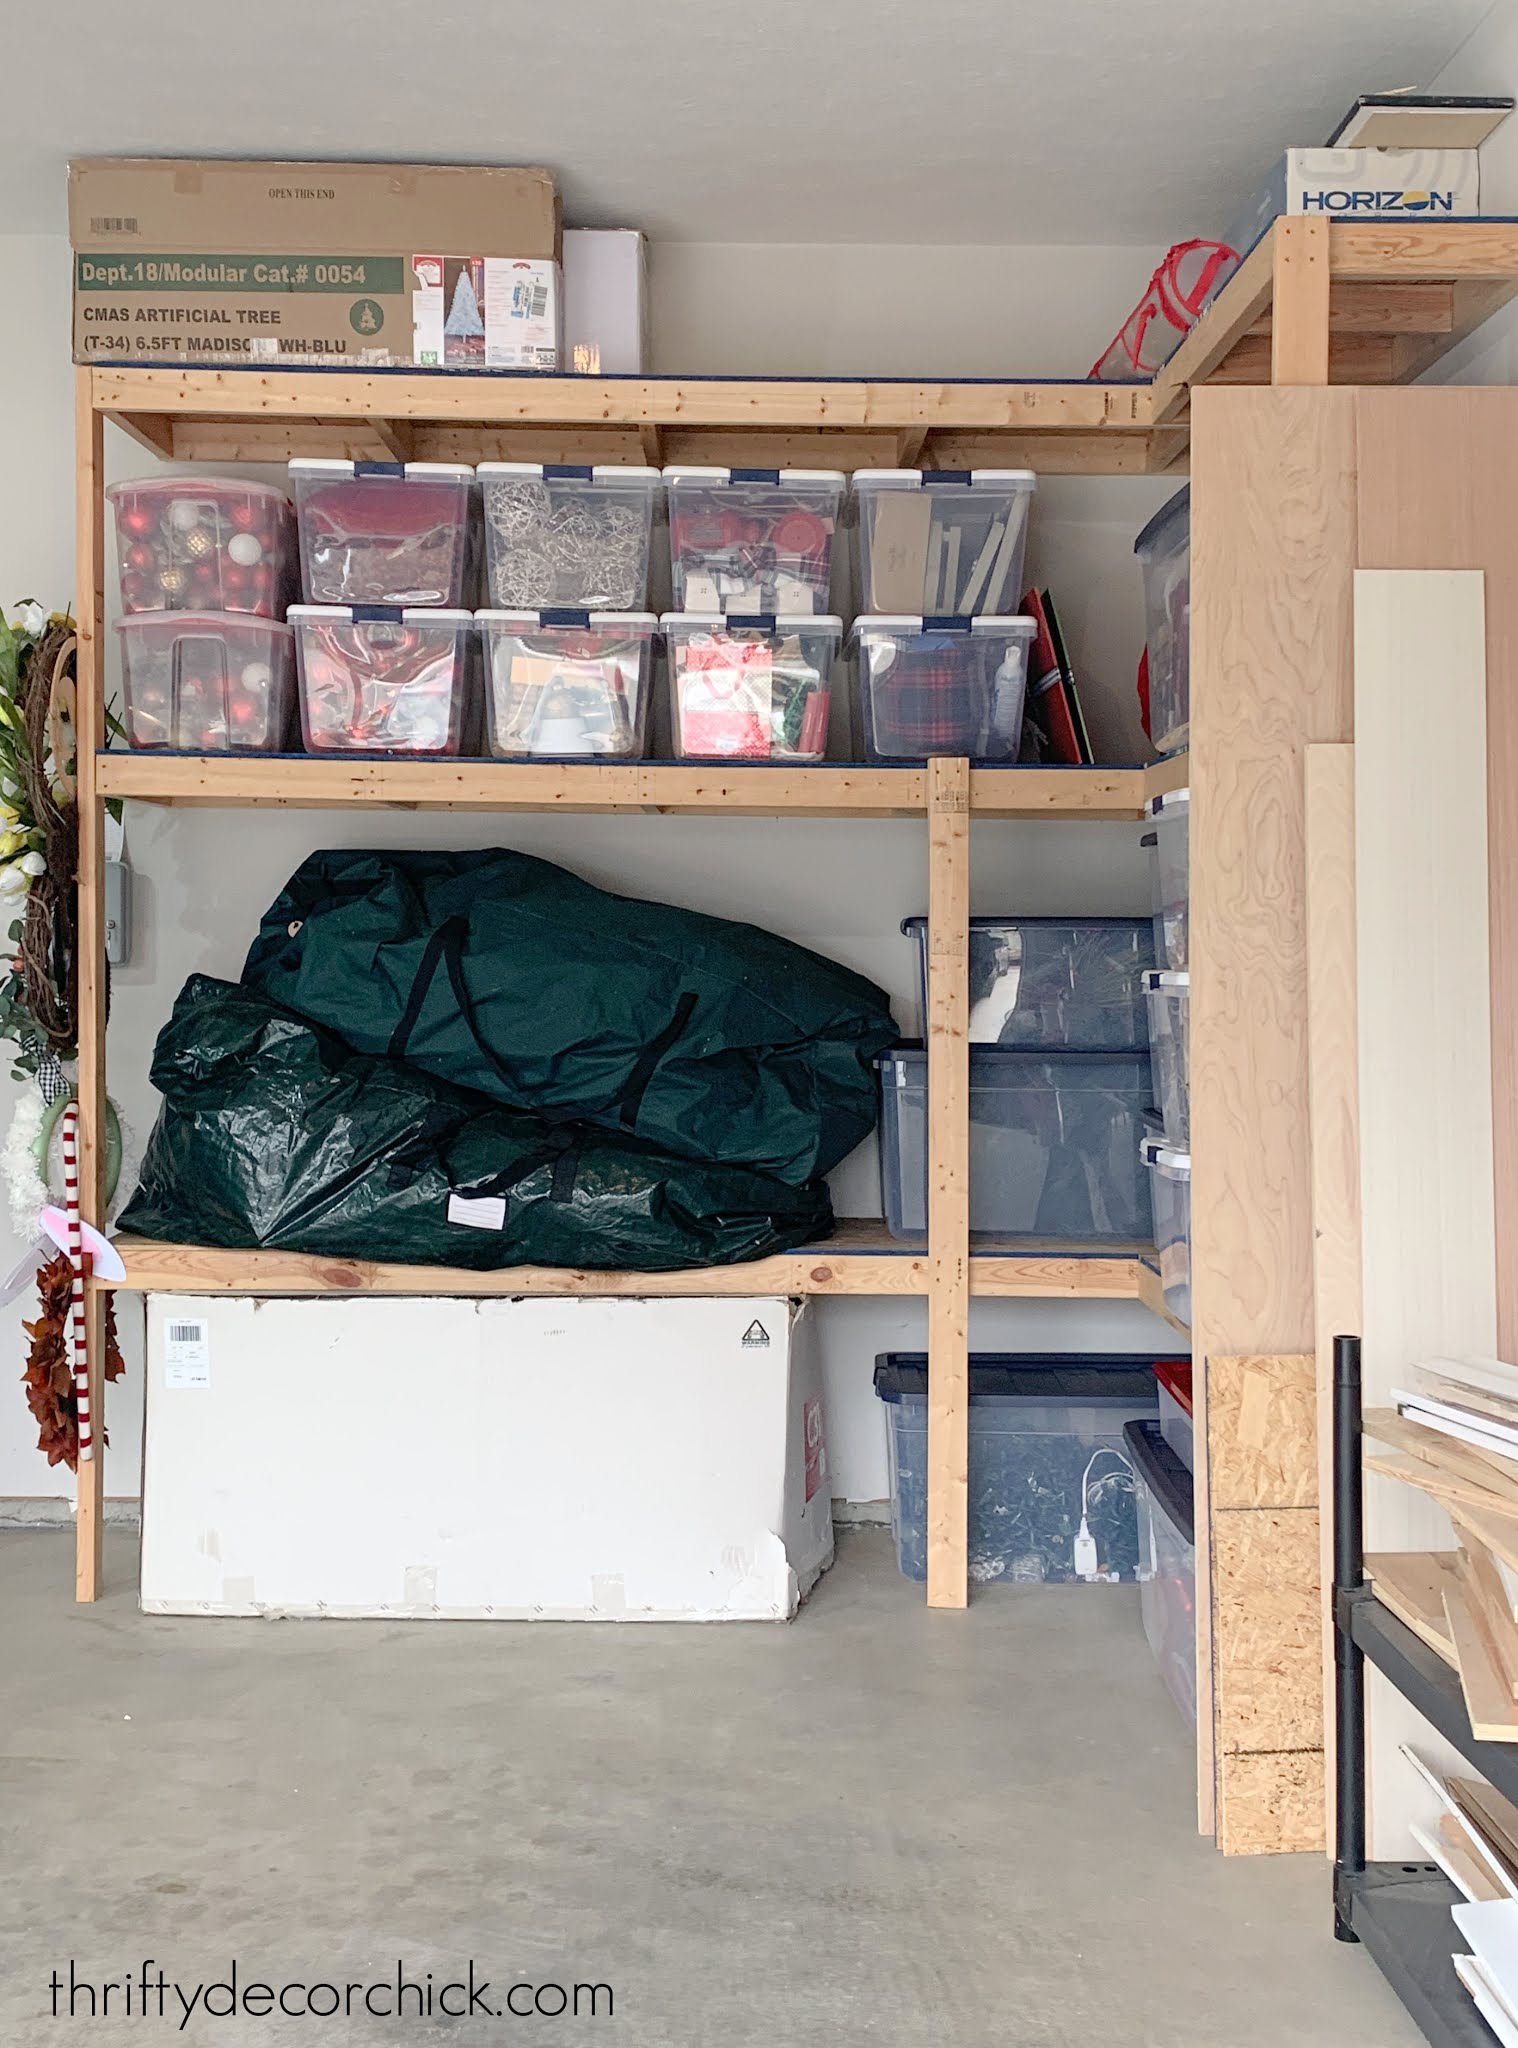
I love having seasonal decor in clear bins so I can see exactly what I'm looking for.
If you're short on garage storage space, going vertical is a great solution!
That post also has tips for light strand storage, as well as my favorite way to store away the Christmas tree!
2. Get the clutter off the garage floor.
This beautiful corner of the garage is one of my favorite parts:

Read all about how I
got things off the garage floor and onto the walls here!
This gives us easy access to sports equipment, rakes, shovels and brooms and gets everything off the floor. The melamine shelving is easy to clean and keeps the outdoor toys easily accessible as well.
I also changed out a rolling basketball cart for this skinny basketball holder that
takes up WAY less space on the garage wall:

This post may contain affiliate links for your convenience.
I may earn a small commission when you make a purchase through links.
See my policies and disclosure page for more information.
I'll share additional links to all of the items pictured at the end of this post!
3. DIY scrap wood holder.
Right down from that corner was the mess where I kept my piles of scrap wood:

Don't look too close at the windows, so gross. #wherebugsgotodie
I thought this was such a brilliant idea for my scraps...at first. I quickly
realized it wasn't working -- I couldn't get the longer pieces out because of
all the stuff that used to sit on the ground (see the after pic above).
There
was also nothing to prevent all the little pieces from falling off all. the.
time.
Once I got my workshop side of the garage cleared out, I knew what I wanted to
do for my scraps. I figured out the size of the largest pieces I had and used
that as my back panel on the wall.
I attached it with screws into wall studs to make it super secure:

You don't have to have a piece against the wall, but it will protect the
drywall.
I rarely have wood wider than three feet, since I have it cut down to fit into my car.
I just kind of winged it while building this wood holder -- I used
uhhhh...some scrap wood 😂 to start building compartments:

I could have used a jig to screw it together with hidden screws, but I didn't
need it to be pretty, I just wanted it to be sturdy. I used 1x2s as brackets
as I built to attach a new section.
My top section was the highest to hold the long pieces (secured with a bungee cord), the middle section was
about two feet high, and the smallest about a foot.
I also segmented some of
those for smaller pieces that would have fallen over in the larger
sections:

It works SO well and I've already utilized it a ton!
4. Storing small stuff by category.
Next, it was time to sort through all of the items in here so I could organize
them in a new storage cabinet. I had an obscene amount of spray paint from
past projects and partnerships:

I think I counted at least 100 cans -- they were taking over the garage! I
saved the colors I knew I would use and donated or gave the rest away to
friends.
I purged our garden/outdoor stuff as well, and what had been in two tall
plastic cabinets was downsized into this one metal cabinet:

I used
my favorite plastic bins
to organize everything into like items...with labels of course!:

These are easy to slide out and I like that we can see what's inside. I have gardening items, cleaning supplies and other small items grouped together.
Before
we had everything out and stuffed in the shelves...this has already worked so
much better for us!
I love that this cabinet has pegboards on the doors for longer items
too:
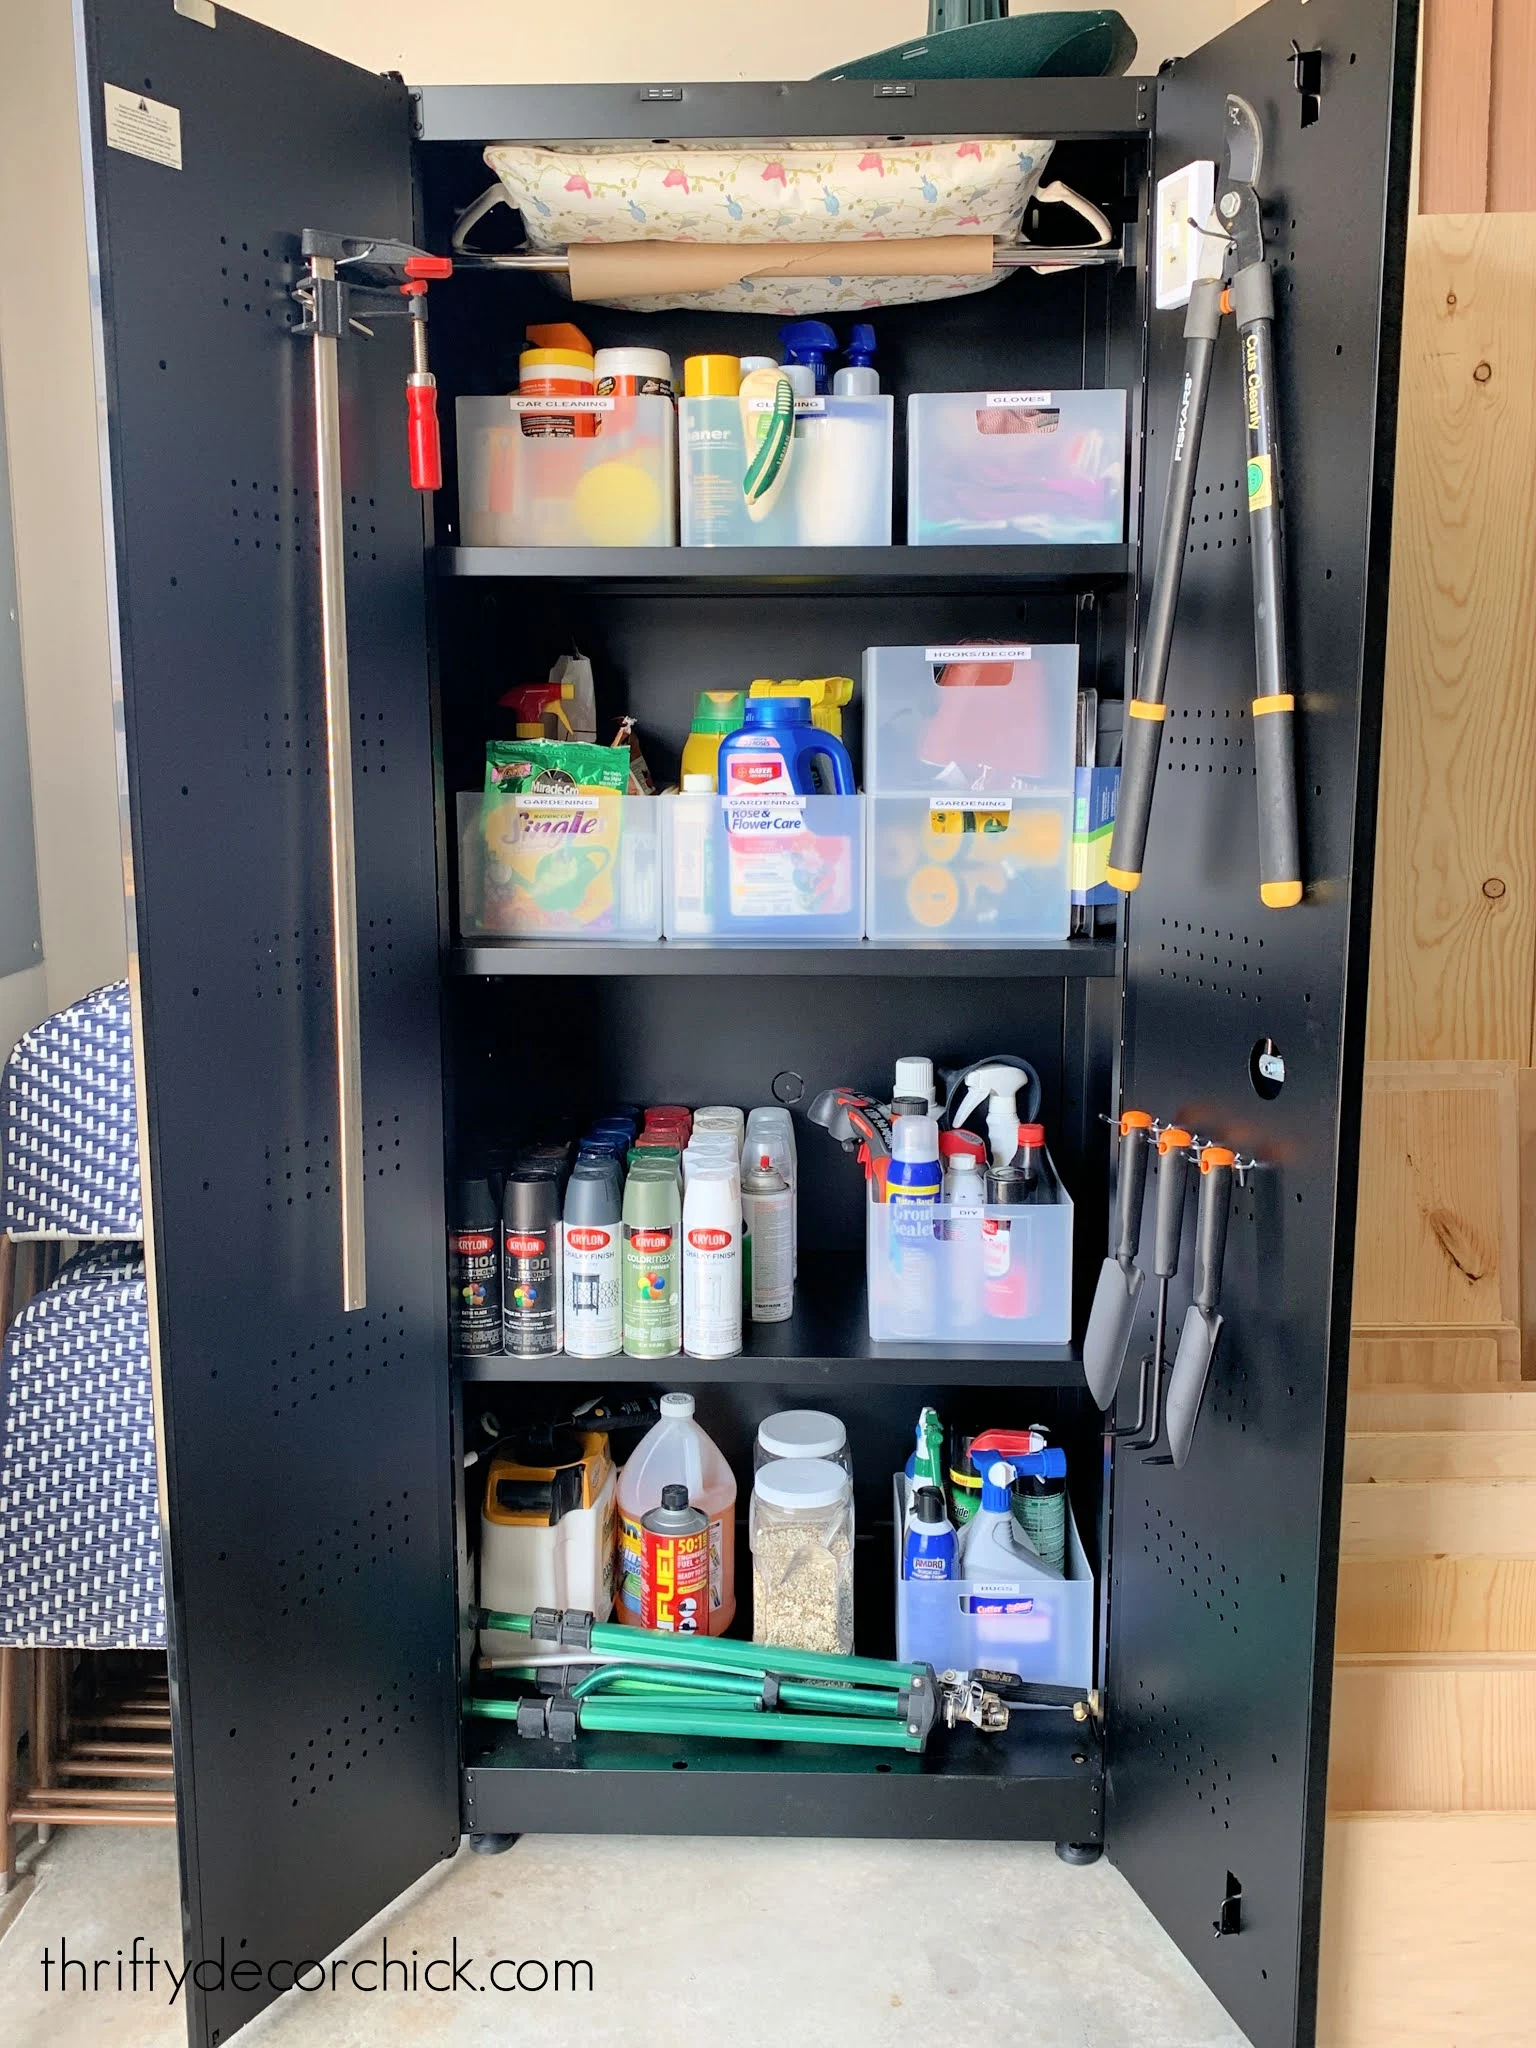

Before we had plastic cabinets that just didn't hold up to any kind of weight.
The shelves sagged and the doors never shut completely. I spent almost the
same on those as I did on this one unit that will hold up to just about
anything!
5. Tool and hardware storage.
My favorite part of this redo is my tool storage. I built a
long workbench into the wall in our old garage, but knew I wanted something I could roll outside instead. (The sawdust gets
out of control!)
Shortly after we moved in I built this rolling work bench
with scrap till I figured out what my permanent solution would be:

Those cabinets next to the cart were filled with my tools -- and no matter how
much I tried to organize them, I could NEVER find what I needed.
So I looked into options for months and found what may be one of my favorite
purchases EVER:

This is a rolling Husky workbench and it is AWESOME.
The drawers fully extend, so you can see everything inside:


When I got that workbench put together, I held off on putting my saw up
there because I kept using the top to work on projects. I've worked on the floor or the kitchen island all this time. It was
wonderful to be able to work and have my tools right there.


They are soft close too. The bench comes with those drawer mats so items
don't scoot around when you open and close the drawers. (All of the drawer trays are from the dollar store.)
Oh, and it has USB ports and
outlets on the side for chargers and tools. Some of the options have all drawers, but I wanted something with a cabinet for my compressor and deeper drawers for the drills and saws.
Gah. I love it so! I cannot believe after DIYing for 20+ years that I've
never had anything like this. I feel so grown up and legit! 😄
I also went through and sorted all of the little hardware like screws, nails and
doodads. I needed a better organizing system for these small accessories and wanted containers I could easily bring inside when needed.
I found the perfect solution and shared these awesome (and super cheap!)
small organizers for hardware here:


They are a game changer!
A rolling table for the miter saw.
SO my last addition to this space was a rolling work bench just for my saw.
It's lighter, smaller and easier to roll than the big one, but is the
perfect size for my saw:


You can crank the height up or down, which is awesome when using a saw. Mine
has always been up too high and I would get shoulder pain when I used
it too much. The length also works well.
I can roll it outside easily and the wheels lock so it won't go anywhere as
I cut. The garage has already stayed SO much cleaner because of it!
I so wish I had taken more before pics of the whole space, but you can see
some peeks of it in the photos above. It is really night and day!:


You know I had to add a fun little DIY project to this space with the TDC
letters.
They are just big cardboard letters and I covered the front with
black and gold wrapping paper:


All of the larger items in here are the Husky brand from Home Depot
(cabinet, rolling work table and rolling work bench).
Thankfully I got all
of them during a great sale, but I would buy them again in a heartbeat! They
are perfect for our storage needs.
Here are some of my thoughts and tips when it comes to garage decluttering
and organization:
- I used the Konmari decluttering method (as I do every time I go through items) when going through everything in this space. Especially when it came to my tools -- do I really LOVE or USE each item?
- I moved paint supplies to the basement storage room with the paint. That way I'm not gathering items from two different spots every time I paint something.
- Some of the items we had in the garage moved to the mud room storage. Extra light bulbs, extension cords, command hooks, batteries, etc., went there instead. It's stuff we reach for more often, so it makes more sense for them to be inside.
- I thought a lot about placement and how we use things -- the storage cabinet is now closer to the garage door since most of the items in there are used while we're outside. Lawn equipment went under the windows where the wood storage used to be so they'll be easier to access.
- I dusted or cleaned nearly every surface and item in the garage as I went through everything. Some of my tools hadn't been cleaned for years! I cleaned the tops of surfaces, window sills, cobwebs...all of it. I hope to do this once a year from now on.
If you are tackling your garage this spring I hope my ideas help you! If
you have any tips for organizing the garage, I'd love to hear them!
You can find many of the items I used to organize our garage
here:
Label maker
for bins
Garden/project stool
(I use this ALL the time and love it!)
LED garage lights
(These make a HUGE difference in a garage/work space! SO much
brighter.)
Plastic storage bins for cabinets
Perfect small storage bins for hardware
Never miss a post by signing up to get posts via email.
Do you have a link for your rolling work bench that you use for your saw?
ReplyDeleteI added it to the list at the bottom! They are all from Home Depot.
DeleteYour garage looks amazing! Is your garage floor raw concrete without sealer? Thank you
ReplyDeleteThank you! Yes it’s concrete but I’m pretty sure they sealed it — I’d love to do the epoxy coating eventually!
DeleteHow old is the floor? Ugh I feel
DeleteYou on the sawdust. And it’s cold in the winter so I worked in garage more. I have to clean the garage it’s soooo bad but the floor needs some help
The garage floor is about 3 1/2 years old. :)
DeleteIt looks amazing! And I love your tool bench and wood storage! You nailed it (haha) on this one! Congrats!
ReplyDeleteHi Sarah,
ReplyDeleteI love ALL of your projects and I aspire to be just as handy as you when I grow up (I'm in my 50's already!) :-). My question for you is, how did you learn to use your different tools like your saw, etc.? I have so many ideas in my head for projects I'd like to do, but feel very intimidated by actually using the tools. Any suggestions on how to start are greatly appreciated!
Sorry I missed this! Anytime I've tried a new tool I do a lot of research about them beforehand -- I'll look up YouTube videos to see how they are used. I also make sure to read the manual in the box. I've found that overall we build up difficulty/fear in our heads and it's usually nowhere close to that in real life. :)
DeleteJust be sure to take safety precautions when using any tool!
One of my favorite blogs! Needed organizing and storage solutions for our workshop.
ReplyDeleteHey! Amazing work! For some additional organization, check out kaizen foam. This will allow you to make spaces for your tools so that they stay organized. I'm sure you will find other uses for this too. Can't wait for your blog on that stuff. It's the best!
ReplyDeleteFunny you mention that -- I got sucked down a Youtube search and found videos of that stuff a few weeks ago. It was oddly soothing to watch people cut out around their tools. Ha! I'm considering it -- I may do it down the line when I'm sure they are exactly where I want them long term.
Delete