
How To Add a Custom Pinch Pleat on Store Bought Curtains
March 06, 2024
Share this
Update store bought drapes with this easy DIY pinch pleated curtains tutorial!
This easy (sew or no-sew) trick transforms your basic store bought drapes and makes them look MUCH more custom and expensive looking!
It is SUCH a great drapery hack! I don't know why I've waited so long to do this, it made a huge difference in how our drapes look.
I've shared a lot of curtain tips over the years -- there are so many ways to make store bought drapes look custom.
This is one of the best though!
This DIY pinch pleat curtain trick works especially well on thinner drapes that don't hold their shape well.
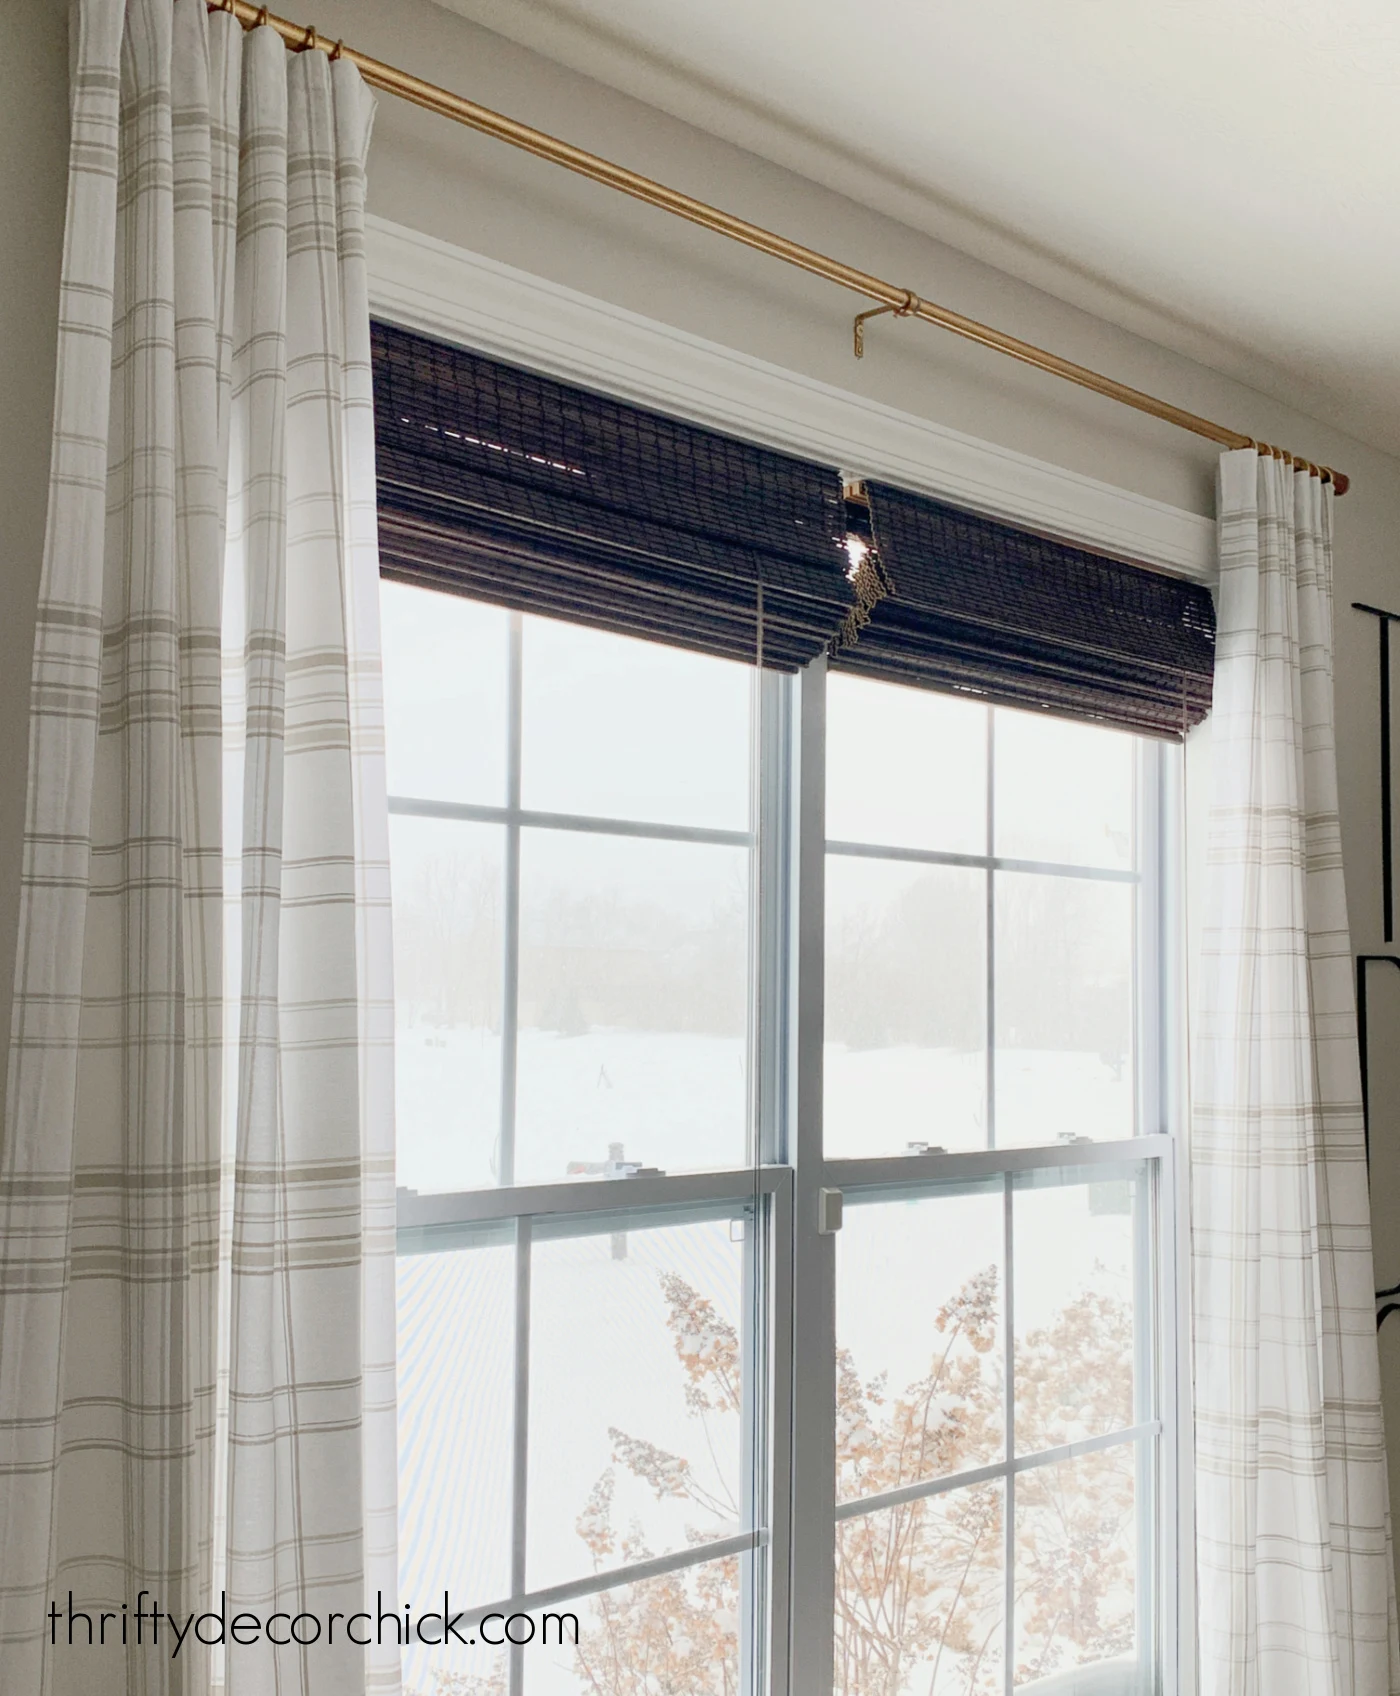
The curtains in my home office didn't look bad from far away:

But if you got up closer you'd see what I was dealing with up at the top:

This post may contain affiliate links for your convenience.
See my policies and disclosure page for more information.
I found these cream and plaid drapes at HomeGoods years ago and shared how I made some easy custom touches.

I've always used a little hack for giving my drapes a fake pleat -- if you clip the fabric from behind instead of the top of the fabric, you get a more custom look:

It gives the look of pinch pleat drapes, but this definitely works better with thicker fabrics.
My office drapes would look good for a while, but the cotton fabric was just too thin to keep them standing nicely.
So after a few weeks, I'd up with the messy, slumped pleats like you see above.
I've known about this easy fix for years (since my decorating days!), but haven't ever taken the time to do it.
Now I'm kicking myself for not doing it sooner!
To get this custom look with store bought curtains, you'll need pleating tape and metal drapery hooks:

They are very affordable -- I got ten yards of the tape and 20 hooks for $24.
That's enough pleater tape to fix at least six standard curtain panels (most are around 54 inches wide). I did have to buy more hooks for another project.
It's so easy, and you don't have to know how to sew to do this. I'll explain both methods!
If you look close, you can see that the tape has a dotted guide line at the top:

This gives you the line to follow as you're sewing. So nice!
I pinned the tape to the back of the top of the curtains and then ran it through the sewing machine:
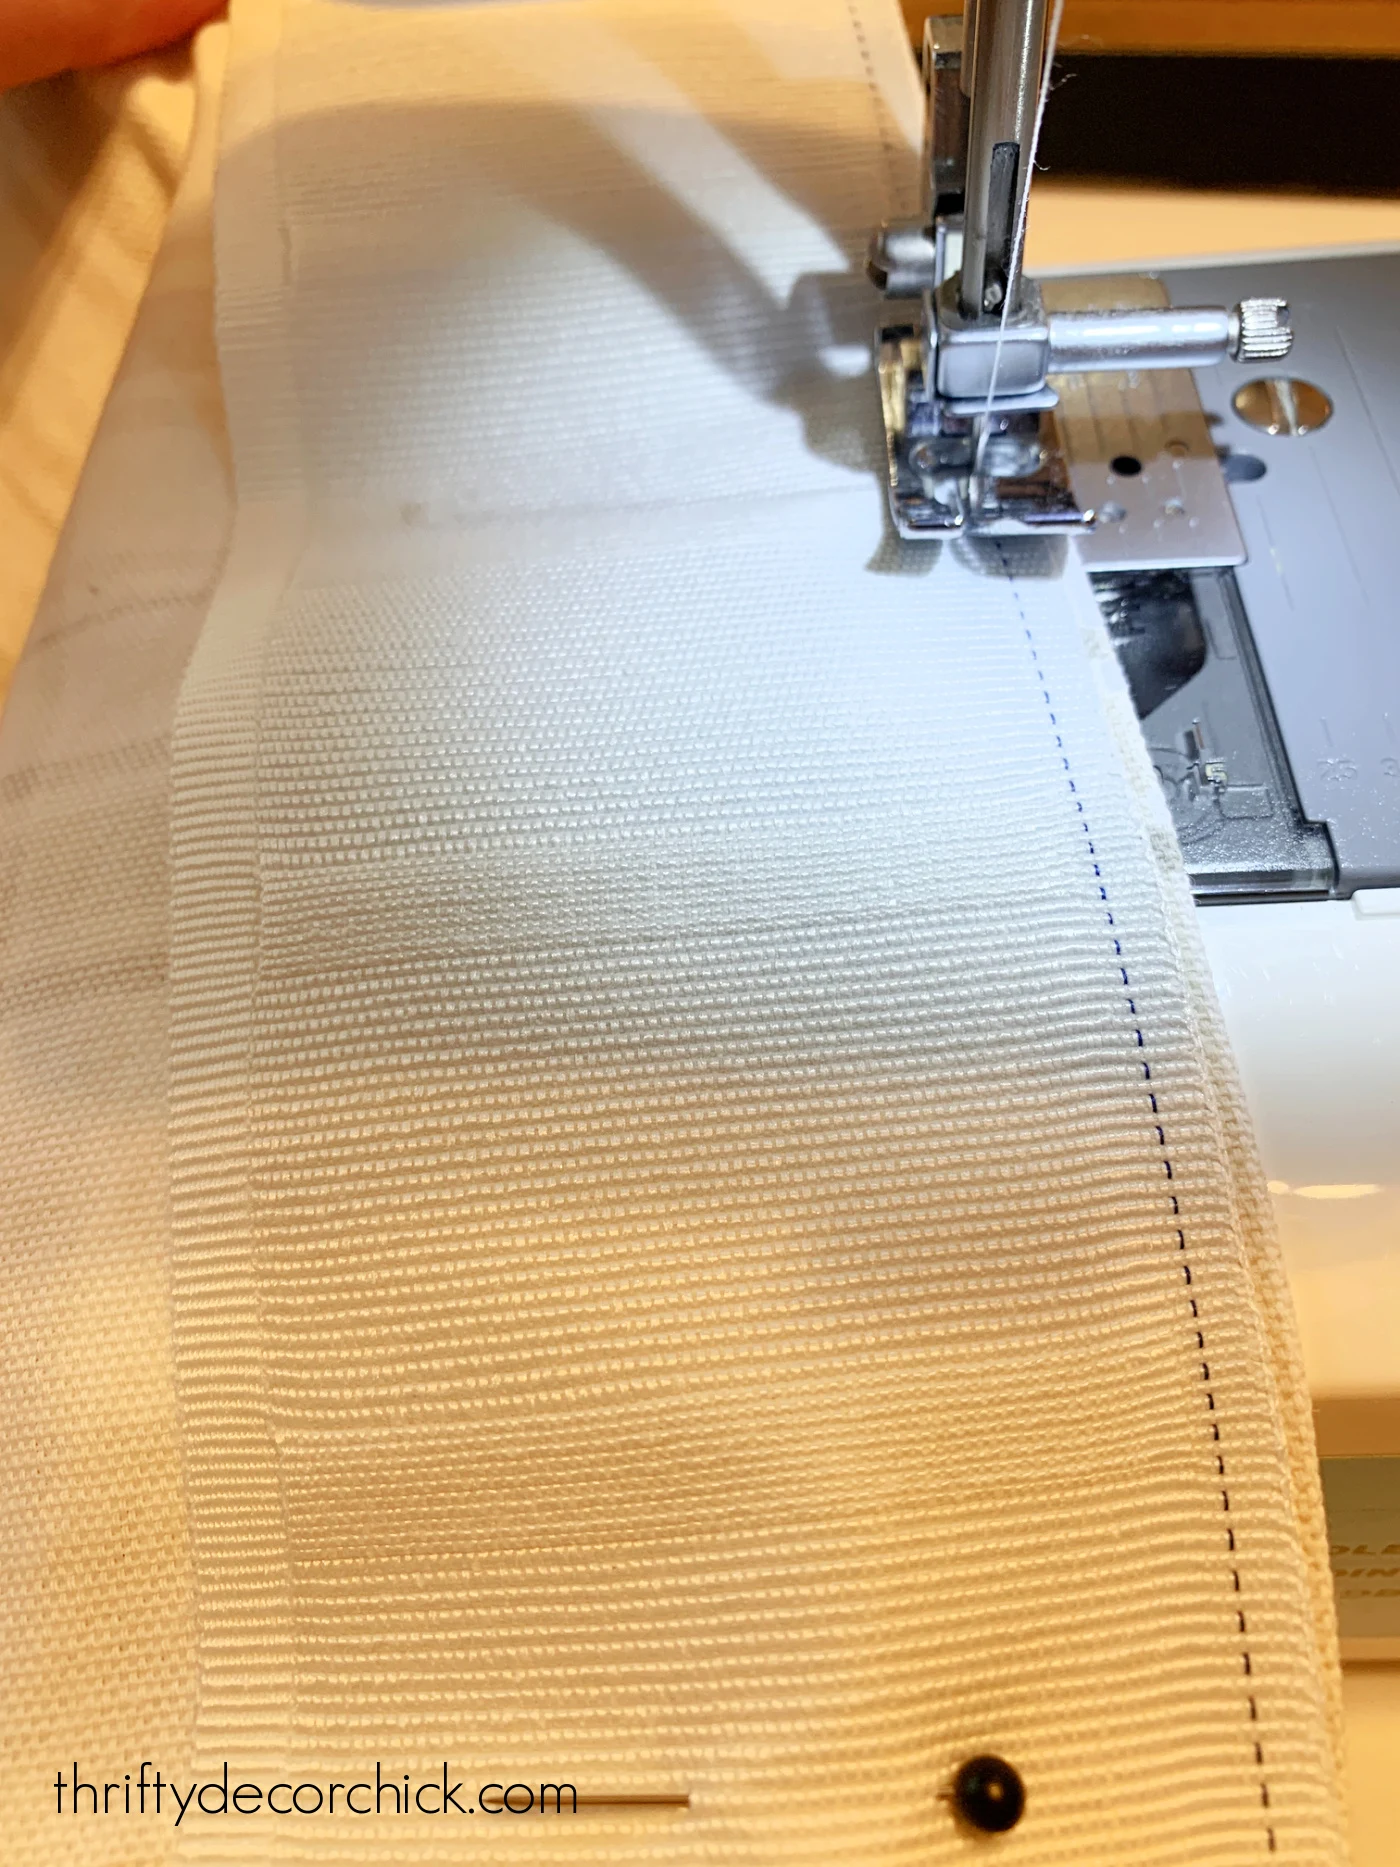
The little line was so helpful -- sewing a straight line is harder than it looks. ;) For me anyway.
I ended up sewing it along the sides and bottom of the tape as well, so it was extra secure.
Make sure you check the direction of your tape before sewing!
You need to be able to insert the drapery hooks from the bottom, so make sure those are not at the top of your drapes.
Then it's time to figure out how you want to place your pleat hooks. They slide right into the little pockets on the back of the pleat tape:

This is the only part that takes some time!
You'll want to figure out good spacing -- I like odd numbers when it comes to pleats so I used seven hooks:

You want to space them out at the same width in between. Mine weren't exactly perfect, but as long as you're somewhat close you won't notice.
There are a few ways to thread your metal hooks for a different look on the front of your fabric!
I used the most basic and easiest method of inserting the two outer prongs into two side-by-side slots:
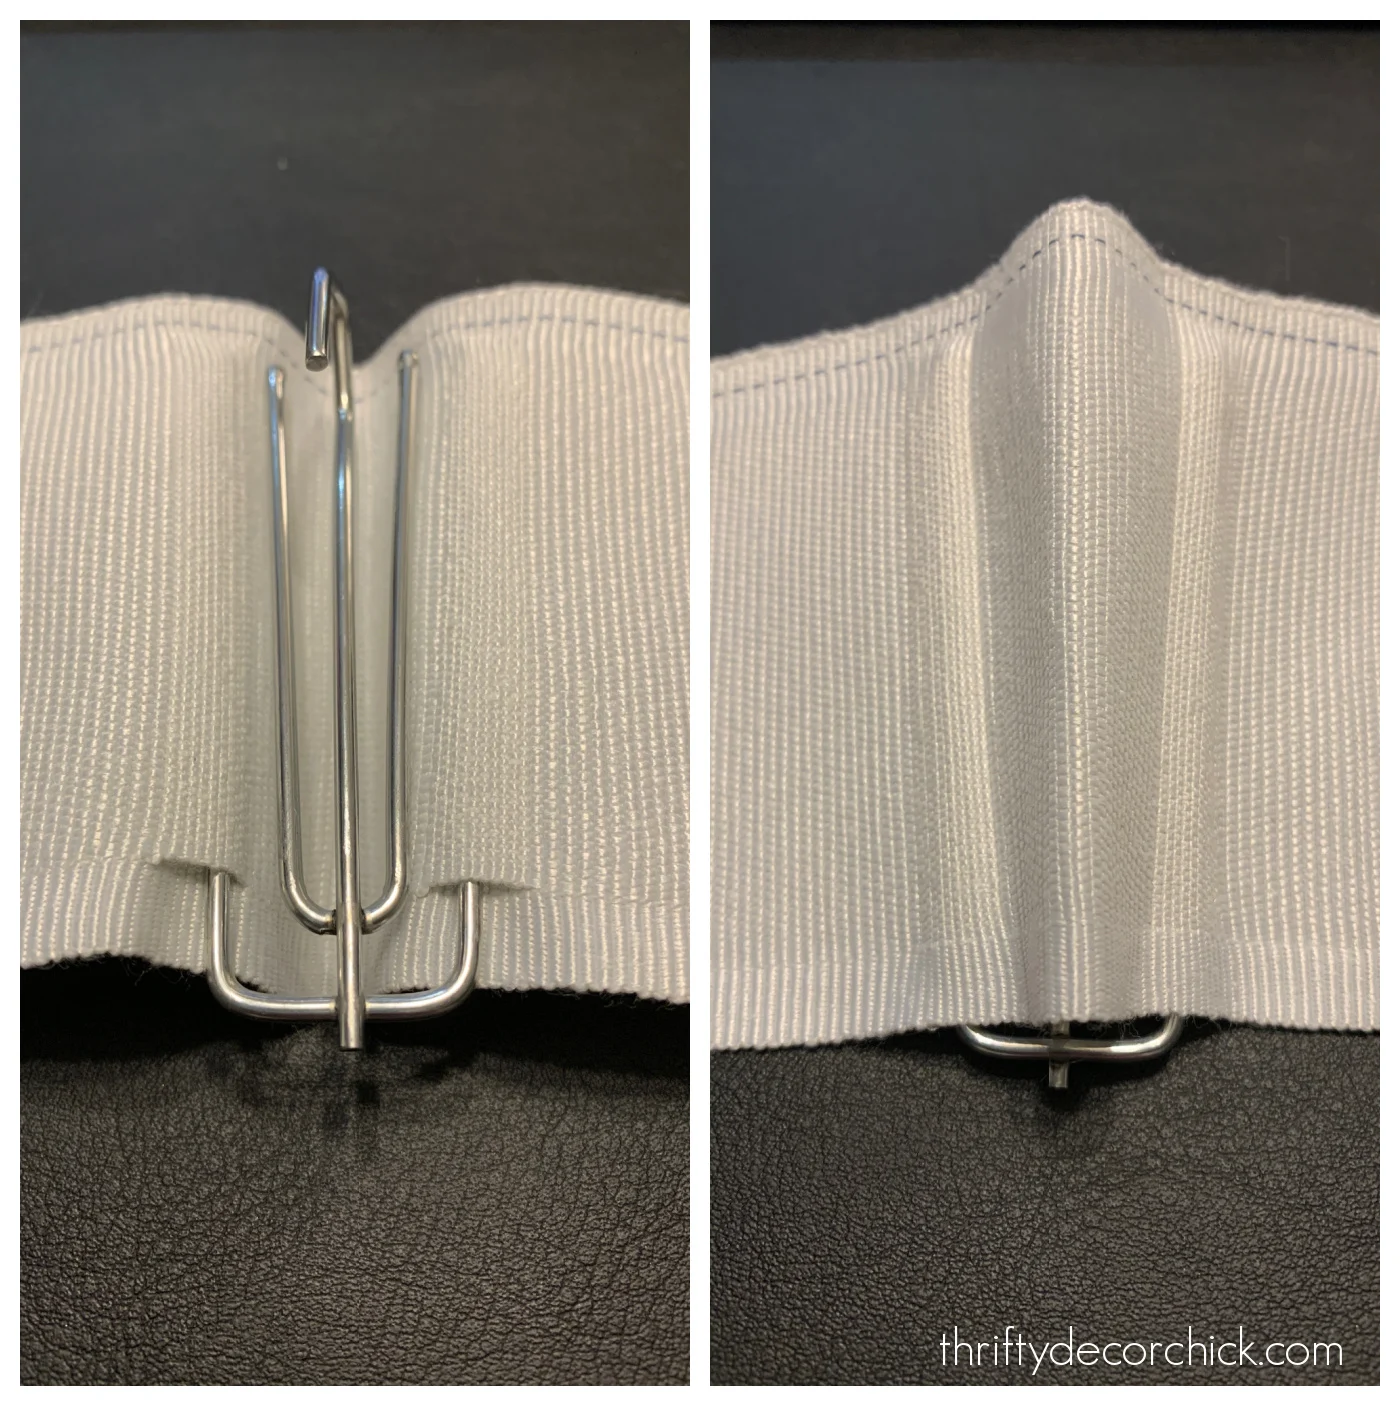
You can see the simple pleat that gives you on the front. This is an inverted pleat that creates uniform spacing between each drapery ring.
It is the least fussy in my opinion.
I loved the other options too -- here it is with just the two inner prongs:

And with all four -- this is the classic pinch pleat look:

These pleats will soften just a bit with the fabric on top.
Keep in mind, the more pleats you add, the less width you will have on your curtain panels.
Of course I'm a crazy person and couldn't just take the drapes down and sew this tape on. Easy, right?
I took them down, decided they should be washed, then figured a new, larger drapery rod would look great, hung that, sewed a new bottom hem, then realized I needed to spray paint the old curtain rings:
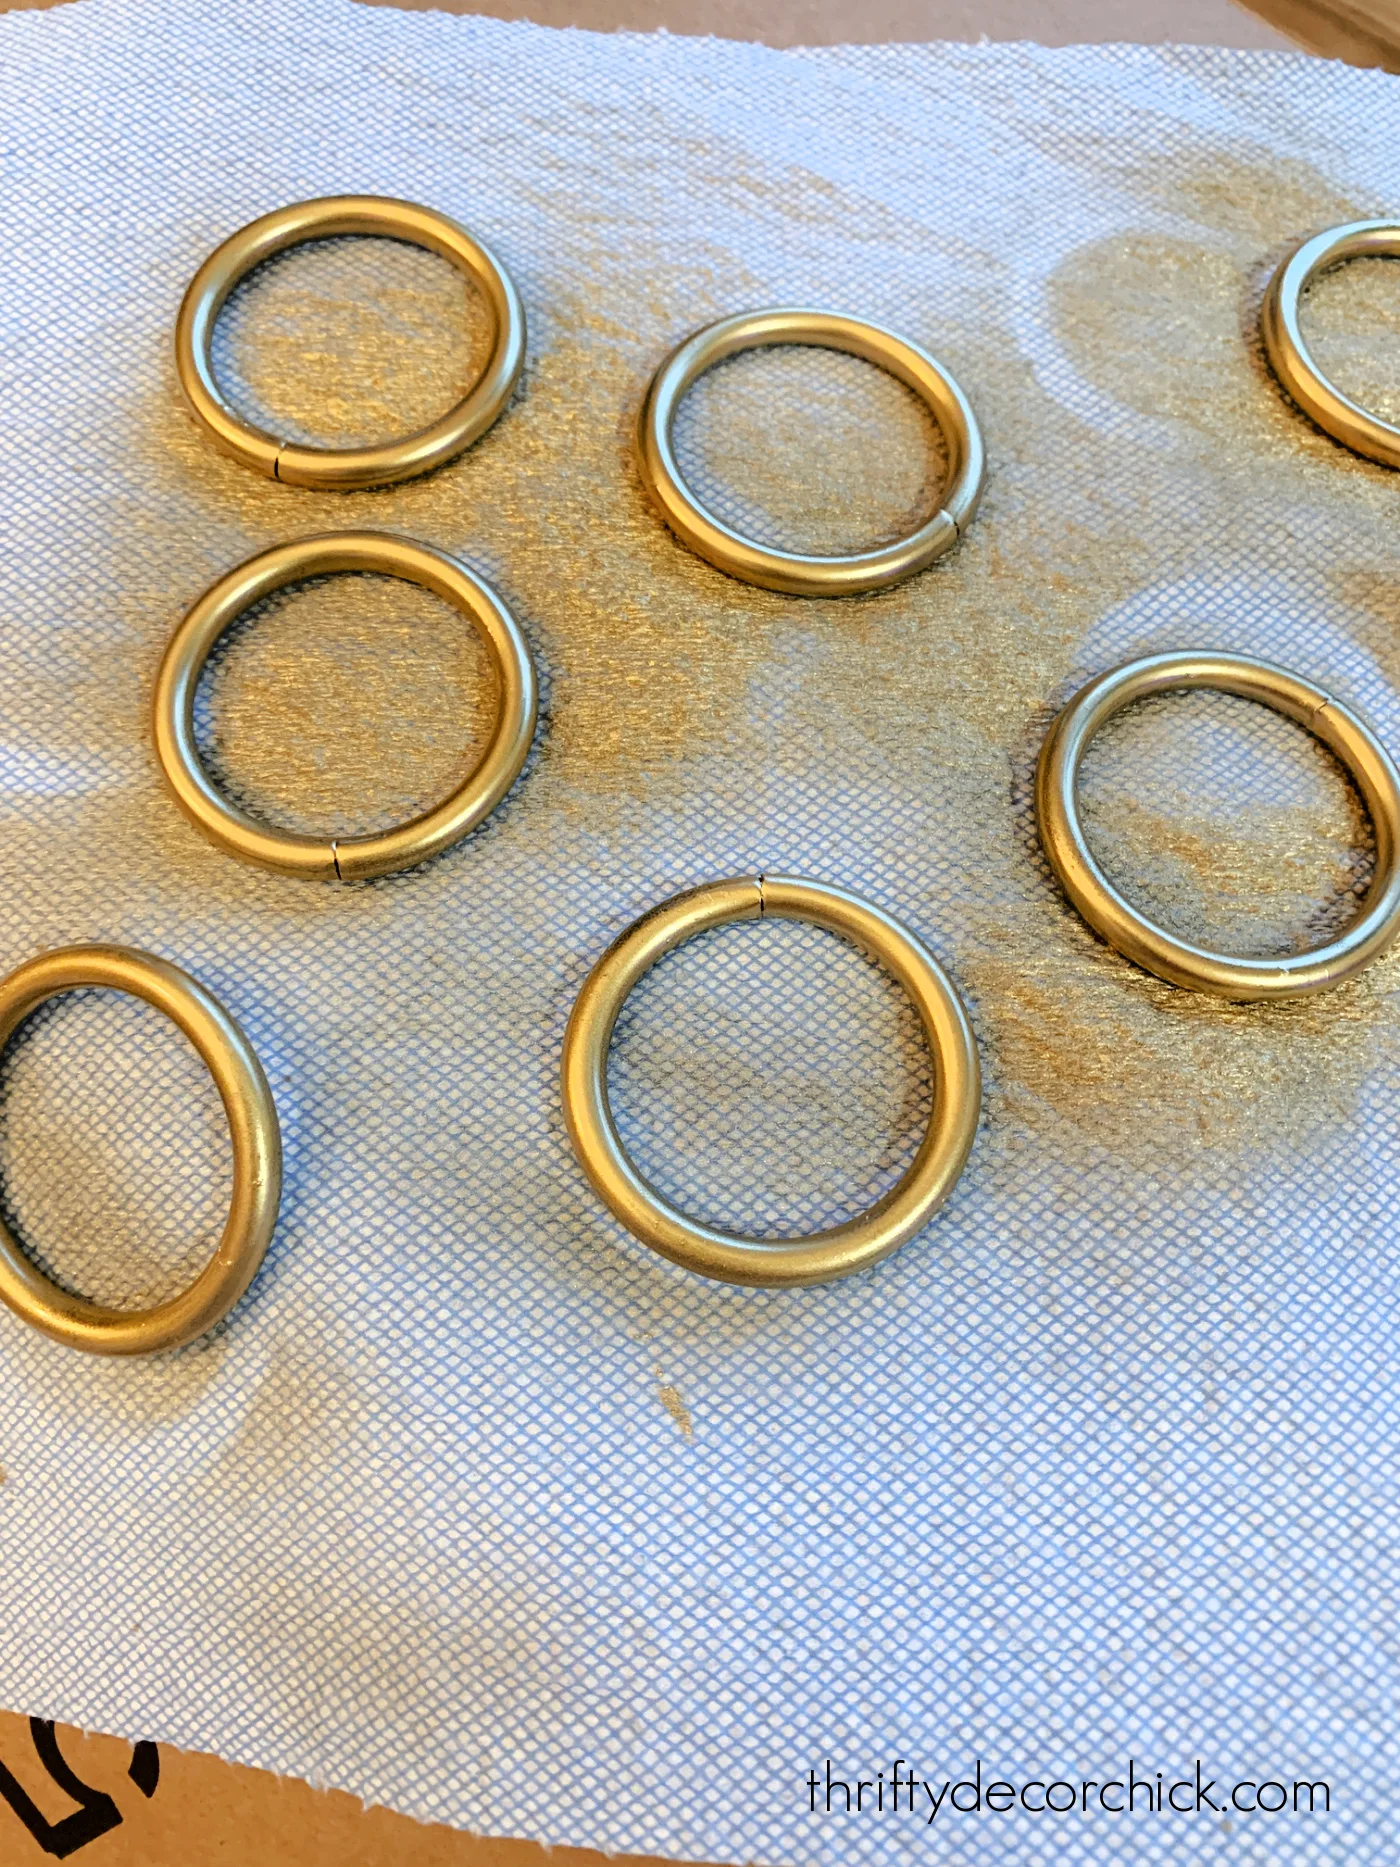
I used the bright shiny finish metallic spray paint from this best gold and brass spray paints post!
You can use basic drapery rings like mine to hook your drapes onto, or these rings that have a tiny circle that the prongs can hang from.
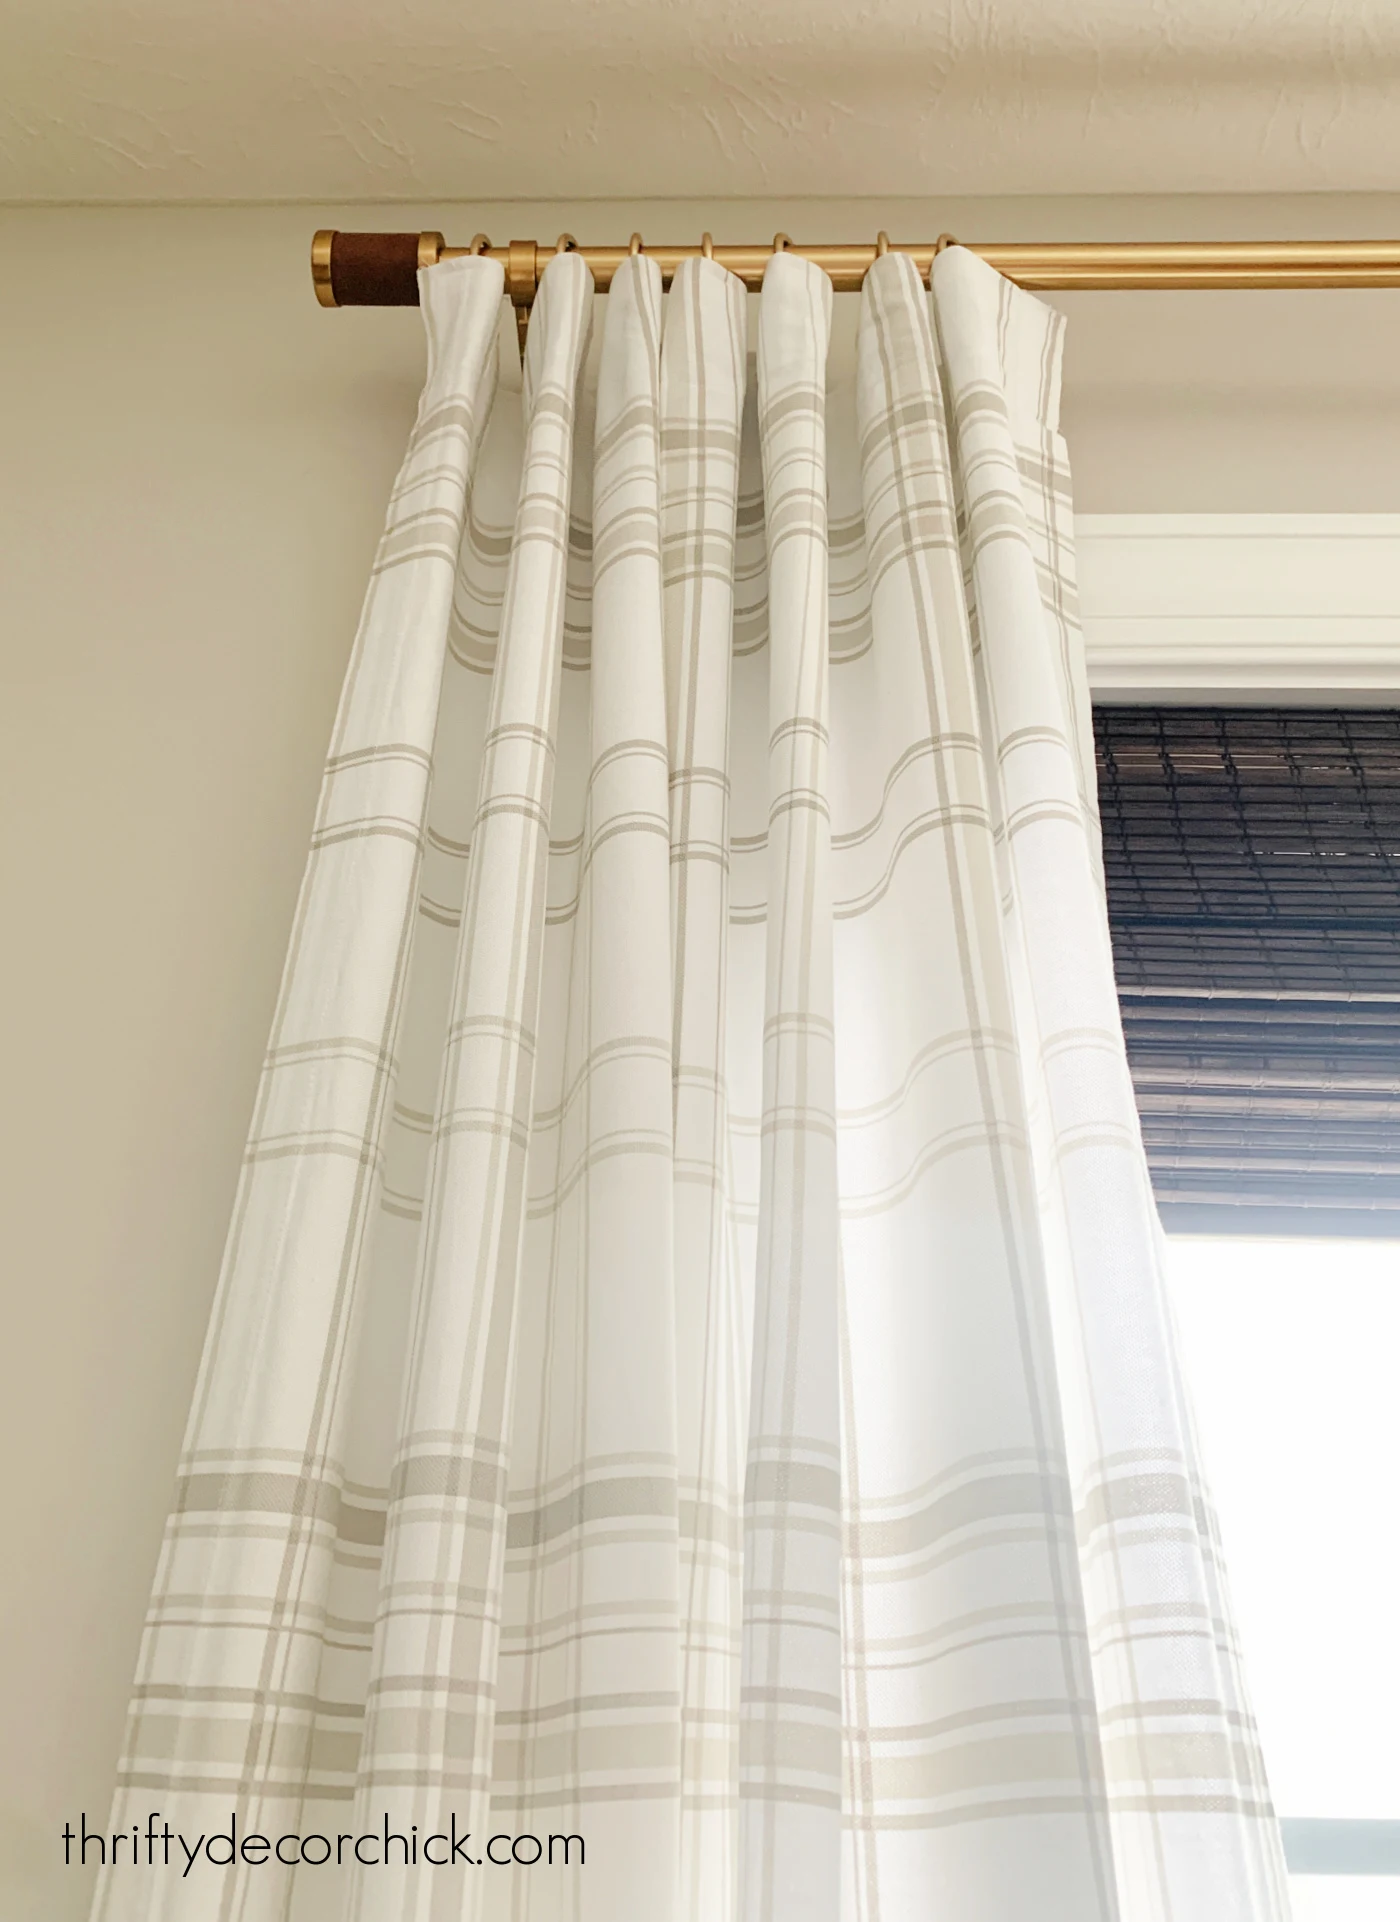
After ironing the drapes and getting them back up, I was SO pleased with how they looked.
WHAT a difference!!:
Let's take a look at the before again, shall we?:

So. much. better.
I found a similar drape set with this classic plaid pattern and the same design in more colors here. Make sure to check the length you'll need!
I don't know why I waited so long to do this. Sewing the tape on took no time at all. (Everything else I did took the time.):

I'm so glad I hung a new curtain rod!
It's brass with a leather accent from Target and I love it! It looks so much better:
If you don't sew or have a sewing machine, you can still add this pinch pleat look to your drapes!
Use a heavy duty hemming tape to attach the pleating fabric to the back of the fabric with an iron. Make sure to use the stronger version like this Stitch Witchery.
If you have a sewing machine, I do recommend using that. The weight of the pleating tape and the hooks will may pull on the hemming tape over time. It wouldn't be difficult to hand sew them either.
Now I plan to do this DIY pleat treatment on the other sets of rod pocket curtains we have in the house.
This pleating tape can be sewn right over the pocket at the top or any tabs on the back of your store bought curtains.
The soft pleats give window treatments a higher end look for sure. It's one of the biggest bangs for the buck I've done to customize them over the years:

I think I'm going to take the hem on these up just a little higher so they "kiss" the floor.
If you want that pleated, uniform look all the way down your drapes, check out this curtain training trick I shared years ago.
As I mentioned, you can also add pleats to curtains that have grommets or tab top designs.
I recently hung new drapes in our bedroom, but they came with the tabs on the back. These never slide well enough for me, so I cut them off:

A good pair of fabric scissors are so helpful for this project!
I then sewed the pleat tape onto the back:

I took the dark gray drapes that were in our room and hung them in the basement, but those hung with grommets.
I pulled out the scissors and sewing machine again and cut the grommets off so I could add the tape to the back instead:

Just look at the difference in the drapes after adding the pleating tape made!:

The pleated drapes are on the left -- isn't it wild how much fuller they hang now?
This is one of those little details that makes a big difference in the overall feel of a room.
I just love it!

Have you tried this DIY pinch pleat curtain hack? It looks SO much better!
Never miss a post by signing up to get posts via email.
Looks great! How are the rings attached to the drapery hooks?
ReplyDeleteYou just hook them onto the rings! Super easy. :)
DeleteWait, what part do you hook the curtain ring back up to?
ReplyDeleteThe rings go on the rod like usual, you just hang the drapery hooks on those.
DeleteThanks! My custom made, lined drapes are dry rotted...I won't say how old they are. I made pinch pleated kitchen curtains years ago, but I did not use this type of tape which would have been a dream. The livingroom rod is the old traverse type that accepts the hooks only and it is mounted on the ceiling, so no inexpensive replacement..would probably need the ceiling painted if taken down.
ReplyDeleteHi Carol,
DeleteYou can use the pleat tape and when you insert the pleating pins, they will hook right onto your ceiling mounted traverse rod.! Very easy!
That looks so nice, Sarah!
ReplyDeleteChrissy
Hi Sarah,
ReplyDeletequick question. I love the signage on the wall TDC, would you be able to tell me where you purchased them?
Thank you,
Chris
WOW.. I've been looking for something like that for ages. Decorator drapes quote I received is roughly $3000.. So that is a great idea.. Just one question. Not sure I goot that right.. When you sew the tape with the dotted line at the top, do you also sew the bottom of the tape? Thanks!
ReplyDeleteHi, I have store bought drapes and loved your info for quick easy pinch pleating. My question I'd what kind of pleating tape did you use. Having a hard time determining which kind to buy. Thanks for any help you can provide.
ReplyDeleteHello! I share a photo and link above in the post, but I think most pleating tape is fairly similar. You should be OK to use any pleating tape!
DeleteHello ! Love your drapery. Where do you purchase the pin hooks & tape for pleats ???
ReplyDeleteCan you tell me if this shortened the finish length of your drapes at all?
ReplyDeleteNo, not at all! If anything it made them a bit longer because of how I had them clipped up before. But do consider that when you try this!
DeleteOh My Gosh!!!! I love this. I hate getting custom drapes because I always feel as though I need to use them forever. This looks easier than I thought it would. Thanks so much for sharing this idea. 😊
ReplyDeleteI always have problems when putting up a curtain rod, the anchors don’t see to help. Any suggestions? Thx!
ReplyDeleteI like the screw in anchors -- they are white and you can get them to hold different weights. In my opinion those hold way better than the tiny plastic ones.
DeleteHi! What a great project! I also have some grommet top drapes I would love to update. How did you hem the top after cutting them off?
ReplyDeleteYes! I wondered about this too. My guess is when she sewed the tape on, it kind of created the seam at the top.
DeleteThank you! I just folded them over and then sewed the pleat tape on top of that, so the raw edge of the fabric is under the tape. :)
DeleteHad this question as well. Am a visual person and having trouble imagining how this is done. If the grommets are cut off, then there's a raw edge? Do you then sew the pleating tape to the right side of the fabric, then flip it over and sew again to "tack" it to the lining side of the curtain? Am asking because I have this exact project waiting to be completed. Thanks!
ReplyDeleteThank you so much for this information/how-to! I used the pleating tape and it was exactly what I needed to change my curtains from rod pocket to pleating, and also to add another inch or two to the length. :)
ReplyDelete