
Three Clever Ways to Add Storage Around a Refrigerator
January 18, 2023
Share this
Three ways to customize the outside of your refrigerator with additional storage!
I love finding smart ways to add storage around the house, especially in the
kitchen! I really enjoy figuring out ways to make better use of an
underutilized spot.
When I shared the start of our basement kitchenette last week (and listed
the
pros and cons of store bought kitchen cabinets), I mentioned the difference enclosing a refrigerator can make in a
kitchen.
One of the first DIY projects I worked on in our old kitchen was adding a
DIY enclosure around the fridge. This makeover will go a long way to
making a kitchen feel more custom and updated.
PLUS, there are so many ways to add storage when you "build in" a fridge!
I'm sharing the ways I've done just that.
1. Add or extend the cabinet above a refrigerator.
If your fridge doesn't have any cabinetry, adding a cabinet at the top with side panels will give it a custom touch.
In our last kitchen, we already had a cabinet above but it was the same
depth as the rest of the cabinets:

Not super useful when you have to climb on top of the fridge to get to it!
Ha!
So I figured out a way to
extend that cabinet to the front without moving the original one. It worked so well!

This post may contain affiliate links for
your convenience.
I may earn a small commission when you make a purchase through links.
See my policies and disclosure page for more information.
I was able to move the original cabinet doors to the one I
built.
I think some of my readers probably wondered where the heck that project was
going after seeing the photo above, but after
taking the cabinets all the way to the ceiling
and adding pretty trim, it came together beautifully:

If you purchased your cabinets from a big box store, you may be able to find
matching side panels to match.
If not, use a 4x8 foot wood panel cut in half to create your own! (This will
always be cheaper than buying the "matching" panels.)
You can add a refrigerator enclosure if it's against a wall, placed in between cabinets or standing alone.
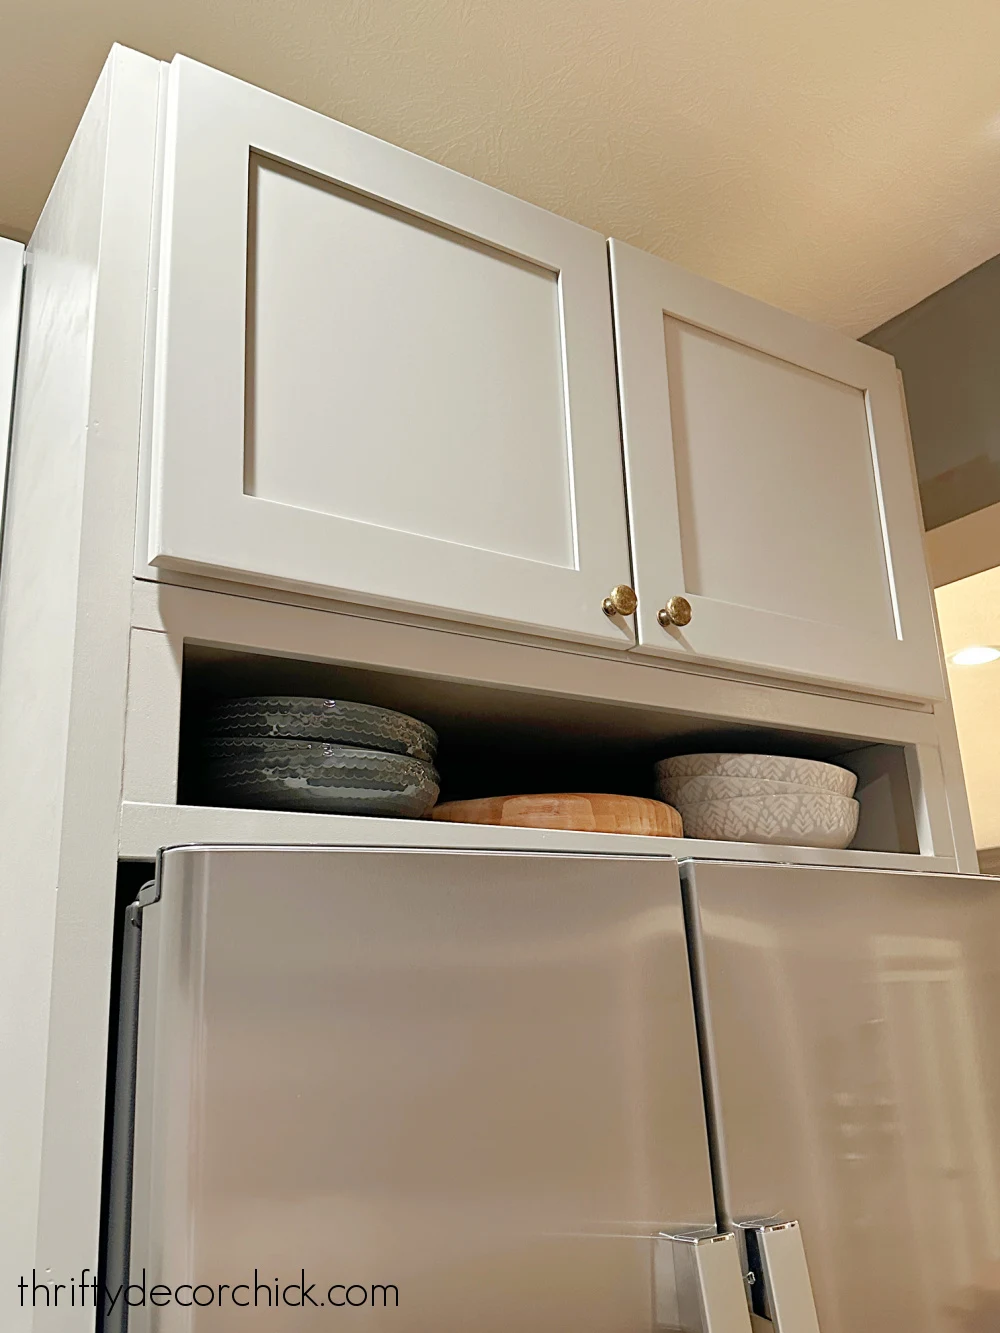
2. What to do with the space above the fridge?
If you add a cabinet above, congrats -- you have some new storage space! :)
In our last kitchen, I shared how I used that cabinet for long and awkward baking dishes or cutting boards:

In our current kitchenette, we used a sheet of plywood for the side panels:

I saved more than $100 by using this instead of the finished panels
that match the cabinetry.
We purchased a side by side fridge for this spot (they are SO much
cheaper than the French door options!) and after it was installed, we
had a good ten inches of open space between the top and the cabinet
above.
I knew I could make that space useful, so I started by nailing some
scrap wood into the sides as support strips:

And then I cut down some wood that fit under those supports to close it
off and create a shelf.
My original plan was to add a piece of wood on the front that we could
flip up and access the inside of our new shelf. But I couldn't figure
out the right hinges to make it work.
So I went back to my scrap pile and decided to finish if off by making a
box I could slide in to cover all the ugly parts (you could see the
hardware under the cabinet and the supports I had just installed).
I nailed in a couple more scrap parts to along the back and sides to
attach my new insert to:

I painted the box before sliding it in and nailing, and then trimmed out
the front to cover the rough edges.
Now that awkward space not only looks better, but is a useful spot!:
I still need to fill in some gaps around the trim, but this little
detail is almost done!

I saved more than $100 by using this instead of the finished panels that match the cabinetry.
We purchased a side by side fridge for this spot (they are SO much
cheaper than the French door options!) and after it was installed, we
had a good ten inches of open space between the top and the cabinet
above.
I knew I could make that space useful, so I started by nailing some
scrap wood into the sides as support strips:

And then I cut down some wood that fit under those supports to close it
off and create a shelf.
My original plan was to add a piece of wood on the front that we could
flip up and access the inside of our new shelf. But I couldn't figure
out the right hinges to make it work.
So I went back to my scrap pile and decided to finish if off by making a
box I could slide in to cover all the ugly parts (you could see the
hardware under the cabinet and the supports I had just installed).
I nailed in a couple more scrap parts to along the back and sides to
attach my new insert to:

I painted the box before sliding it in and nailing, and then trimmed out
the front to cover the rough edges.
Now that awkward space not only looks better, but is a useful spot!:

I still need to fill in some gaps around the trim, but this little
detail is almost done!
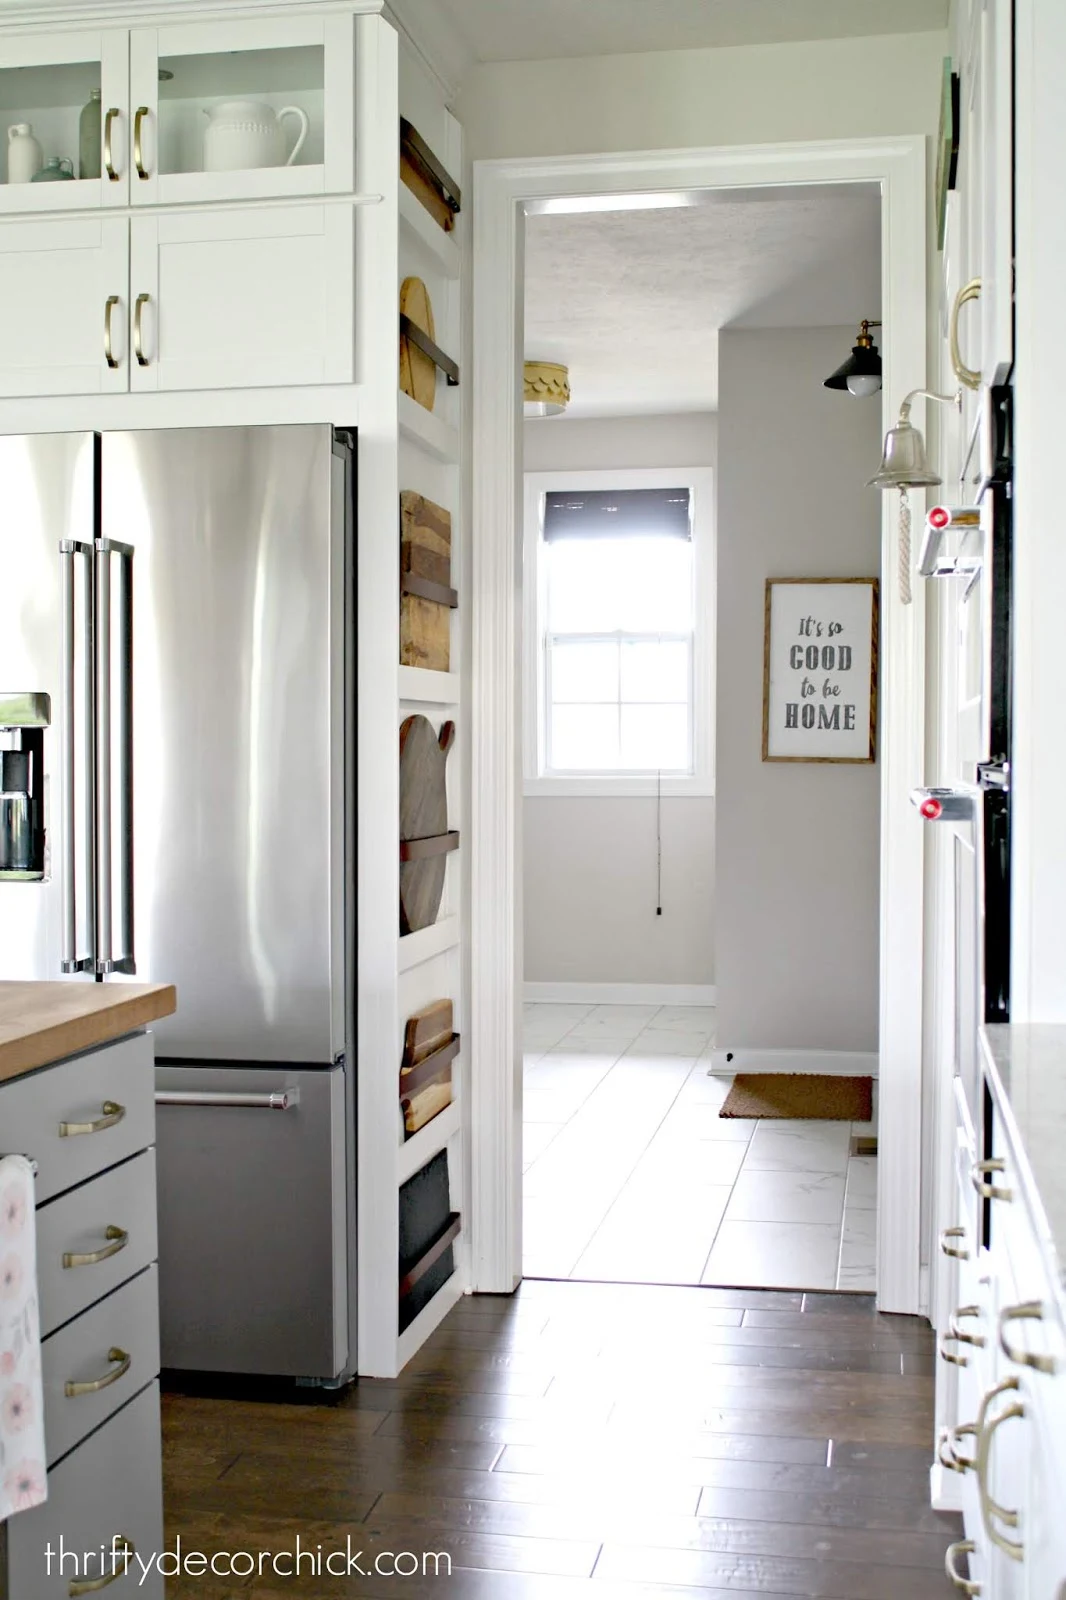
3. Add pretty storage to the side of the refrigerator.
This is one of my all time favorite kitchen DIY projects!
Enclosing the refrigerator creates a wall if it's open on one side...and
after living with ours for a couple years, I wanted to utilize that empty
vertical space.
I ended up creating this decorative cutting board and plate storage on the side:
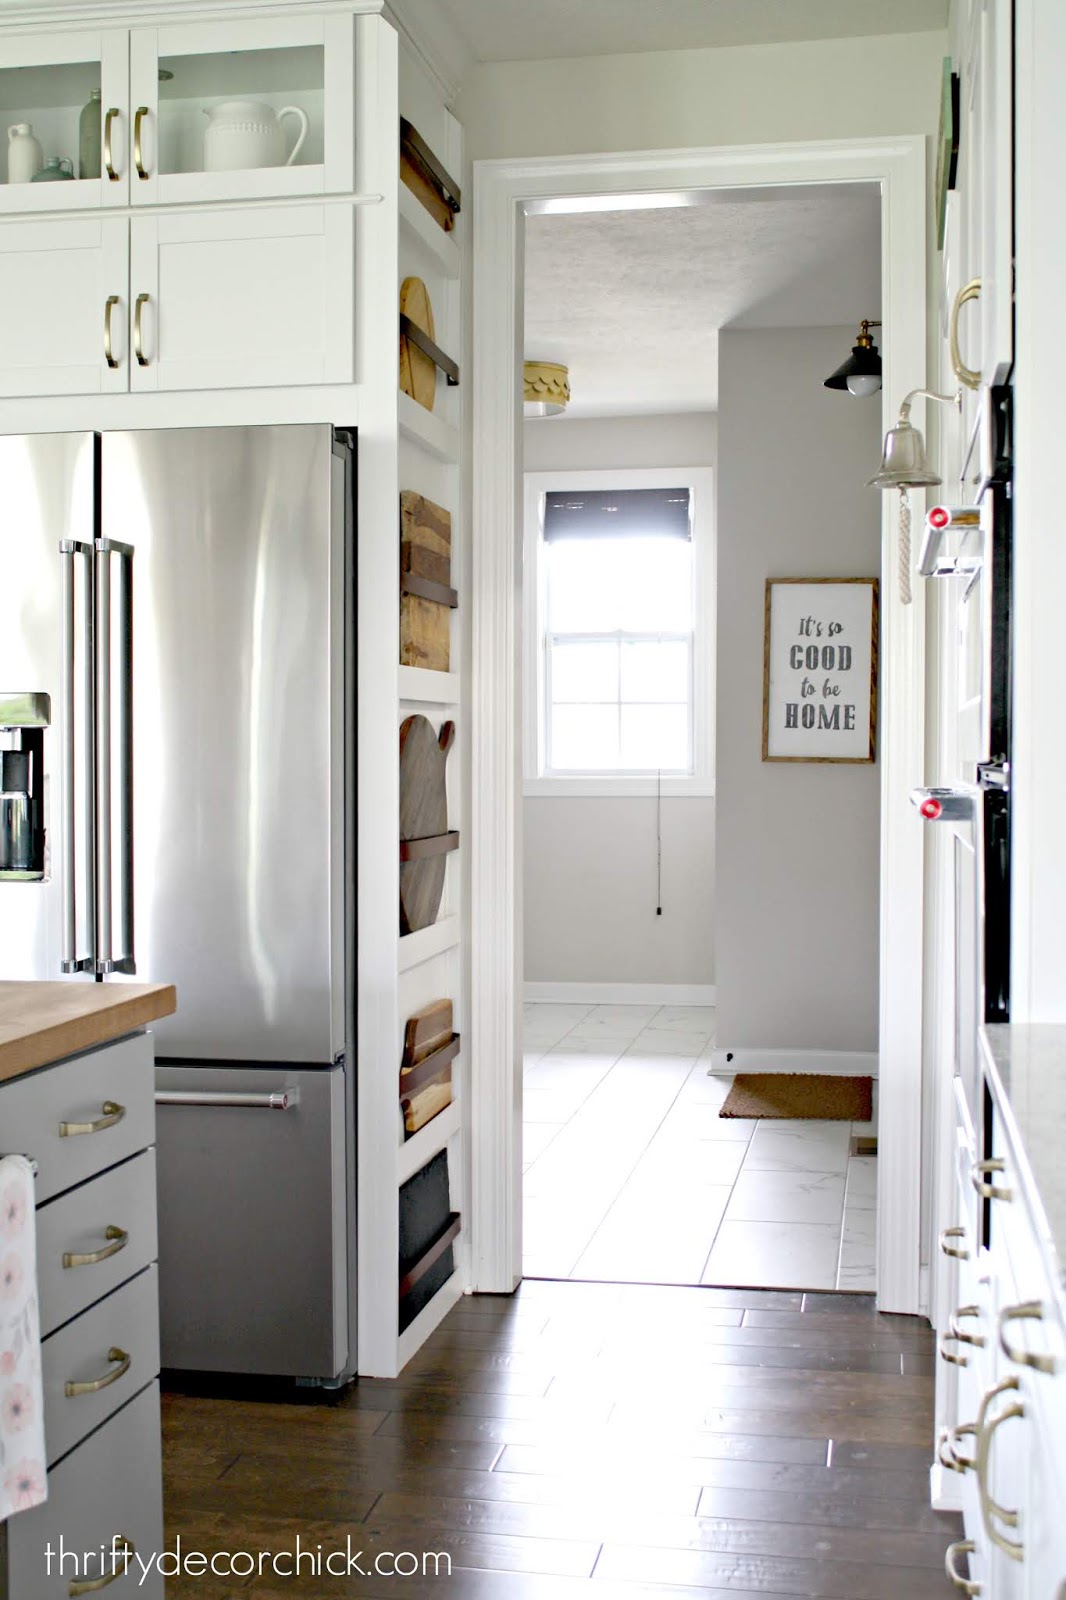
I LOVE this wall now! It's such a sweet little detail in our kitchen, and
it's USEFUL. I love when form and function meet up so beautifully!
I created little shelves with leather strips to keep the cutting boards from
falling. For a little decorative detail, I hung scrap wood on the back for a
shiplap look, but you can also use beadboard, wallpaper, an accent
color...whatever!
Instead of leather, wood dowels or a decorative metal bar like
this pretty brass curtain rod or
a metal hanging rail are great
options as well.
On the basement enclosure, I had that same empty wall that was calling out
for something. I grabbed a pile of pretty cutting boards I've had in
our storage room and decided on a way to display them.
By the way...yes I have too many cutting boards. I KNOW. 😂 But we always
grab one for entertaining or when we're having snacks and watching
TV.
I decided to hang them on this wall for easy access. You can use cup hooks
to hang cutting boards, but I was a little extra and used a few of the
antiqued brass knobs
I installed on our cabinets.
Knobs can be used so many ways other than for cabinet hardware! I showed you
the many ways to use
knobs or cabinet hardware as picture hangers here.
To do this you'll need a
double ended screw called a hanger bolt
that has a pointed side (that screws into the wall) and a flat side (that
goes inside the knob):

I drilled pilot holes into the wood panel, then screwed the knobs in.
They are super secure and hold all of our cutting boards:

I love the brass detail!
The wood tone looks great against that gray, and it ties in nicely with the
new floor (that I still need to show you!) and the wood accents on our
entertainment center:

I hung most of the boards with
leather string
I had in my craft stash:

There you go! I hope these give you some ideas for your own refrigerators. Who
knew they had so much potential? :)
Of course there's nothing wrong with just leaving them as is, but I love to
figure out ways to use unused space.
Never miss a post by signing up to
get posts via email.
Well done. Nicely organized. I like that.
ReplyDeleteI love this! Your ideas are so smart! One question, do you have any tips/hacks for drilling straight into a hole, and also not stripping screws? I’m not strong enough to push down while drilling and most of the time I strip a few screws or make a mess out of the hole. Thx!
ReplyDeleteThank you! It will definitely help if you use a small drill bit first to make the initial hole for the screw. You won't have to do nearly as much work to get the screw in! Also, make sure you're using good quality screws, they won't strip as easily.
DeleteJoanne, I used to have the same problem until I switched from using Phillips head screws and started using star head screws instead. The star head bit stays in the star groove and makes things so much easier. I hope this helps.
DeleteLove all of these! Now to figure how to adapt to my weird set-up!
ReplyDeleteIn the kitchen pic with white upper cabinets, and gray lower cabinets, did you paint the cabinets, and if so, what are the two cabinet colors? (It has the chalkboard in the pic)
ReplyDelete