
Five Simple Tips for Decorating Shelves and Bookcases
February 05, 2021
Share this
Simple tips for decorating shelves and bookcases
There are a few easy formulas to keep in mind when you're styling bookcases and shelves.
I'm DONE with the basement entertainment center build and I can't wait to show you!
Now it's time to decorate the shelves -- which is the most fun but also the hardest. Fun but difficult -- is that a thing? Ha!
I can build all day and I love it...but I sometimes struggle with the decor part.
It will take me a few hours to get it right, and once I do it will stay the same for years. The thought of rearranging things that already look good seriously stresses me out. 😆
I have a few tried and true tips for decorating bookcases and shelves that always help! They're easy to follow and make for decor that is really pleasing to the eye.
Tip #1: Decorate in odd numbers
It's often said that things in threes are most appealing to our eyes. Actually, odd numbers in general are more pleasing.
I add plenty of even numbers, but the "rule of threes" always seems to work even better:


Tip #2: Give your eye a place to "rest"


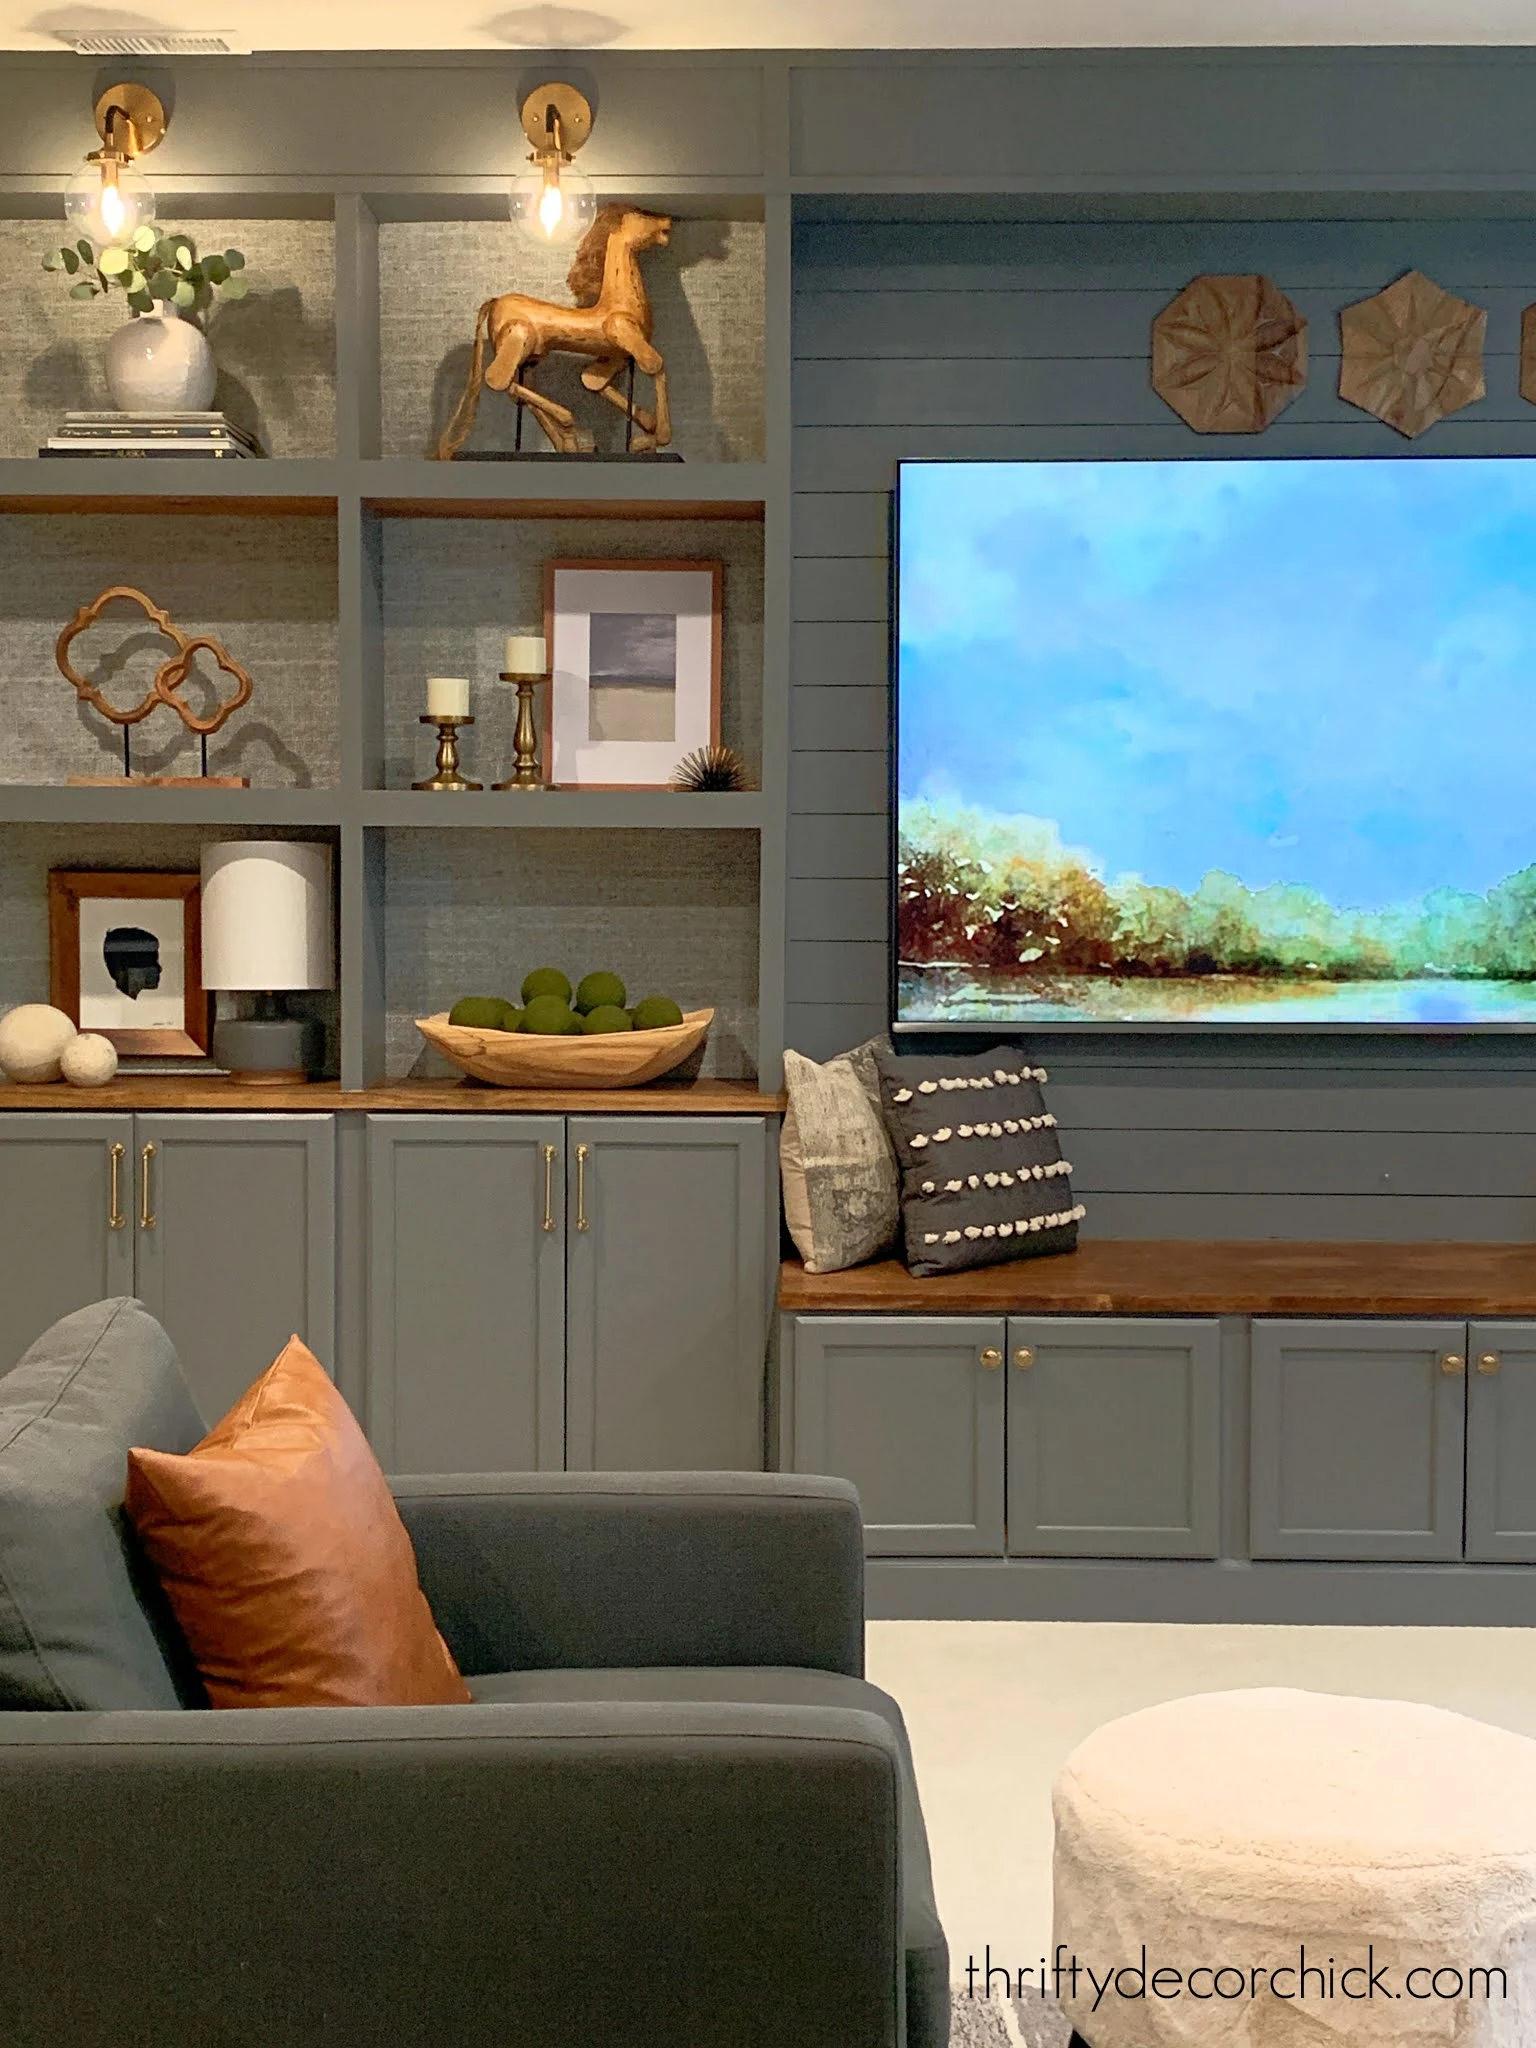
Tip #4: Mix decor of different heights
Mixing taller and shorter items allows your eye to travel up and down.


Tip #5: Use books!

I later toned it down just a bit -- it was feeling busy. I pared down the decor and the books:

- Change it up -- stack books or line them up next to each other.
- Thrift stores are a great place to find beautiful books!
- I like to take the covers off of our hardcover books -- I love the pretty spines and beautiful title fonts.
- Books are a very personal thing! You may not want some books on display for whatever reason. I also turn some books around so you just see the pages.
I shared some of these shelf styling tips years ago when I first decorated those dining room turned library bookcases I built. These incorporate some of what I've talked about!
I repeated many items -- this one points out metal accessories I repeated throughout:

I repeated the green items too:

I even thought about which way to go with the books. I tried to switch back and forth -- starting on the right, then left, right, etc.:

Otherwise parts of the bookcases started to look “heavier” than others.
And I also thought about what to center on the shelves and what not to:

The top and bottom items are all centered, and two of the shorter shelves in the middle are as well, on each end.
Decor tip: Paint the backs of your bookcases or add wallpaper to add a pop of color!
Sometimes accessorizing falls right in to place, sometimes it’s agonizing. :) If decorating shelves feels like the latter for you, use these tips as your guide.
I hope my bookshelf styling can provide some inspiration as you work on your own spaces!
I gathered some of my favorite bookcase decor I've used around our houses -- check out some of my favorite decor accessories here.
Gorgeous! You are so talented and that room looks incredible!
ReplyDeleteYou have done SUCH a good job! The styling looks stunning.
ReplyDeleteYou should be so proud of yourself!
That is a very nice bookshelf.I love it :)
ReplyDeleteYou all are so sweet, thank you!!
ReplyDeleteWowza! What a project! So beautiful; I wish I had only a part of your talent. You can be so proud of yourself. Love it!
ReplyDeleteYour bookshelf looks great! I will have to weed out my bookshelves so there is room for accessories!
ReplyDeleteYour bookshelf looks amazing!
ReplyDeleteThese bookshelves look great! Definitely worth all the effort:)
ReplyDeleteI absolutely love these shelves. I am thinking hard how i can pursuade my husband to let me have some in our living room... lol!
ReplyDeleteI just reorganized my built ins, and this post would have been so helpful! Some rearranging may be in my future...
ReplyDeletehttp://createbakecelebrate.blogspot.com/2012/10/create-better-looking-built-ins.html
Okay, Sarah, I have to admit I am going to be copying a little of your inspiration! You see we have a wall of bookcases... which is starting to look a little heavy and lopsided. Talk about timing!! and... I just so happen to have some lovely antique italian terra cotta pots... empty! Thank you once again for all your inspiration!!
ReplyDeleteNow to get pinning!!
Sarah, you are an expert to me. Everything you decorate really looks great!
ReplyDeleteLove it!!!!! It looks so great...nicely done.
ReplyDeleteCheers
~ jillian
www.hersplitends.com
So helpful! This is a project that everyone I know struggles with. So many options!
ReplyDeleteI think you've struck the perfect balance, stocking the shelves with both functional items like books, and purely decorative items. Nice work. Enjoy!
The built ins are beautiful! Thanks for sharing all your hard work.
ReplyDeleteI may be showing my age here, but the little fat birds remind me of the opening to the Partridge Family. So maybe they're little partridges???
Looks great! I have built-ins on either side of my fireplace and I'm totally gonna copy some of your ideas for them! I've always felt they looked a little "off" but they're so big and overwhelming... Your ideas are great! Thanks so much for sharing!
ReplyDeleteWhat a great tutorial! I love how you broke everything down like that. I think we all can take for granted things like pretty bookcases but it really does take a lot of work. Great thrift store finds too!
ReplyDeleteIt looks good. :) We have similar styling techniques, and I really like some of the pieces you acquired like those quail birds. The lights above are also a nice touch too.
ReplyDeleteGorgeous, I love how your bookcases look. Fabulous job and great tutorial. Hugs, Marty
ReplyDeleteWhat a great bookshelf! I can't say any of mine are well accessorized at this point. I'll have to watch out for things to add to it though.
ReplyDeletethe breakdown (and arrows) definitely helps - thanks! looks beautiful!
ReplyDeleteThey look amazing, beautiful job! Thanks for all of the great tips! :)
ReplyDeleteThe whole thing looks really beautiful and it sounds like a (long) labor of love. I especially like that you didn't use brand new things throughout. The thrift shop finds adds provenance.(sp?) LOVE the brass things. So bookish!
ReplyDeleteI absolutely loved your posts about building the bookshelves, it's very inspirational to me as I'm knee deep in my own whole-house reno. However, you've said many times that this room is to be your library (which is an awesome concept), and the arrangement you have going on the shelves just...doesn't say library to me. When I was scrolling down the post to see the pics I was so excited, and then my very first reaction was "where are all the books?"
ReplyDeleteI hope this is constructive and not purely negative, it just looks like a decorated bookshelf to me as it is.
I love how it turned out! Still green with envy over those lights!!! I too use some of our paperbacks, I just put them in baskets so just the tops show.
ReplyDeleteLove how it all came together! I scored those EXACT same globe bookends from an estate sale not too long ago - LOVE them!
ReplyDeleteI love how your bookcase turned out! We have been considering one on the back wall of our formal living room/turned study. I had not thought of putting lights up. What a great idea. Love it and the way you decorated it!
ReplyDeleteYou, my friend, are an expert bookshelf styler! ;-) My mother-in-law is the same way -- she gets it right every time. She has built-ins a lot like these in the family room, and I always love the way she styles them for the Holidays. I cannot WAIT to see what you are going to do for Christmas!
ReplyDeleteThank you so much for writing this how to! I'm design challenged and right in the middle of trying to revamp my built-in shelves so this was a tremendous help. They look so beautiful - just like you did have a whole lot of people working a lot of hours on them.
ReplyDeleteThey are stunning! I like how everything stands out against the dark back drop...it creates a cool mood!
ReplyDeleteThanks so much for sharing this! They look beautiful and you have inspired me to go to work on mine! I'm taking my laptop and referencing your pictures as I work on mine! They are gorgeous! Have a great weekend.
ReplyDeleteLeslie
houseontheway@gmail.com
Everytime I read your blog, I go home and re-do a part of our home that weekend. Hubby says it looks so nice. He never said it looked bad before, but now he actually compliments me. After 34 yrs and several homes together, that's a great feeling! And you can imagine how much I have to "shop the house with"! You inspire me to use things in new and different ways and I love that! Thanks!
ReplyDeleteYour whole room looks terrific. What a treat to have a library/reading room. A thought....my eye goes to the outlets or light switch because of the color (white pops from the blue). Would your bookcases look even more beautiful if the switch plates were painted to match the wall color? Thanks for sharing the whole process.
ReplyDeleteGorgeous! I love getting to the point in decorating for my rooms and my clients, when accessorizing begins. So rewarding..especially when things that are dear to you are displayed :-)
ReplyDeleteYou're library looks stunning, don't change a thing... I used to have a copy of "The Secret Language of Birthdays," and found it to be eerily accurate. Love, love, love your decor!!!
ReplyDeleteI think if I were you, I would just sit on the floor in there and stare at those shelves. They look fantastic! I am so enjoying seeing your library come together!
ReplyDeleteYour library shelves look great. Everything is veryneat and uncluttered looking and I love the globes. I wouldn;t have the heart to change the globe bookends because I think they are brilliant as is--very "libraryish" and vintage.
ReplyDeleteRita at Cashel19162yahoo.com
DO you have anywhere on your blog a tutorial on how you installed the lights at the top of your bookcase? They are so cool!
ReplyDeleteI love your bookcase! It's very elegant and classic a t the same time. Thanks for sharing your talent! mknobleatuniontwpschooldotorg
ReplyDeleteI am still amazed that you actually built that yourselves, and it is pretty the way you have arranged everything. Just lovely.
ReplyDeleteShame on stink eye for taking your globe! Love the brass cranes/birds and the globes and of course, the shade of blue you chose for the bookcase & rug. The hammered metal light looks good, too. I didn't notice the hammered part when I read your 'light' post. ;o)
ReplyDeleteThis came out fabulous. Can you tell me what color blue you used and who makes it? Thanks for sharing!
ReplyDeleteI would love to be inspired by this book! I am so inspired by your blog!! Thank you for sharing your talents!! Christy (cbeyers at yahoo dot com)
ReplyDeleteThat looks great! Thanks for the pointers/letting us know the thought that you put into it. It's very helpful.
ReplyDeleteChrissy
Love your shelves and love how this room has turned out!
ReplyDeletePatti
Love the bookcases. Maybe I've been under a rock but I've never seen lighting done that way before. Keep the fun ideas coming!
ReplyDeleteSarah you did an amazing job styling your bookcases. I LOVE a well styled bookcase. I could stare at pictures of them forever! I'm pinning yours. =)
ReplyDelete~ Catie
Great tips!!! Love your shelves dear!
ReplyDeleteIt looks very pretty. Where do you keep the rest of your books? I'm guessing there are shelves in some other rooms. What made you decide to have just a few books in the library and mostly decorative stuff?
ReplyDeleteThank you so much for this post, it's so detailed :)
ReplyDeleteGreat pointers and tips!
LOVE your library and the way you decorated the shelves. It's perfect! Beautiful, Sarah!
ReplyDeleteCheck out my super cute gold accent pieces! Perfect for shelves!
ReplyDeletehttp://createbakecelebrate.blogspot.com/2012/11/create-gold-accent-pieces.html
The bookcases really lighten and brighten this space! And my mom had those globe bookends years ago. :) ah, nostalgia.
ReplyDeleteI realize this post is from a few years ago but I'm dying to know what blue color you used in the back of the shelves. It is beautiful!!
ReplyDeleteWhat kind of wood top do you use for your built in book cases? We are going to follow your idea of using upper cabinets to make our sideboard and are stuck on what top to use.
ReplyDeleteI shared exactly what I use and how I do that here: https://www.thriftydecorchick.com/2021/01/wood-counters-for-less-DIY.html
Delete