
Add character with thick Craftsman door trim
February 25, 2020
Share this
Hey there! I'm back with a fairly quick DIY that I'm working on throughout the house. I LOVE the character it adds to our home!
It didn't take too long after we moved in for me to start changing out some of the door trim in the house. I did this chunky Craftsman trim on all of our doors in the old house and loved it. I didn't have our builder do it here because I wasn't sure where I wanted it.
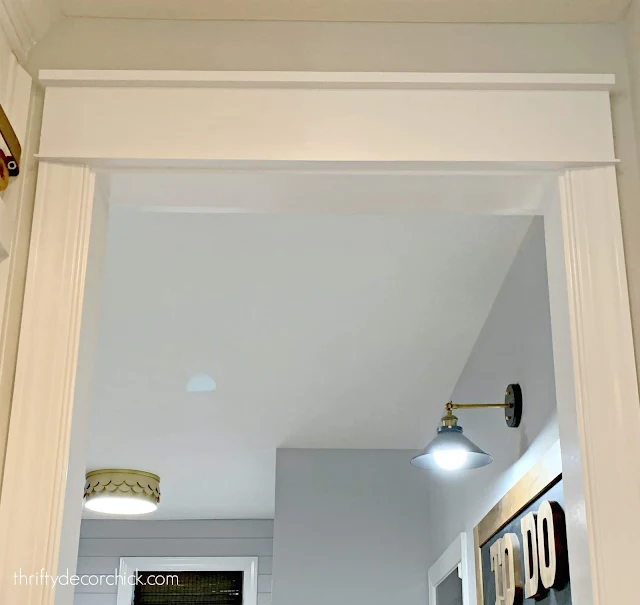
We have WAY more doorways here -- mostly just open ones that lead from one space to another. I felt like having it on every single doorway would be too much. But some are just calling out for it, like this tall opening to our foyer:


You'll need to caulk where the new and old meet to make it look like it started that way. I love how it looks together!
I find it easier to paint this before install, and then do one more coat after filling the nail holes (I use a nail gun to attach it to the wall).
Here's a look at the before and after:


Anyone see where I stopped painting this room? Haha! That's next on my list.
Here's a visual on how to put these headers together -- you can build before install or put it together on the wall. Either way works great! (I find it easier to paint if you build them first):


See more of our home here. To shop items in our home, click here! Never miss a post by signing up to get posts via email.
It didn't take too long after we moved in for me to start changing out some of the door trim in the house. I did this chunky Craftsman trim on all of our doors in the old house and loved it. I didn't have our builder do it here because I wasn't sure where I wanted it.
We have WAY more doorways here -- mostly just open ones that lead from one space to another. I felt like having it on every single doorway would be too much. But some are just calling out for it, like this tall opening to our foyer:

You have to go and see the before to see the difference that simple trim made!
This post may contain affiliate links for your convenience.
See my policies and disclosure page for more information.
On those larger doorways, I plan to replace all of the trim with thicker all around. But when working on the little wallpapered hallway last year, I realized I could try leaving the side trim and just replace the top:

It turned out GREAT and I was hooked! Now my plan is to continue the widest doorways with all new trim all around, and then finish these smaller ones with the accent of the Craftsman header only.
On the smaller, more standard doorways, I don't plan on changing out the trim at all. I think it will be a nice mix that adds just enough character around the house.
My next spot to tackle was this one between our kitchen and the mud room:

I took pictures of the actual process this time so I can show you the tool I use!
Adding the header is SO MUCH less work and time than replacing all of the trim, so it's a good option for anyone who wants to add some detail and height to doors.
You'll need an oscillating tool to cut through your trim like so:

My old tool pooped out on me, so I picked up this one and it worked great!:

It charged fast and held the charge the whole time. As you can see, it was easier to use when I placed the saw attachment at an angle instead of straight on.
You'll need to use a razor blade to cut through any caulk on the inside and outside of the door trim, then you can start pulling it away from the wall. A crowbar does the trick:

Take your time as you do this -- you want to make sure you've cut all the way through the trim or it could start pulling more than you want away from the wall.
When I replace all of the trim I have to cut down the baseboards, recaulk all around and paint of course. This cuts that down big time because it's concentrated to just the header.
Sometimes I'll build my header first and then just place it on top of the trim. That's what I did this time:

I'll show you the exact trim pieces I used in a bit. First, here's the final result after a few coats of paint:

You'll need to caulk where the new and old meet to make it look like it started that way. I love how it looks together!
I find it easier to paint this before install, and then do one more coat after filling the nail holes (I use a nail gun to attach it to the wall).
Here's a look at the before and after:

Here's another view from this side:

I added the same rug from the family room in here too -- I LOVE these rugs!
And the view from the mud room:

Anyone see where I stopped painting this room? Haha! That's next on my list.
Here's a visual on how to put these headers together -- you can build before install or put it together on the wall. Either way works great! (I find it easier to paint if you build them first):

This is a side view of the one over our larger doorway. For the narrower spot in the kitchen I used a 1x6 since I didn't have as much space above.
I hope this gives you better visual of how to put these together! They are very simple to build and make a bigger difference than you'd think for such a small project. I spent $20 to replace the header on both sides of the kitchen doorway (I had some lattice leftover so that saved me a few bucks).
If you have any questions let me know! You can see how to create this chunky Craftsman trim on windows here!:

See more of our home here. To shop items in our home, click here! Never miss a post by signing up to get posts via email.
Share this
February 25, 2020
before and after
DIY
molding
Mud/Laundry Room Combo
Window and door trim
OMG, I love the partial replacement! Adds something but isn't a huge undertaking. Perfect!
ReplyDeleteLove the wallpaper you chose! It's really nice for a small area! ❤️✨
ReplyDeleteCharmaine Ng | Architecture & Lifestyle Blog
http://charmainenyw.com
You.are.amazng! I would never even think of doing something like this by myself, but you inspire me!!
ReplyDeleteHi Sarah,
ReplyDeleteIt looks great and I'd like to do something similar. You said you used a 1x12, is the header really 12 inches tall or did I miss something? That seems pretty tall. Thanks in advance. =)
I used that size for the really wide door because there's so much space above -- for the smaller one I used a 1x6 (but they really measure 1/2 inch to 3/4 smaller).
DeleteI know a few years ago you bought a spec house. I was wondering since I'm now in the process of buying a builder house if you could do a post of how you picked your design elements. I feel so overwhelmed with all the decisions coming up that we need to make. Are there things you feel you Should have chosen but didn't or ones that weren't worth it? We can DIY most things but want to spend our $$ and time wisely with this process.
ReplyDeleteThank you so much for this! I have started changing my doors. I'm doing the outside doors first and the area over the pantry doors in the kitchen. There are a number of doors in one of our halls where the builder left virtually no room between the wall and the door frames. I couldn't figure out what to do because I didn't want to put plain thin trim on them but couldn't add anything wider. Soooo....now that you have shown me how it looks with the updated header on the original trim, my problem is solved. I just have to build the courage to use that oscillating saw on my trim. lol
ReplyDeleteThis change sure looks nice!
ReplyDeleteHow much wider is the lattice and 1x2 than the 1x6? I see there is a small amount of overhang on each side.
ReplyDeleteI make those about half an inch bigger than the middle part. (So they hang over about a quarter inch on both sides.)
DeleteWhere is the white circle wall art on the staircase from? I’m looking for something similar. Thanks!
ReplyDeleteIt not only gives the opening a "Grand" feeling, it makes it look larger and taller.
ReplyDeleteLove it!
You're right. It is much nicer in the "After" photo! Well done.
ReplyDelete