
How to Reupholster a Bench {With a Rug!}
March 22, 2023
Share this
How to recover a wood bench with a rug (and no sewing machine)!
I've reupholstered a bench using a rug instead of regular decorative fabric a few times over the years. This option will hold up to wear and tear and is often less expensive than thick upholstery fabric.
I shared the start of a mini makeover in our bedroom recently...I'm trying to do as many small projects as I can without spending any money. This little bench makeover turned out so well!
My first project for the bedroom was transforming our nightstand dressers with some black paint. I don't know why I waited so long to do it!
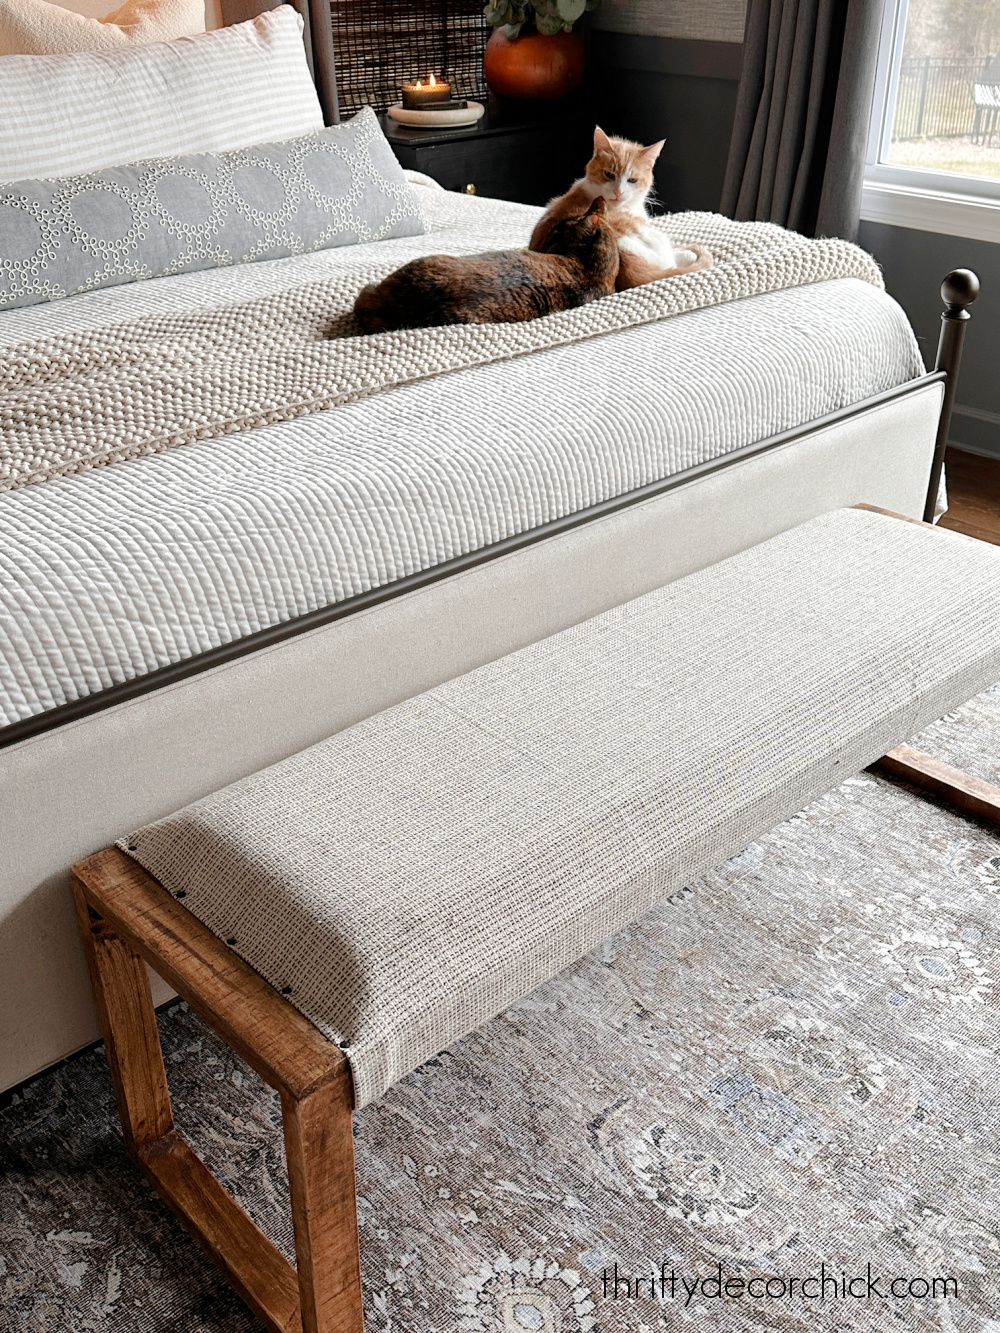
We've had a long upholstered bench that I love for years. I like the length and the pretty stained legs, but the burlap-type fabric had discolored over time.
Lately we've had the bench in our basement:

This post may contain affiliate links for your convenience.
I may earn a small commission when you make a purchase through links.
See my policies and disclosure page for more information.
It came from HomeGoods year ago but there's no brand name on it. Sorry I can't source it for you!

I love that one too, but all the metal legs were a bit busy in here. I wanted to tone that down with something simpler, plus have room underneath to easily throw our decorative bed pillows. :)
The burlap on the bench had discolored over the years and the fabric wasn't the most comfortable anyway:

I've had it in my head to redo this bench for a long time, so I searched for a thick upholstery fabric forever. I never found anything with the look I wanted.
We needed the fabric to hold up to both use from us, but also the animals as well. Since I've used rugs to cover bench tops before, I kept those in mind as possible fabric options.
About a year ago I found a thin $15 rug at Ikea that was perfect!:

It's called the Tiphede rug and the description says it's black and beige, but it can go dark blue as well. These thin rugs are perfect for upholstery projects like this! I find they move around and/or curl up too much when actually used as rugs.
I put the rug away in our storage room and thought about this project every time I touched that scratchy burlap fabric...until I finally got to this easy DIY recently. :)
I used this mini pry bar to pull up the upholstery nails that were holding the existing fabric down:

My Dad got me that little tool years ago and it's one of my favorites. I use it everywhere!
If the bar doesn't get under the nails, use a hammer to tap it underneath. Once I got a few of the decorative nail heads out, the rest pulled up fairly easily:

You can also use pliers to remove these types of nails, but you need to be careful that they don't get damaged.
When the old fabric was off, I vacuumed the foam quickly to clean it up, then started attaching the new fabric on top of the bench.
Since the rug was already hemmed on all sides, I started with one finished edge on top and reattached it with the nail heads:

I didn't use nearly as many as were there before, I like the simpler look. I kept all of the nails in case I need to use more.
Instead of upholstering it exactly like it was before (with only a section on the top covered), I realized I liked the look of having the fabric wrap around the front and back of the bench.
I turned the bench upside down and then wrapped the rug around the front and used my fabric stapler to attach the rug on the underside:

You may need to hammer the staples into the wood a bit more to make it super secure. I prefer these staples that have a bit of an angle at the bottom so they attach to the wood well.
I'd like to get an electric staple gun one day, but this one is cheap and does the job!
There were support boards running underneath the bench, so I used my fabric scissors to snip the rug just a bit so I could attach it around those:

Is the underside of the bench pretty? Not exactly:

Will anyone ever lay down on my floor and see it? NOPE. 😂
I love having the fabric wrapped around the long sides of the bench! For the unhemmed side, I simply folded the fabric up and then pounded the nailheads in:

Reupholstery tip: When working with a striped pattern like this, be sure to watch your lines as you pull your fabric to the opposite side so it doesn't get wavy.
Don't pull the fabric too tight as you attach it around the bench!
The rug cover has held up beautifully -- it's durable enough for the animals and their nails, and is still soft and comfortable for us to sit on:
SO much better than that scratchy fabric from before!
And I have plenty of fabric leftover to make pillows. :)
We like the softer, simpler look so much better...and since I bought the rug so long ago, I consider this to be another free update!:

I also switched out the colorful blue rug that was in this room with this gorgeous green and gray rug from our basement. And leather bench looks GREAT where this one was. So many great switches! :)
We absolutely LOVE it! This room has "calmed" so much with just these small changes...but I have a few more in mind:

I love moving things around in the house to make spaces feel like new! And these simple DIY makeovers have been an easy way to update this room.
I've done so many projects like this over the years! Here's how to add a padded fabric seat to a wood chair. Also, how to replace the fabric on a dining chair.
And if you have a built in bench, I shared how to make a no sew bench seat cushion here:

Have you tried out one of these bench reupholstery ideas? It's great beginner redo if you're starting out with do-it-yourself projects!
Never miss a post by signing up to get posts via email.
Your blog is such an inspiration! We are redecorating and I love DIY projects. I’ve been thinking I could create padded chairs with our wooden dining chairs, so was so excited to see the link where you did that!!
ReplyDeleteUsing a rug is a great tip! The fabrics & rug look so nice in your room. Chrissy
ReplyDelete