
How to Easily Cut Crown Molding {This Jig Saves So Much Time}
February 22, 2024
Share this
This crown cutting jig makes cutting and installing crown molding a BREEZE!
If you've ever cut crown molding on a miter saw, you know what a pain it can be. I used to have to keep example pieces of molding with the cuts nearby to remind myself every time I do it because it can be so confusing.
To get the perfect cut, there's a lot of flipping and reversing (anyone else singing "is it worth it, let me work it?"), and making sure the crown lays just right on the saw.
I've tried coping the crown molding joints (using a hand saw to "cope" the ends of the crown) and can never get it right.
Since I've installed so much of this trim over the years, I shared how to cut crown molding on a miter saw and also how to use decorative corner blocks that make installing crown molding much easier.
But THIS, my friends, is the best method of them all!
If you've read about my projects for any length of time, you know how much I love decorative trim and molding in a room.
It adds so much!:

I recently finished up the molding in our basement using this helpful jig, and it took half the time it used to:

I'm SO glad to have this done! It only took two years. :)
The character that crown molding adds to a room works beautifully for both traditional and modern spaces.
I first tried out this crown jig for the pantry makeover a couple years ago.
I planned to add it around the cabinet extension I added to the top of the tall pantry cabinets, and then decided to keep going with it on all of the walls:

This post may contain affiliate links for your convenience.
I may earn a small commission when you make a purchase through links.
See my policies and disclosure page for more information.
This small room has eight corners though, and cutting crown molding is one of my least favorite DIY jobs. Installing isn't bad, but the cutting is a pain!
So I finally looked picked up this crown cutting tool I've seen a few times online.
I found this Crown 45 cutting jig and figured I'd give it a try:

When you pull it out of the box the tool is intimidating...I had no clue what to do with all the gizmos. But they provide a link to this video that explains how to set it up (super easy), the tools included (very helpful) and how to place it on the saw.
I watched the video and kept saying to myself...there's no way it's that easy. I was wrong!
First up, they provide these little angle finders that are stored on the jig:

Place your crown on a flat surface (wall or a table) and place the angle piece inside the back of the molding till you get the right fit.
For example, this one is not good:

But this one (38 degree angle) is perfect!:

Crown molding comes in a few "spring angles" so these little angle finders are incredibly helpful!
The spring angle is the angle from the crown when it's installed to the wall behind it.
Before you start cutting, you'll want to place your jig at the right angle height:

This is what keeps it at the perfect angle while cutting the crown molding on the saw.
Their video shares where to place the jig for both inside and outside corner cuts, as well as the direction your saw blade should be going. (There are also images on the actual jig to reference.)
I tried my first piece of molding, held it up in the corner, and started to believe. ;)

I laughed out loud when I held the first two pieces up next to each other and they matched perfectly. I mean...where has this thing been all my life??
I always recommend starting your crown molding at a corner -- meeting in the corners is the most important part.
To use this jig on your saw, all you have to do is place your crown in front of the saw fence (decorative side out), then push the jig up to it.
You'll want to make sure the bottom of the crown is flush against the saw guard at the bottom and the top of the crown is leaning against the jig:
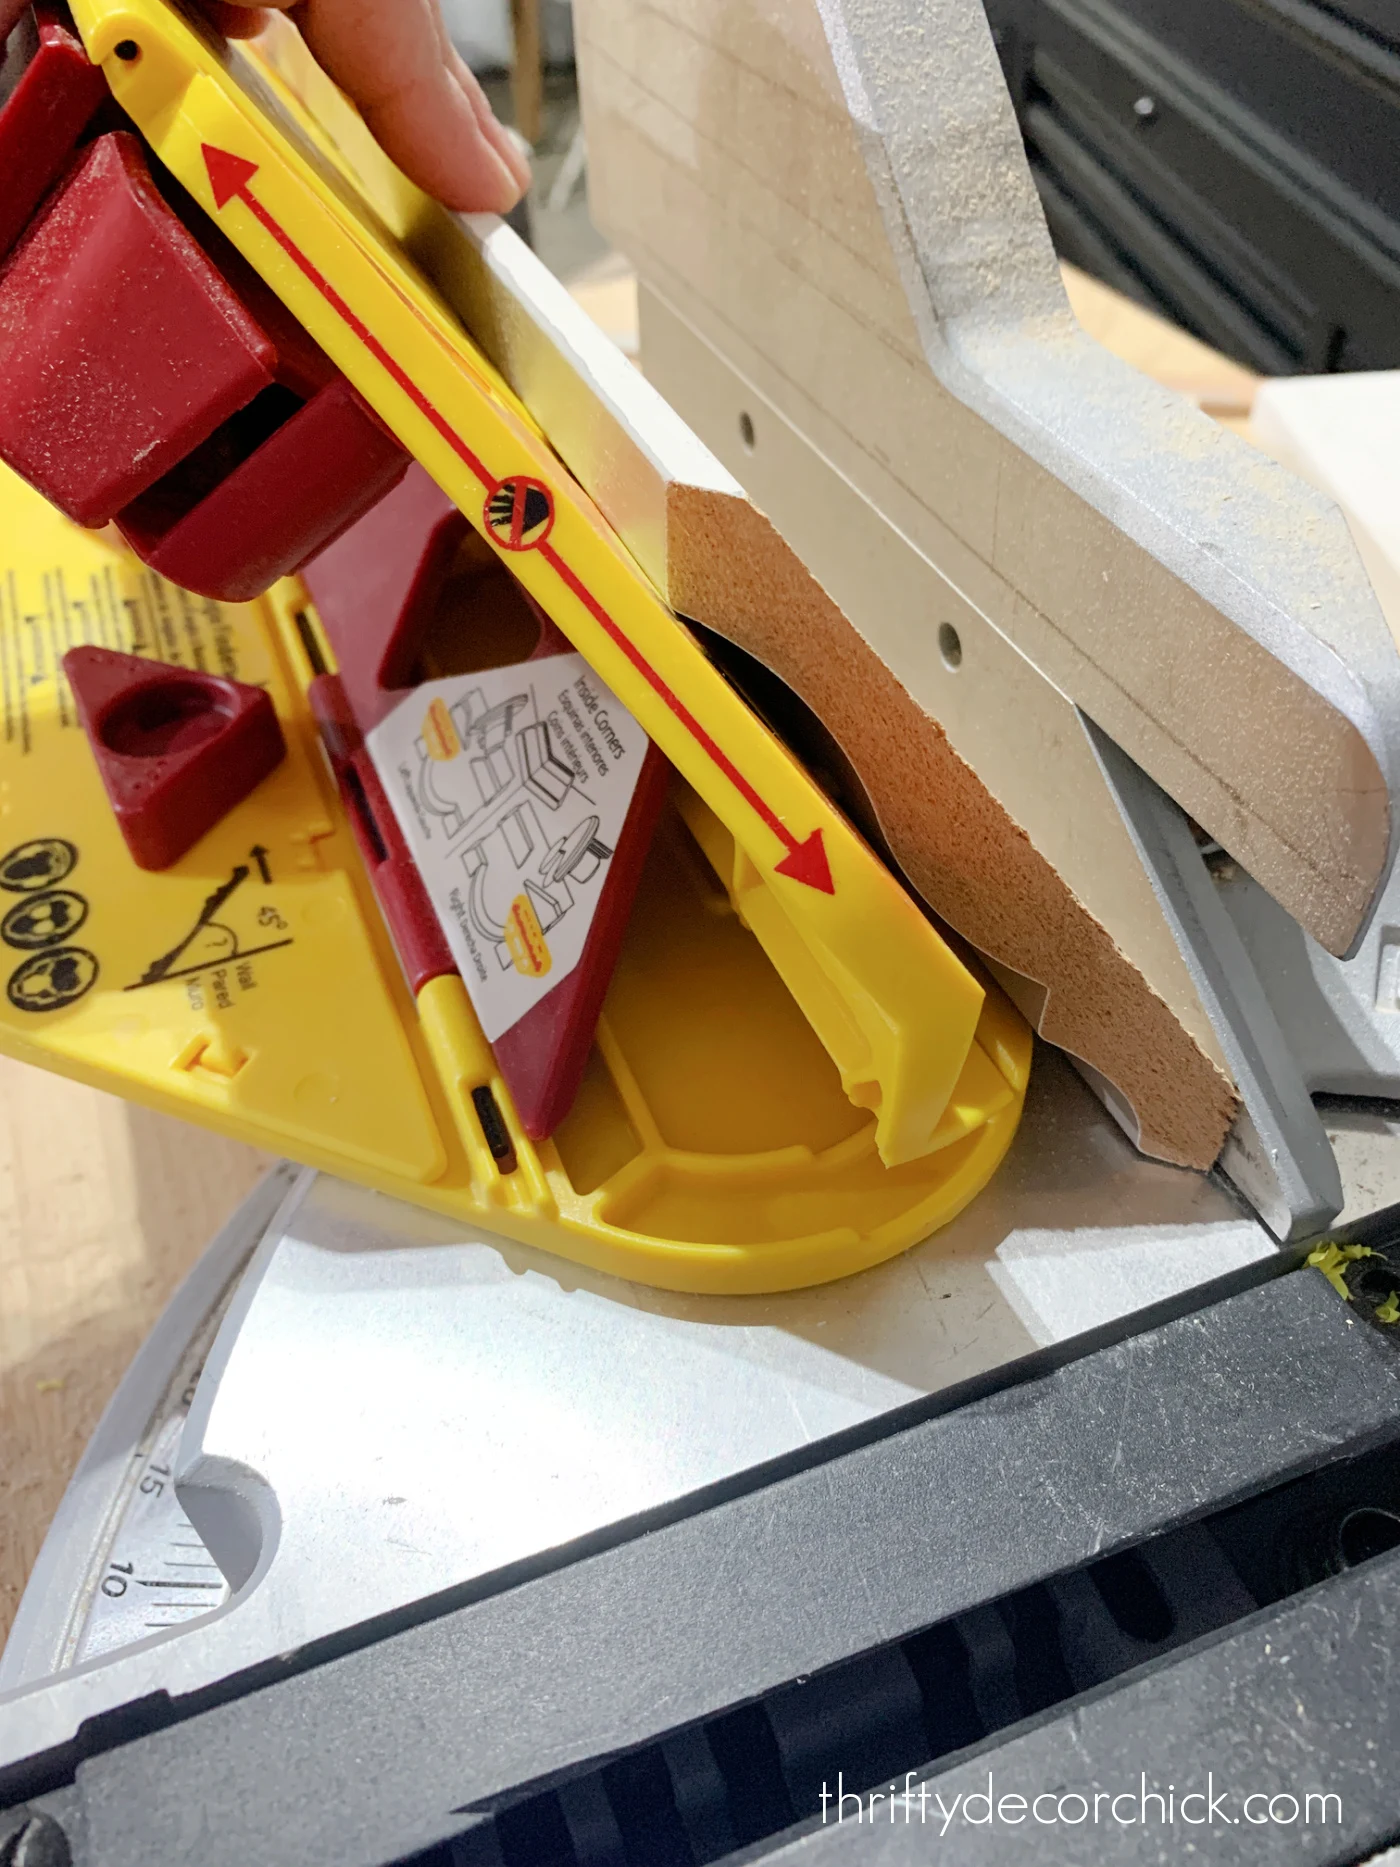
Make sure your jig is out of the way of the saw blade, then cut in the direction for your inside or outside cut.
Most corners will require a 45-degree miter cut, but occasionally I've needed a 33 or 23-degree angle.
You can use a protractor to find your corner angle if needed!
The visuals for the angled cuts on the jig are incredibly helpful -- it's a bit confusing to remember at first, but after a few cuts you'll get it down quick.
It shows you how to cut both the left and right side, for inside and outside corners:

You'll want to mark your measurements on the back of your crown, not the front, because all of your cuts will be made from the back of the molding.
This is nice because you don't mark up the front of your trim with a pencil line!
My first two pieces with this tool were for an outside corner and they met up PERFECTLY. Look at that tight seam!:

And the inside corner pieces were excellent as well!:

You can tour our finished pantry makeover here!:

I cannot tell you how much time (and actual crown molding!) this jig has saved me! When using a compound miter saw without this jig, you have to remember how to place the crown, turn it upside down to cut from the bottom of the crown, etc.
Even though I've cut crown numerous times, it was usually frustrating and time consuming to get just right.
I'm KICKING myself for not getting one sooner! This knocks off half the time of what I would normally spend installing crown molding.
Total game changer. Now I'm eyeing all the rooms that could use this trim!
I got this crown molding jig online, but you can find them at Home Depot too.
Have you ever attempted cutting crown molding? If it's intimidated you, I highly suggest using a jig like this for your saw!
Never miss a post by signing up to get posts via email.
OMG that does look like a game changer! I hate cutting crown moulding as well, although I'm addicted to trim so I keep doing it. This makes me excited for my next room!
ReplyDeleteThis is amazing! Crown is definitely my nemesis. LOL I can't wait to give it a try.
ReplyDeleteOoooo. This makes a small job that has kept me scared to start it suddenly possible! With this tool, I believe I can totally DI-myself. Nice share, Sarah!
ReplyDeleteI.love.you. val
ReplyDeleteYou offer and show wonderful ideas; I am not a homeowner but have used one of your lighting ideas; once I saw that table with the lamp, I knew how to have light in a corner room much in need. Now when we walk into the room, we flip the switch and let there be light. I had what was needed but would not have thought of it had I not seen your inspiration and so I thank you.
ReplyDeleteis your miter saw a compound miter saw ?
ReplyDeleteYes it is.
Delete