
Basic Pantry Turned Pretty Butler's Pantry REVEAL!
March 15, 2022
Share this
Transforming open shelves into a functional pantry with cabinets and counter space!
Welcome to the reveal of our butler's pantry makeover! I turned this small room with open shelving into a beautiful butler's pantry with built in cabinets and plenty of storage.
Yay! Pantry reveal day...finally! I started this makeover almost six months ago and it is DONE.
Remember a few weeks ago when I said I didn't have much left to do? Hahahaha, I was delusional. I worked for hours a day for two weeks straight in this little room and thought I'd never. finish. caulking.
I am quite sure it took me longer to finish up this room than it did to build the whole basement entertainment wall. Yep.
It didn't help that I changed up the design plan at the last minute, but I'm SO glad I did! I LOVE this room! This is one of my favorite DIY projects EVER.
Let's recap and then I'll share the final result...
I've wanted to make this change for a few years now -- we love the size of our pantry, but no matter how I tried to organize and sort items, it was always cluttered and messy...even when it wasn't:

This post may contain affiliate links for your convenience.
See my policies and disclosure page for more information.
I would clean it up and within a couple days it would feel messy again.
I mean, I know it's a pantry. That holds food. It's not supposed to be pretty. But as I've mentioned one or 100 times over the years, the older I get, the more I crave uncluttered spaces that are well organized.
I've never regretted making a room more functional for our family!
Plus, I felt like the space wasn't being utilized well. The pantry is a great size (certainly bigger than anything we had before!), but I knew I could make the space work better and make it look great!
I wanted to use cabinets instead of shelving and played around with a couple different layouts. At first I considered the same layout as the shelves, with just base cabinets along the long wall, a corner base cabinet and then a couple tall pantry cabinets on this side: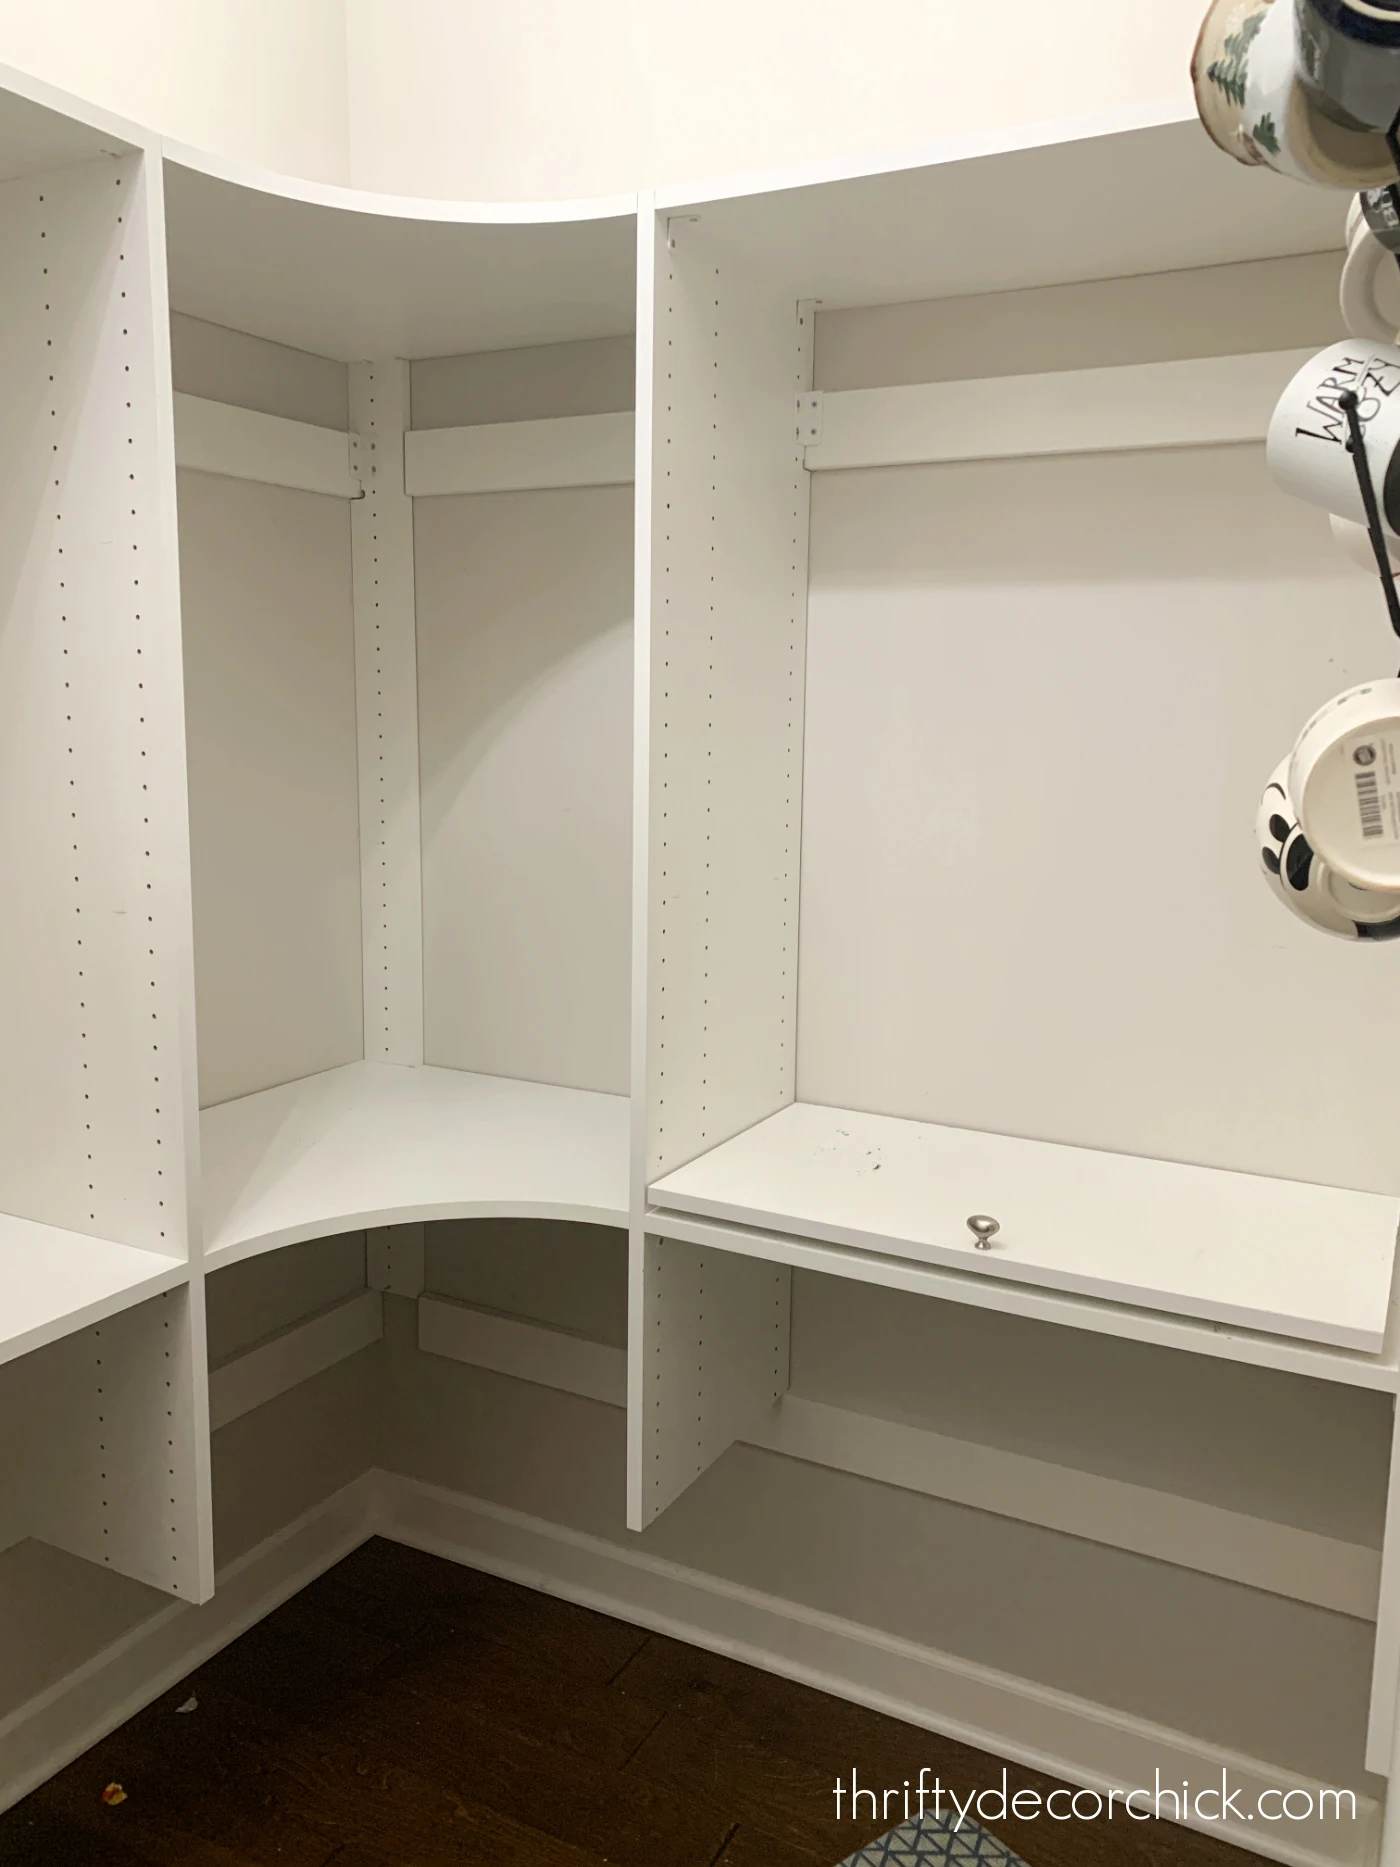
But corner base cabinets aren't the best use of space, and it would limit the space I had for the tall pantries. Ultimately I decided to go with the simplest option (it cost a lot less too).
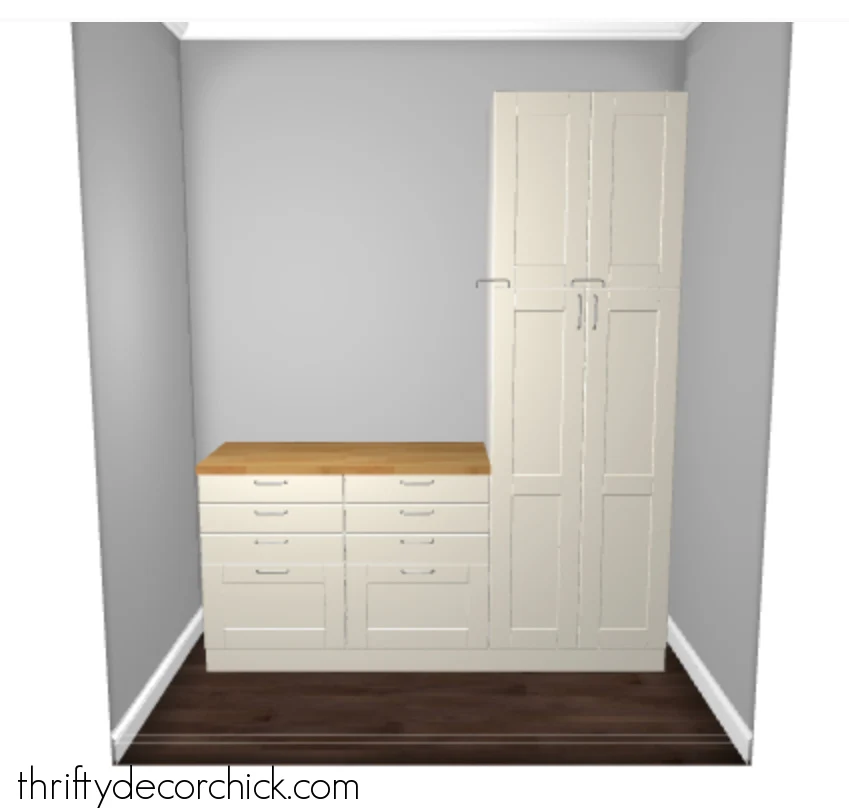
Initially I was going to purchase IKEA cabinetry, but then realized how many parts and pieces I'd have to buy and assemble.
Because I had to remove the melamine shelving to prep the room for cabinets, I knew we'd be without food storage for at least a few days. Assembling cabinets for another couple of days wasn't ideal when I could buy them ready made.
So ultimately I went with these in stock kitchen cabinets from Home Depot and I'm so glad I did!
After removing the melamine shelving, I spent a day removing baseboards, filling holes and cleaning up. The electrician added a couple more outlets and a sconce, as well as two recessed lights (he capped the ceiling light location).
I'd love to have a pretty hanging light in there, but with the addition of the cabinets it would have been crowded. The two LED recessed lights are perfect and make this space SO much brighter!
I got the cabinets installed in one day and was able to get most of our food back into the drawers and shelves by that night.
For the time being the food was just thrown in there, the organization part happened later. :)
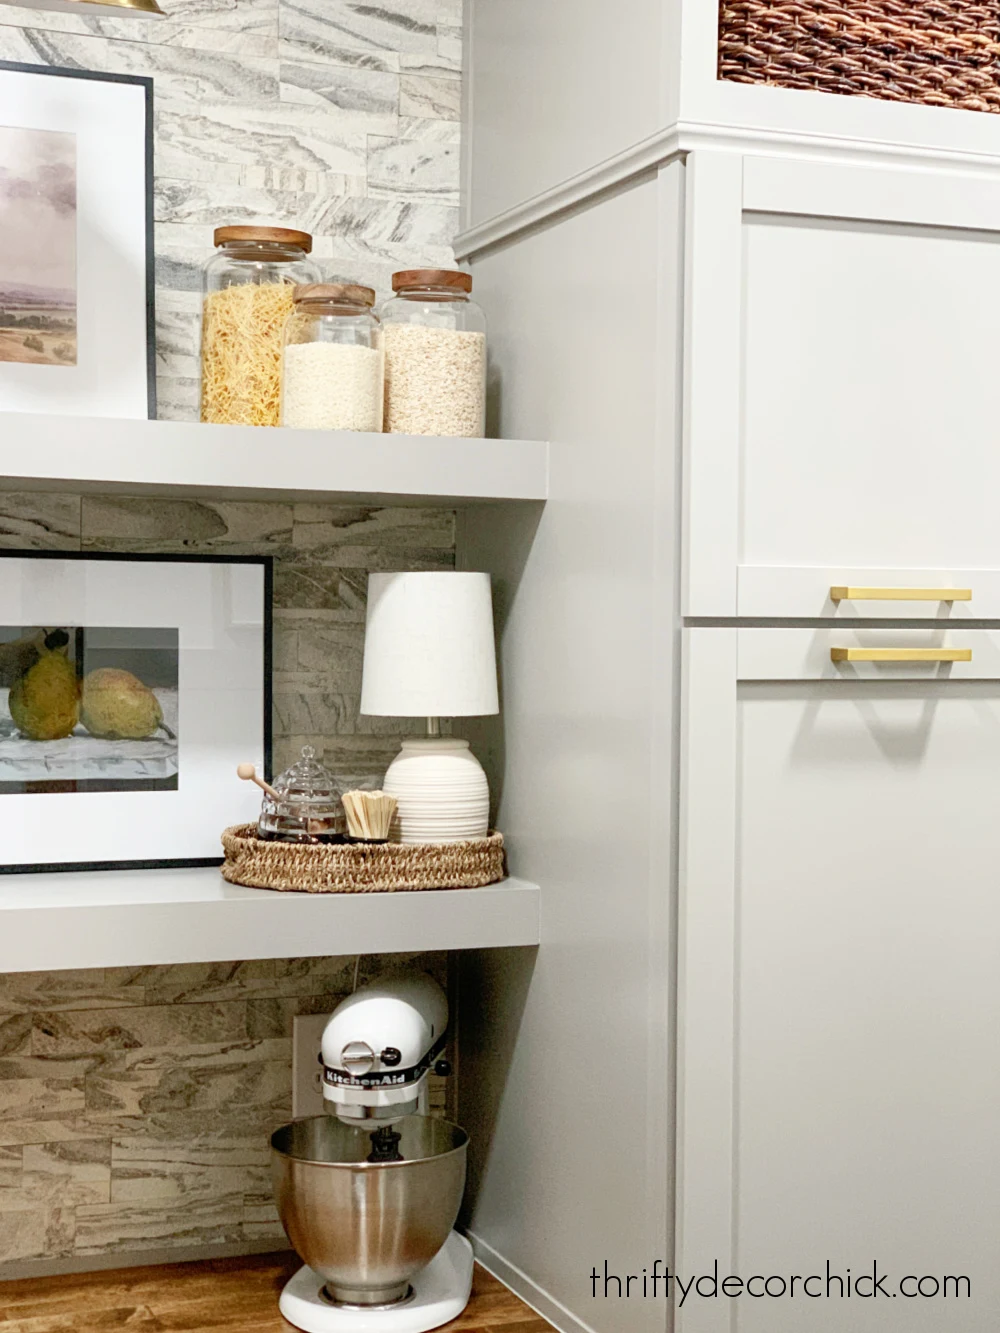
Next, I installed this marble looking peel and stick tile backsplash:

And built the floating shelves on that wall as well:
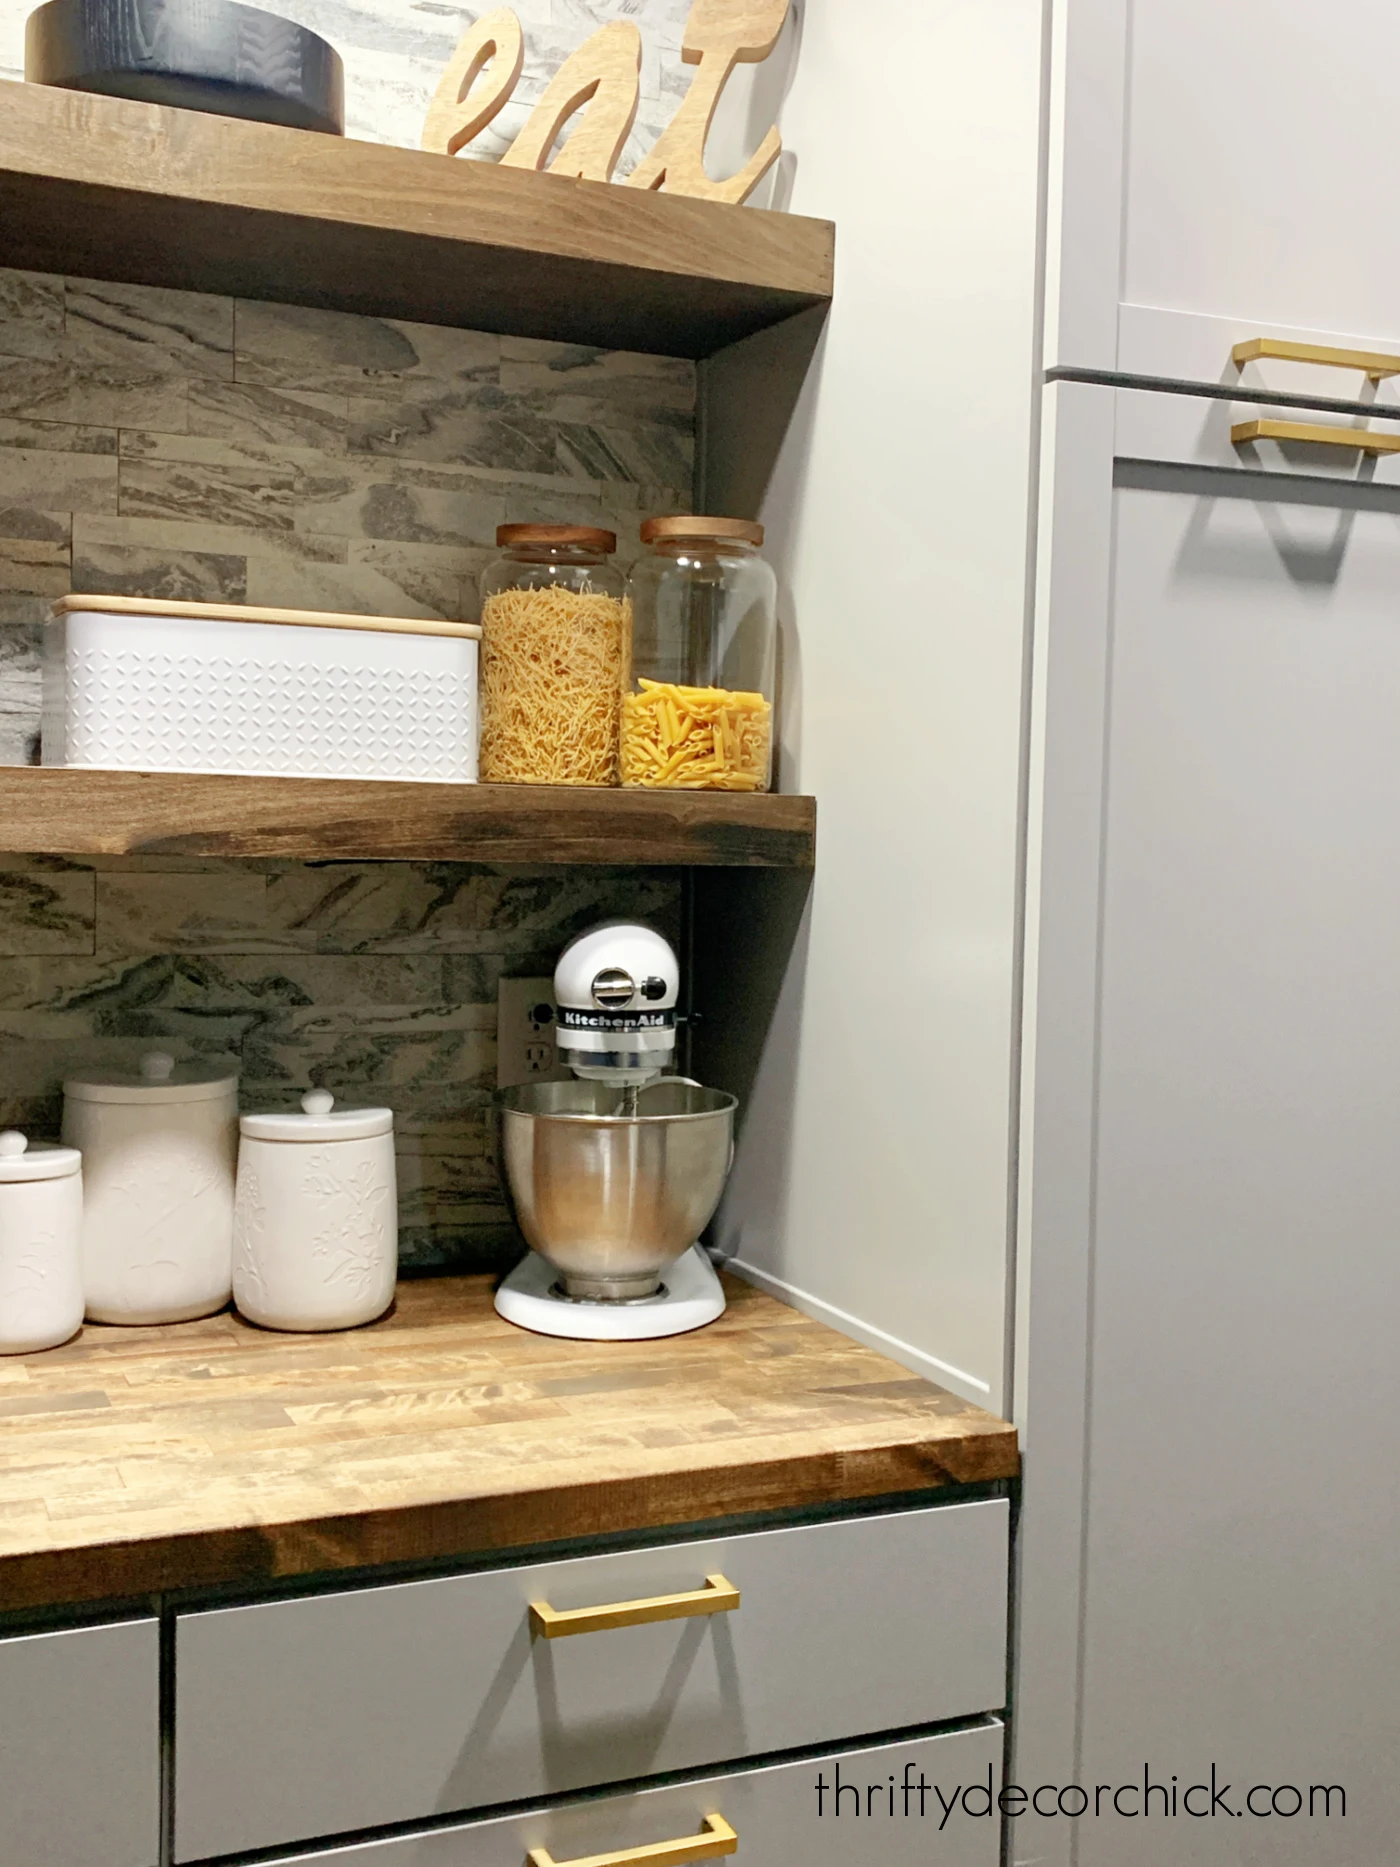
The countertop is inexpensive butcher block from Home Depot and I immediately loved having this additional prep space! It is GREAT!
Those tall cabinets have a ton of space -- there's an upper cabinet and the bottom cabinet came with a few shelves. But I've always thought drawers are more functional, so I had a plan to use all of that space and make our food easier to access.
I showed how I made these DIY pull out pantry cabinet drawers a couple weeks ago -- they are a game changer!:

If you did the smaller spacing like I did above, you'd probably be able to fit ten drawers in each cabinet. That's a TON of food storage!
The roll out drawers are great, especially for stuff that's below eye level. You can pull it out to see everything on the shelf and easily keep things organized.
A couple of weeks ago I started building the upper cabinet over the store bought ones, and while I was at it, I installed the crown molding in this room. If you've ever cut crown on a saw, you have to check out this awesome crown cutting jig that makes it SO much easier to cut and install. I still can't believe how much time it saved me.
Then I painted the upper open cabinets, added trim to the those and the sides of the store bought cabinets, installed a wall treatment on a couple walls and filled and caulked a TON.
It was after all that, when I was thisclose to done, that I decided to paint the room back to a lighter color. Last year I painted it the dark blue (called Cyberspace) that I've used throughout our main level. But even with the new lighting it still felt so heavy and dark in there.
It was really bugging me, and as soon as I started painting the walls it brightened up a ton. That was definitely a good call! It's so light and bright now, which is especially nice in a room without natural light.
This is how the room looked as you walk in last time I shared it with you:

And here it is, lighter and brighter and finally finished!!

I absolutely, positively LOVE this space! It's so pretty and has never been so well organized.
I prefer drawers over shelves, so these two drawer base cabinets have worked out really well. It's so easy to find what we need. I'll share more about the inside of the drawers soon!:

Painting the shelves and walls made a huge difference! Here are the darker walls and shelves before the upper cabinets:

I chose a white paint color with a slight gray undertone called Eider White for the walls and the gray paint was matched to the cabinet color:

I added trim between the store bought cabinets and my DIY upper cabinet to make them look like they were built together. I continued the trim on the sides of the cabinets as well:

I drilled a hole through my brand new shelves 😳 so I could run the lamp cord to the first shelf. I LOVE the soft light a lamp adds to little spaces like this!:
One thing I probably should have done during the cabinet install was to put spacers between the end cabinets and the walls to give them a little more space. They operate fine and we can access everything, but a professional would have added that.
Although if I had added those spacers, the awkward leftover space would have been even more awkward...way too small to do shelving. I wanted the shelves between the two tall cabinets to be wide enough to be useful:

The open cabinets at the top are perfect for extra storage! I used baskets we had and they fit perfectly.
I have seasonal kitchen towels in one (for holidays, fall, etc.) and the other one will hold extra food items:
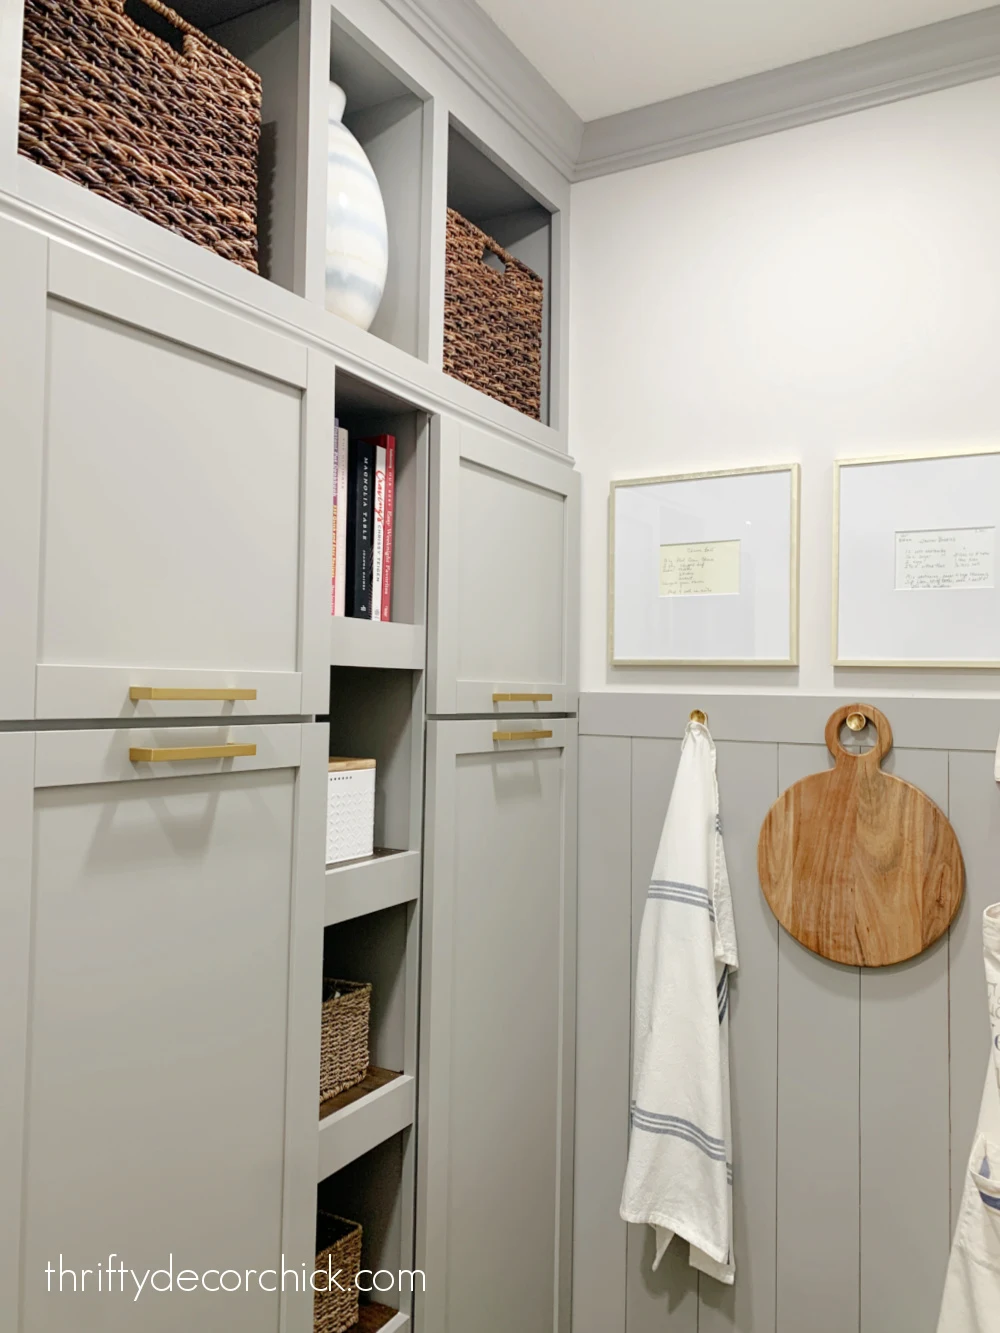
One tall pantry is for food storage, the other is all appliances. I share more of that soon as well!
The vertical shiplap accent walls were always in my head for this room...I just love how this side of the room turned out!
And full disclosure -- I was able to cover the drywall cuts the electrician made to run more outlets. :) I was able to skip the messy step of finishing those since I was covering them anyway:

One of my favorite additions to this space are the framed recipes on these walls:

I scanned some of my mom's handwritten recipes and made them into art:

Our mother was an incredible cook and was always making up delicious dishes. And she had the most beautiful handwriting. I love having this personal touch in here!
Let's take a quick look at the before and after...it's a good one! Before, with the open shelving:
And now, transformed into a butler's pantry with drawers and pull outs for all the food, countertop prep space and a cleaner look:

I'm so glad I didn't add a corner cabinet like the shelves:
Corners are awkward space anyway, and this open wall gives us more room to move around and get to what we need:
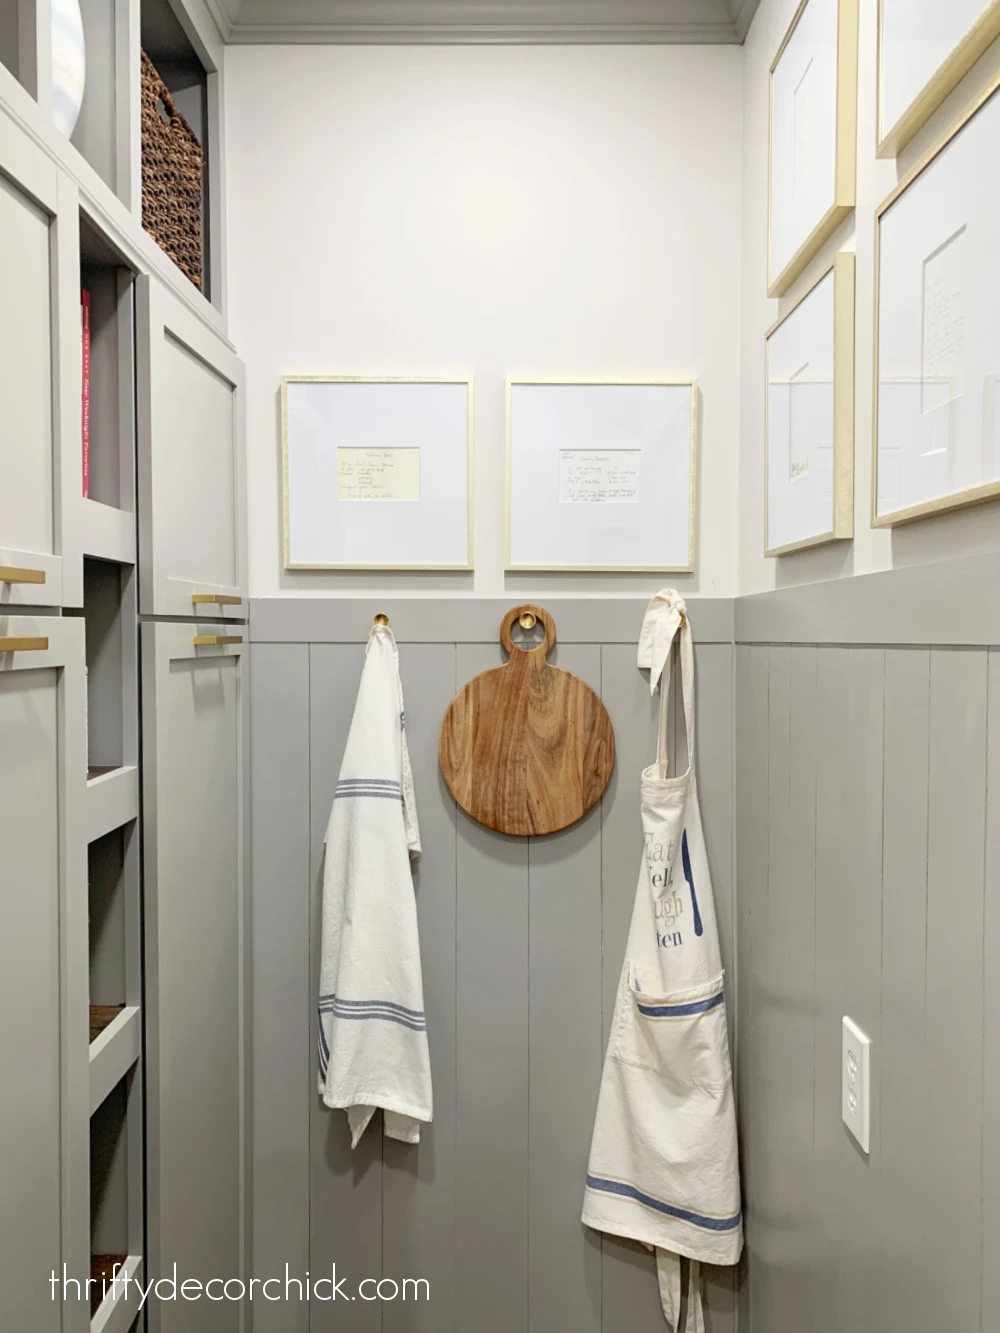
I'm still deciding on adding two more square frames on this wall. For once I actually like that it's not all perfectly even! :)
The only big cost in this space was cabinets and a few organizational items. I used scrap wood for almost all of the shelving, pull out drawers and the upper cabinet addition. I even had the shiplap boards in the garage for a project I've put off for two years! I was happy to put them to use.
My scrap pile is sparse now!
Hope you enjoyed the new pantry tour and it inspires you to make changes to your home that make life easier and prettier. 😊

By the way, I used some of the previous melamine shelving for the pull out drawers, and I'll be using the rest in our son's closet. So all of it will be put to good use!
I'll share a little tour of the inside of some the drawers and cabinets very soon. The storage methods I've incorporated over the past six months have made such a huge difference in the pantry.
Sources for most of the items in this room:
DIY butcher paper roll for wall
Wood hooks on wall (I sprayed them black) and two basket set
Never miss a post by signing up to get posts via email.
Absolutely stunning. I think the lighter paint does look great, although I also liked the wood stain. I also love that you are reusing the melamine. It's important, I think, to try to reduce and reuse!
ReplyDeleteFantastic! So many wonderful ideas packed into a small space. and the framed hand-written recipes add a so much warmth and personality. I give it 5/5 <3's!
ReplyDeleteIt looks amazing! I love the lighter color. The framed recipes are a perfect touch to it.
ReplyDeleteso pretty - you did a beautiful job! I so love your Mom's handwritten recipes - such a personal touch!
ReplyDeleteSarah! That is just beautiful. You totally made that little closet into a star. I'm blown away by your skills.
ReplyDeleteAbsolutely gorgeous!! You have great ideas and an amazing talent.
ReplyDeleteWhat a great space! I love the framed recipes. What a lovely homage to your mom.
ReplyDeleteMy favorite space of yours as well! Colors and design on the money! Hope to see the interior shelves soon. I love your recipe frame idea. I also like the wall with the 2 frames alone. It gives you eye a place to rest and maybe you add something else there above the recipes in the future that is long and singular, like a hand painted floral tray, etc.
ReplyDeleteThis is a FANTASTIC space....your vision and execution are spot on !!! Love it!!!
ReplyDeleteSo beautiful and functional. Amazing job as always.
ReplyDeleteGorgeous! Absolutely stunning….you’re going to need another new house soon…;)
ReplyDeleteIt’s just wonderful! I love it so much.
ReplyDeleteLove this, Sarah, very nice! I light your lighter version of paint as well. It's pretty enough to leave the DOOR OPEN now! I'm picturing you peeking in there several times a day! Well done. Chrissy
ReplyDeleteYour "before" looked very neat and functional...then I saw the beautiful transformation! So very nice! As others have said, your mom's framed recipes create such beautiful art. That little corner with the hanging aprons reminds me of the scullery of a great British house! I love that you're reusing some of the shelves for another project. I cringe when makeover TV shows demolish perfectly good cabinets just because they want another style. Outstanding job.
ReplyDeleteI love it! Very welcoming. I love the idea about framing the recipes. You said you scanned them…and then what? Did you take to a printer to have them placed on card stock? Thanks
ReplyDeleteThank you Nancy! I scanned and printed them at home, but you can have them printed at most office supply or drug stores as well.
Delete